Looking for a simple and stylish way to organize your coats and accessories? You can create a unique coat rack using drawer pulls—yes, those small hardware pieces you usually find on cabinets!
This project is easy, affordable, and adds a personal touch to your space. Whether you want to save room in your entryway or add a decorative element to your wall, this coat rack idea is perfect for you. Keep reading, and you’ll discover step-by-step how to turn ordinary drawer pulls into a functional and eye-catching coat rack you’ll love.

Credit: www.youtube.com
Materials Needed
Gathering the right materials is the first step to build a coat rack with drawer pulls. Each item plays an important role in the project. Choosing quality parts helps create a durable and attractive rack.
Below are the main materials you will need. Focus on simple, easy-to-find items. This keeps the project budget-friendly and fun.
Choosing Drawer Pulls
Drawer pulls act as the hooks for hanging coats. Pick pulls that are strong and have a good grip. Metal pulls work well for strength and style. You can choose vintage or modern designs.
Make sure the pulls are large enough to hold heavy coats. The shape matters too; round or curved pulls prevent clothes from slipping off.
Selecting The Wood
Wood forms the base of the coat rack. Choose a sturdy wood that holds screws firmly. Pine, oak, or plywood are good choices. Pine is cheaper and easier to work with.
Consider the wood’s finish. A smooth surface looks better and prevents splinters. You can paint or stain the wood later for a nice look.
Additional Supplies
You need screws that match the drawer pulls’ holes. Wood glue helps secure parts together. Sandpaper smooths the wood’s edges.
A drill and screwdriver make assembly easier. Measuring tape and pencil help with precise placement. These small tools improve the final result.
Preparing The Wood
Preparing the wood is the first step to build a sturdy coat rack with drawer pulls. Good preparation helps the wood look better and last longer. It also makes the whole project easier to finish. This section guides you through measuring, cutting, sanding, and finishing the wood.
Measuring And Cutting
Start by measuring the wood pieces carefully. Use a tape measure and mark the wood with a pencil. Double-check the measurements to avoid mistakes. Cut the wood with a saw following the marks. Straight cuts make the coat rack look neat and professional.
Sanding The Surface
After cutting, sand the wood to smooth rough edges. Use medium-grit sandpaper first, then fine-grit for a soft finish. Sand all surfaces where you will attach drawer pulls. Smooth wood helps paint or stain stick better and makes the rack safe to touch.
Applying Finish
Choose a finish like paint, stain, or clear sealant. Apply it evenly with a brush or cloth. Allow the first coat to dry before adding another. Finishing protects the wood from moisture and wear. It also gives your coat rack a polished look.
Attaching Drawer Pulls
Attaching drawer pulls is the key step to turning simple wood into a stylish coat rack. Proper placement and secure fixing ensure the pulls hold coats firmly. This part is easy but needs care and focus. Follow the steps below to attach drawer pulls neatly and safely.
Marking Placement
Start by deciding where each drawer pull will go. Measure the wood piece evenly to space pulls apart. Use a pencil to mark spots clearly. Mark the center of each pull’s position. This makes sure the coat rack looks balanced and tidy.
Drilling Holes
Use a drill with a bit that matches the screw size. Drill holes on the marked spots carefully. Drill straight to avoid crooked holes. Drill slowly to keep the wood from splitting. Clean away any dust or wood chips after drilling.
Securing Pulls
Place each drawer pull over the drilled hole. Insert screws through the back of the wood. Tighten screws with a screwdriver until pulls are firm. Check each pull to ensure it does not wobble. Secure pulls well to hold heavy coats safely.
Mounting The Coat Rack
Mounting the coat rack is the final step to make it functional and sturdy. Proper mounting ensures the rack can hold coats and bags without falling. This section explains how to choose the right wall spot, find studs, and use anchors and screws for a secure hold.
Choosing The Wall Location
Pick a spot near the door or in a hallway for easy access. The height should be comfortable to reach for everyone in the house. Avoid placing the rack too close to corners or furniture. Clear space around the rack makes it easier to hang coats.
Finding Studs
Studs are vertical wooden beams inside the wall. They provide strong support for heavy items. Use a stud finder to locate them. Move the finder slowly across the wall until it beeps or shows a signal. Mark the stud spots with a pencil. Mounting on studs makes the rack stable and safe.
Using Anchors And Screws
Use wall anchors if you cannot find studs. Anchors help hold screws firmly in drywall. Choose anchors rated for the weight of coats and the rack. Drill small pilot holes first for easy screw insertion. Insert anchors gently, then screw the rack into place. Tighten screws but avoid overdoing it to prevent damage.
Creative Variations
Creative variations make your coat rack unique and stylish. Simple drawer pulls can turn into a beautiful home accessory. Small changes can add personality and charm. Explore different ways to customize your rack easily.
Painting And Staining Ideas
Choose bright colors to match your room’s theme. Paint the wood before attaching the pulls. Use chalk paint for a vintage look. Staining the wood enhances its natural grain. Dark stains give a rich, classic feel. Light stains keep the rack fresh and modern. Try painting the pulls in a different color. Contrast draws attention and adds interest.
Adding Decorative Elements
Add small decorations around the pulls. Use stencils to create patterns on the wood. Attach small hooks or knobs beside the pulls. Glue on fabric or leather strips for texture. Attach metal accents for an industrial style. Use washi tape for a quick design update. These details make your rack stand out.
Customizing Pull Arrangement
Change the layout of the drawer pulls. Place them in a straight line for simplicity. Arrange them in a zigzag for a fun look. Group pulls in clusters for more hanging space. Mix different pull styles for an eclectic vibe. Space them evenly to keep balance. Play with height to fit various coats and bags.

Credit: www.diybeautify.com
Maintenance Tips
Keeping your coat rack with drawer pulls in good shape is easy. Regular care helps it stay strong and look great. A little attention goes a long way in making it last. Follow these simple maintenance tips to keep your rack functional and neat.
Cleaning The Rack
Dust your coat rack often to prevent dirt build-up. Use a soft cloth or duster to clean the surface. For stubborn spots, lightly dampen the cloth with water. Avoid harsh chemicals that can damage the finish. Dry the rack well after cleaning to stop moisture damage.
Tightening Hardware
Check the screws on the drawer pulls regularly. Tighten any loose screws with a screwdriver. Loose hardware can cause the rack to wobble or fall. Make sure each pull is secure for safe use. This simple step keeps your rack stable and reliable.
Preventing Damage
Avoid hanging very heavy items on the rack. Spread out weight evenly across all pulls. Keep the rack away from direct sunlight to prevent fading. Do not use sharp objects near the wood to avoid scratches. Use felt pads under heavy coats to protect the surface.
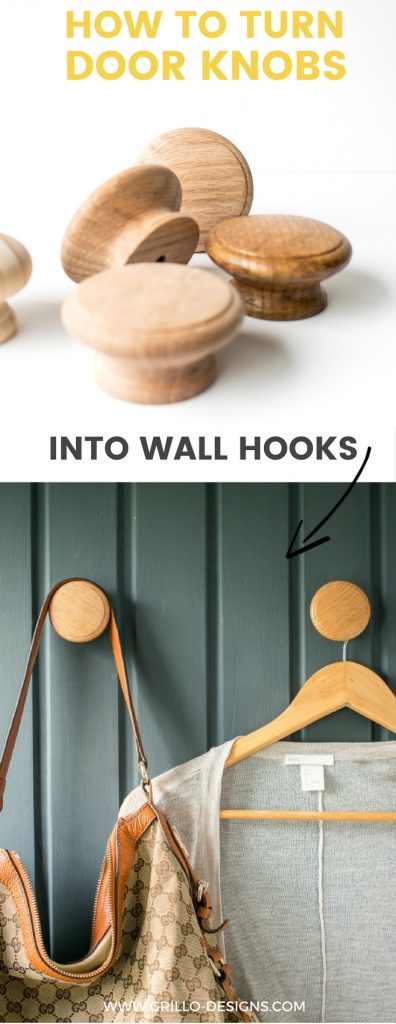
Credit: grillo-designs.com
Frequently Asked Questions
What Materials Are Needed To Make A Coat Rack With Drawer Pulls?
You need drawer pulls, a wooden board, screws, a drill, and wall anchors. Choose durable materials for strength and style. Sand and paint the board if desired before attaching pulls.
How Do You Attach Drawer Pulls To Create Hooks?
Use screws to secure drawer pulls firmly onto the wooden board. Position pulls evenly spaced. Pre-drill holes to prevent wood splitting. Tighten screws until pulls are stable for hanging coats.
Can I Customize The Coat Rack Design Easily?
Yes, customize by selecting different drawer pull styles and colors. Paint or stain the wooden board to match your decor. Adjust spacing and number of pulls for your needs.
Is This Coat Rack Suitable For Heavy Coats?
Drawer pulls vary in strength; choose sturdy metal pulls for heavy coats. Secure the board properly to the wall with strong anchors. This ensures durability and safe weight support.
Conclusion
Making a coat rack with drawer pulls is simple and fun. You only need a few tools and some basic skills. This project saves money and adds style to your home. You can choose any colors or designs that match your space.
It also helps keep your entryway neat and organized. Try this easy DIY to create something useful and unique today. Enjoy the satisfaction of making your own coat rack!