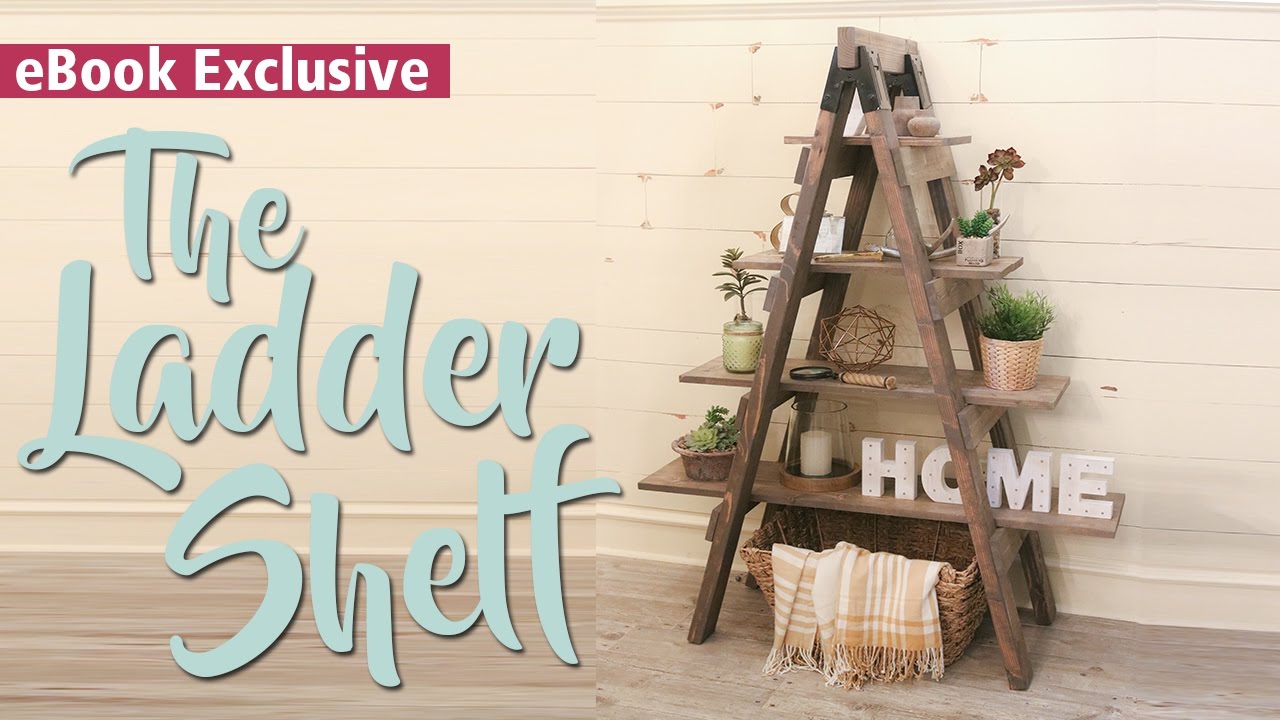
Are you looking to add a stylish and practical touch to your space? Making a ladder bookshelf is easier than you think, and it can transform any room instantly.
Imagine having a unique piece that holds your favorite books, plants, or decor while giving your home a modern, cozy feel. In this guide, you’ll discover simple steps to create your own ladder bookshelf, even if you’re new to DIY projects.
Ready to build something amazing that’s both functional and eye-catching? Let’s dive in and make your vision come to life!
Materials And Tools
Building a ladder bookshelf requires the right materials and tools. Choosing quality wood, the correct hardware, and essential tools makes the project easier. This section covers what you need before starting.
Wood Selection
Pick wood that is strong and easy to work with. Pine and oak are popular choices. Pine is softer and cheaper. Oak is harder and lasts longer. Choose boards that are smooth and free of cracks. The thickness depends on your shelf size, but 1-inch thick wood works well.
Hardware Needed
You need screws to hold the shelves and frame together. Use wood screws that are 1.5 to 2 inches long. Sandpaper helps smooth rough edges. Wood glue adds extra strength to joints. Brackets or corner braces keep shelves stable. Buy small nails to attach the back panel if you use one.
Essential Tools
A drill is necessary for making holes and driving screws. A saw cuts the wood pieces to size. A measuring tape ensures accurate cuts. A level keeps shelves straight. A screwdriver helps tighten screws. A pencil marks measurements on wood. Clamps hold pieces while glue dries.
Credit: www.youtube.com
Designing Your Ladder Bookshelf
Designing your ladder bookshelf is a fun part of the project. It lets you make a piece that fits your space and style. You can choose the size, shelf spacing, and the look that matches your home. This guide helps you plan the perfect ladder bookshelf for your needs.
Choosing Dimensions
Start by measuring the space where you want the bookshelf. Decide how tall and wide it should be. Think about the books and items you want to store. Make sure the width of each shelf suits your needs. A ladder bookshelf usually leans on the wall, so keep that in mind for height.
Shelf Spacing Ideas
Shelf spacing depends on what you will place on each shelf. For tall books, leave more space between shelves. For small decorations, shelves can be closer together. Try different heights to make your shelf useful and attractive. Plan for a mix of sizes to hold different items.
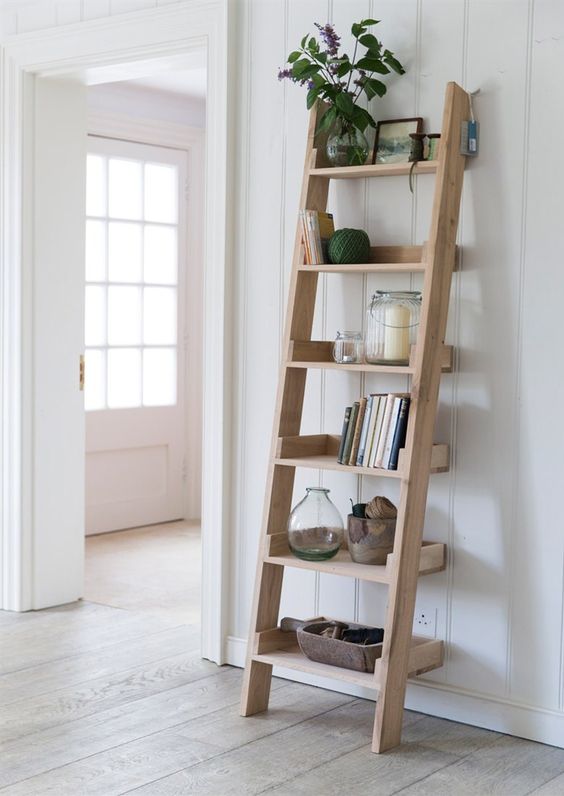
Style Variations
Ladder bookshelves come in many styles. You can make it simple with straight lines or add curves for a soft look. Choose wood types and finishes that match your room. Paint it in bright colors or keep natural wood tones. Add small details like metal brackets for a modern touch.
Preparing The Wood
Preparing the wood is a key step in making a ladder bookshelf. It ensures all pieces fit well and look nice. Taking time here makes your project sturdy and neat. This process includes cutting, sanding, and drilling. Each step helps the wood become ready for assembly.
Cutting To Size
Cut the wood pieces to the exact sizes needed. Use a saw that you feel safe with. Measure twice, cut once. Straight cuts help the bookshelf stand firm. Label each piece after cutting to avoid mix-ups.
Sanding Surfaces
Sanding smooths the wood and removes rough edges. Use medium-grit sandpaper first, then fine-grit for a soft finish. Sand all sides, including corners. This step prevents splinters and improves paint or stain grip. Clean dust off after sanding.
Pre-drilling Holes
Pre-drill holes before screwing pieces together. It stops the wood from splitting. Choose a drill bit slightly smaller than the screws. Mark the spots for holes clearly. Drill straight and steady for best results.
Credit: www.brepurposed.com
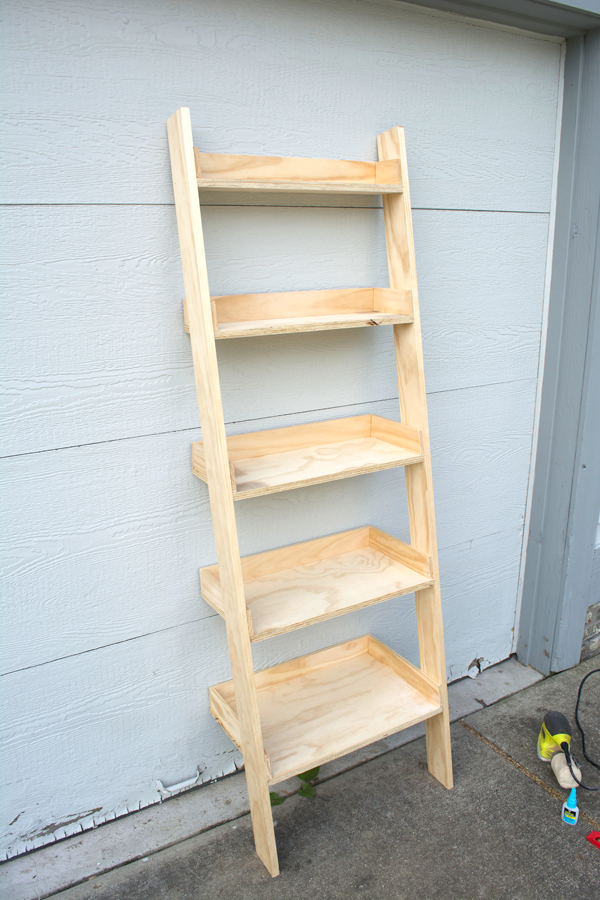
Assembling The Frame
Building the frame is the first big step in making your ladder bookshelf. This part gives shape and strength to the whole piece. Take your time to assemble it carefully. A strong frame makes the bookshelf safe and sturdy.
Attaching Side Rails
Start by placing the two side rails parallel to each other. Use screws to connect the rails at the top and bottom. Make sure the rails are straight and level. Check the distance between them matches the shelf width. Tighten the screws firmly to hold the rails in place.
Securing Shelf Supports
Mark spots on the side rails for shelf supports. Space the marks evenly from top to bottom. Attach small wooden blocks or metal brackets at each mark. These will hold the shelves later. Use screws to fix the supports tightly. Confirm they are level to keep shelves flat.
Ensuring Stability
Check the frame for any wobbling or loose parts. Tighten all screws and fasteners again. Place the frame on a flat surface to test balance. Add corner braces if needed for extra support. Stability is key to safe use and long life.
Installing Shelves
Installing shelves on your ladder bookshelf requires care and precision. This step creates the structure where you will place your books and decor. Follow clear steps to ensure each shelf fits well and supports weight evenly.
Positioning Shelves
Start by deciding the height of each shelf. Use a tape measure to mark spots on the ladder frame. Keep the space between shelves even for a balanced look. Place each shelf at the marks before fixing it. Check if the shelves sit flat against the frame. Adjust positions as needed for stability.
Fixing Shelves In Place
Use screws or brackets to attach shelves firmly. Pre-drill holes to avoid splitting the wood. Align screws with the marks you made. Tighten screws slowly to keep shelves steady. Test by pressing down on each shelf gently. Secure any loose spots for safety.
Checking Alignment
Look closely to see if shelves are level. Use a spirit level to check horizontal balance. Adjust screws or brackets if shelves tilt. Step back and view the bookshelf from different angles. Make sure shelves look straight and even. Proper alignment prevents books from sliding off.
Credit: www.brepurposed.com
Finishing Touches
Finishing touches make your ladder bookshelf look complete and polished. This step protects the wood and adds style. It also helps the shelf last longer. Simple steps like painting, sealing, and decorating can change the look entirely. Let’s explore how to add these final details.
Painting Or Staining
Choose paint or stain to match your room’s style. Paint gives bright, solid color and hides wood grain. Stain keeps the natural wood look and highlights texture. Use a brush or cloth for smooth, even coats. Let each layer dry fully before the next. Two or three coats give the best finish.
Applying Sealant
Sealant protects the wood from water and scratches. Pick a clear sealant for a natural look or a tinted one for extra color. Apply thin layers with a brush. Let each layer dry well before adding more. Sealants keep your bookshelf strong and looking new for years.
Adding Decorative Elements
Decorate your shelf to fit your taste. Add small knobs or handles for style and function. Attach stencils or decals for creative patterns. Use washi tape or fabric to line shelves for color. These small touches make your bookshelf unique and fun.
Maintenance Tips
Keeping your ladder bookshelf in good shape helps it last longer. Simple care prevents problems and keeps it looking nice. Follow these easy steps to maintain your bookshelf well.
Cleaning Your Bookshelf
Dust your bookshelf often with a soft cloth. Use a dry or slightly damp cloth for cleaning. Avoid harsh chemicals that can damage the wood finish. Clean spills right away to stop stains from setting. Regular cleaning keeps your bookshelf fresh and neat.
Avoiding Damage
Place your bookshelf away from direct sunlight to prevent fading. Do not overload shelves with heavy items. Balance the weight evenly across the shelves. Avoid dragging the bookshelf; lift it carefully when moving. Use felt pads under the legs to protect floors and furniture.
Periodic Inspections
Check your bookshelf for loose screws or joints every few months. Tighten screws to keep the structure strong and safe. Look for cracks or signs of wear on the wood. Repair small damages quickly to avoid bigger problems. Regular inspections ensure your bookshelf stays sturdy and reliable.
Frequently Asked Questions
What Tools Are Needed To Make A Ladder Bookshelf?
You need a saw, drill, screws, measuring tape, sandpaper, and wood glue. These tools help cut, assemble, and finish the bookshelf accurately and safely.
Which Wood Type Is Best For Ladder Bookshelves?
Pine, oak, or plywood are ideal. They offer strength, durability, and an attractive finish. Choose based on budget and style preference.
How Do I Ensure Ladder Bookshelf Stability?
Use sturdy joints, secure screws tightly, and add cross braces if needed. Proper assembly and weight distribution prevent wobbling and improve safety.
Can I Customize Ladder Bookshelf Size Easily?
Yes, adjust shelf spacing and ladder height to fit your space. Custom sizes provide flexibility for different room layouts and storage needs.
Conclusion
Building a ladder bookshelf adds charm to any room. It uses simple tools and easy steps anyone can follow. You get a sturdy shelf that holds books and decorations. Plus, it saves space and looks great in small areas. Try customizing it with your favorite colors or designs.
This project brings both function and style into your home. Enjoy your new bookshelf and the pride of making it yourself.