Looking to add a personal touch to your space while organizing your favorite books? You’re in the right place.
Making your own DIY bookshelf is easier than you might think, and it can save you money while giving your room a unique style. Imagine having a bookshelf that fits perfectly in your space and holds all your must-read stories.
You’ll discover simple steps and tips that anyone can follow to create a sturdy, beautiful bookshelf. Ready to turn your ideas into reality? Let’s get started!
Choosing The Right Materials
Choosing the right materials is key to building a sturdy and beautiful DIY bookshelf. The right wood, tools, and finishes make the project easier and the result lasting. This section helps you pick materials that suit your style, budget, and skill level.
Types Of Wood For Bookshelves
Wood choice affects strength and look. Pine is soft, easy to cut, and affordable. Oak is hard, strong, and has a classic grain. Birch offers a smooth finish and light color. Plywood is budget-friendly and stable but needs edge treatment. Choose wood based on weight support and style.
Essential Tools And Supplies
Gathering the right tools saves time and effort. You need a saw to cut wood precisely. A drill helps make holes for screws. Sandpaper smooths rough edges. Wood glue adds extra strength. Screws and brackets hold shelves firmly. A measuring tape ensures accurate cuts and fits.
Selecting Finishes And Paints
Finishes protect wood and enhance appearance. Clear varnish shows natural grain and adds shine. Paint offers many colors to match your room. Use water-based paint for easier cleanup and less odor. Sand lightly before applying finish for smooth results. Choose a finish that suits your style and use.
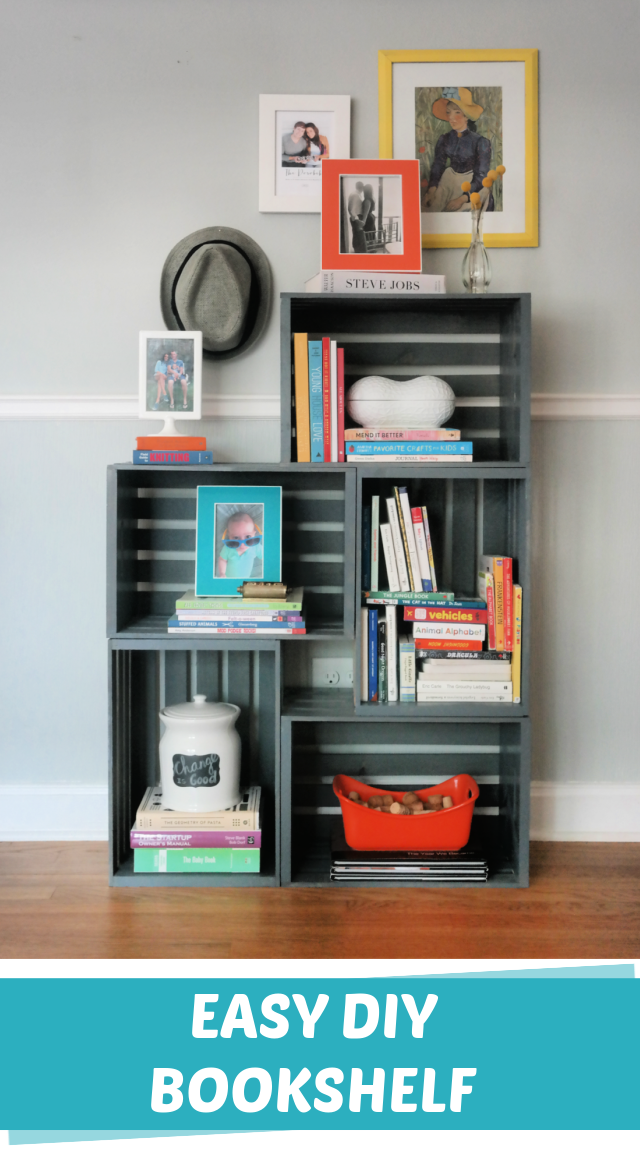
Credit: www.creatingreallyawesomefunthings.com
Planning Your Bookshelf Design
Planning your bookshelf design is the first step in creating a useful and attractive piece. It helps to avoid mistakes and saves time and money. A well-planned design fits your space perfectly and meets your storage needs. Think about the room, the books, and the style you want before starting.
Measuring Your Space
Measure the wall or corner where the bookshelf will go. Use a tape measure and write down the height, width, and depth. Check for any obstacles like switches or vents. Accurate measurements prevent problems during building. Leave some extra space around for easy access and cleaning.
Deciding On Shelf Dimensions
Choose shelf heights based on the size of your books or items. Standard shelves are 10 to 12 inches tall. Adjust the height if you want to store taller books or decorations. The depth should be enough to hold your items without wasting space. Consider the thickness of the wood for strong shelves.
Incorporating Style Elements
Think about the look you want for your bookshelf. Simple lines create a modern feel. Curves or carved details add a classic touch. Choose colors or finishes that match your room. Add features like doors or drawers for extra storage. Style elements make your bookshelf unique and personal.
Cutting And Preparing Wood
Cutting and preparing wood is a key step in building a DIY bookshelf. This stage shapes the wood pieces for assembly. Precise cuts ensure all parts fit perfectly. Smooth surfaces help the paint or finish stick well. Taking time here saves problems later.
Marking Measurements Accurately
Start by measuring your wood with a tape measure. Mark the cut lines clearly with a pencil. Use a square tool to keep lines straight. Double-check each measurement before cutting. Accurate marks lead to better fitting shelves and supports.
Safe Cutting Techniques
Wear safety glasses and gloves to protect yourself. Use a sharp saw for clean cuts. Cut slowly along the marked lines to avoid mistakes. Keep your fingers away from the blade. Always work on a stable surface to control the wood better.
Sanding For Smooth Surfaces
Sand the edges and faces of each cut piece. Use medium-grit sandpaper first to remove splinters. Then, use fine-grit sandpaper for a smooth finish. Wipe off dust with a cloth after sanding. Smooth wood looks nicer and feels safer to touch.
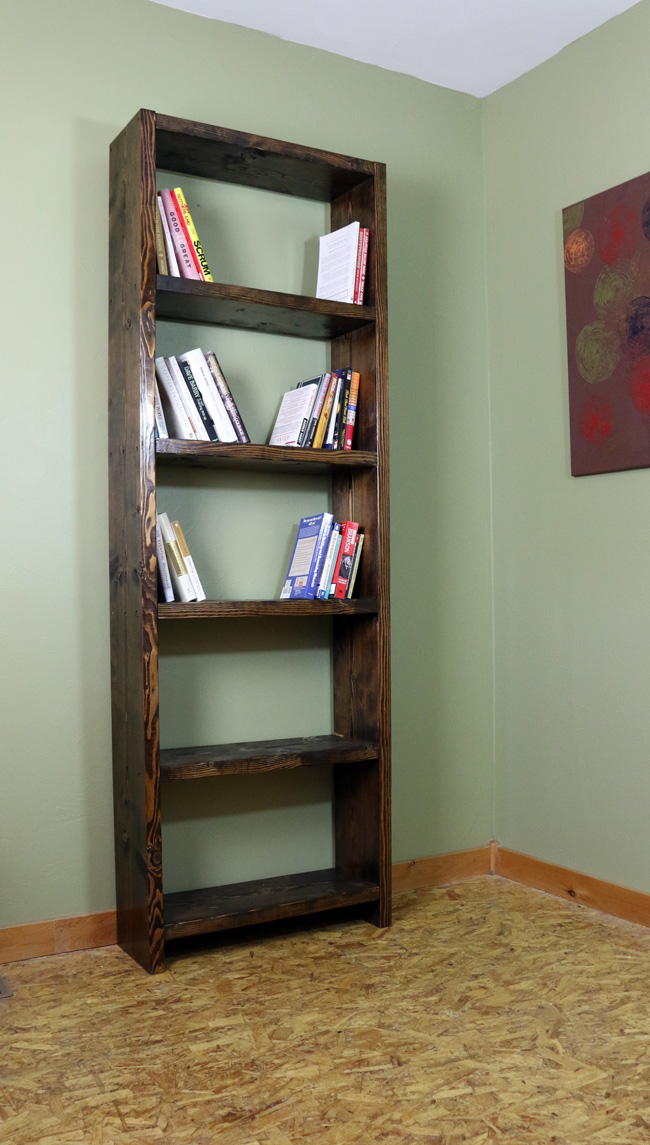
Credit: www.diypete.com
Assembling The Bookshelf
Assembling your DIY bookshelf is the step where all parts come together. It needs care and patience to create a strong and neat piece. Follow simple steps to connect the parts and build a solid shelf that lasts.
Joining Techniques And Fasteners
Use screws or nails to join wood pieces tightly. Pre-drill holes to avoid splitting the wood. Wood glue adds extra strength at joints. Clamps hold pieces while the glue dries. Choose the right fasteners for your wood type. Pocket holes create hidden, clean joints. Use a screwdriver or drill for faster work.
Ensuring Stability And Balance
Check that the shelf stands straight on the floor. Use a level tool to keep shelves horizontal. Tighten all screws and fasteners well. Add corner braces for extra support. Make sure legs or base are even. Avoid wobbly shelves by adjusting parts before finishing.
Adding Back Panels
Back panels increase shelf strength and keep items from falling. Cut the panel to fit the frame size. Attach it with small nails or screws along the edges. Use thin plywood or hardboard for the panel. Make sure the panel is flush with the frame. This step helps keep your bookshelf sturdy and neat.
Finishing Touches
Finishing touches make your DIY bookshelf look complete and polished. These steps protect the wood and improve its style. Small details bring out the best in your project.
Applying Paint Or Stain
Choose paint or stain that fits your room’s style. Use a brush or cloth to apply evenly. Let the first coat dry fully. Apply a second coat for richer color and better coverage. This step highlights the wood’s beauty and matches your décor.
Sealing For Durability
Seal the bookshelf to protect it from damage. Use a clear polyurethane or varnish for a tough finish. Apply thin, even layers with a clean brush. Let each layer dry before adding the next. Sealing keeps your shelf safe from scratches and moisture.
Installing Hardware
Hardware adds function and style to your bookshelf. Attach handles, knobs, or brackets as needed. Use screws and a screwdriver for secure fitting. Check that everything is tight and aligned. Hardware makes your shelf easier to use and enhances its look.
Tips For Maintenance And Longevity
Keeping your DIY bookshelf in good shape helps it last longer and look great. Small efforts in care and maintenance protect your wood and keep the structure strong. Simple habits can prevent damage and keep your shelf fresh for years.
Regular Cleaning Practices
Dust your bookshelf often using a soft cloth. Avoid wet cloths that can warp the wood. Use a small brush to clean hard-to-reach corners. Clean spills immediately to stop stains. A dry or slightly damp cloth works best for daily cleaning.
Preventing Damage And Wear
Do not overload shelves with heavy items. Spread weight evenly to avoid bending. Use felt pads under objects to stop scratches. Keep your bookshelf away from direct sunlight to prevent fading. Avoid placing it near heaters or damp areas.
Updating Your Bookshelf Over Time
Check screws and joints regularly for tightness. Sand and repaint surfaces if paint peels or fades. Add new shelves or supports to increase storage. Change knobs or handles to refresh the look. Small updates keep your shelf useful and attractive.
:max_bytes(150000):strip_icc()/dominiquegebruinsta-35b11dd4f037417980649e06e17c4027.jpg)
Credit: www.thespruce.com
Frequently Asked Questions
What Tools Do I Need To Make A Diy Bookshelf?
You need a saw, drill, measuring tape, screwdriver, and sandpaper. Also, have wood glue, screws, and a level for assembly. These tools ensure precise cuts and sturdy construction for your bookshelf.
Which Wood Is Best For Diy Bookshelves?
Pine, plywood, and MDF are popular choices. Pine is affordable and easy to work with. Plywood offers strength and smooth surfaces. MDF is budget-friendly but less durable. Choose based on your budget and shelf purpose.
How Do I Ensure My Diy Bookshelf Is Sturdy?
Use quality wood and proper joinery like screws and wood glue. Add brackets or braces for extra support. Ensure shelves are evenly spaced and well fastened. This prevents wobbling and supports heavy books safely.
Can I Customize Shelf Size For My Space?
Yes, measure your space first and plan shelf dimensions accordingly. Adjust height, width, and depth to fit your room and storage needs. Custom sizing maximizes space utilization and matches your décor style.
Conclusion
Building your own bookshelf is easier than it seems. You only need some basic tools and materials. Follow the steps carefully and take your time. A DIY bookshelf adds charm and function to any room. Plus, it gives you pride in making something yourself.
Try different styles or sizes to fit your space. Enjoy the process and the final result. Your new bookshelf will hold books and memories alike. Simple, useful, and made by you.