Looking for a stylish and practical way to organize your coats and hats? A Shaker peg coat rack could be exactly what you need.
It’s simple, elegant, and fits perfectly in almost any space. If you’ve ever wanted to create something useful with your own hands, this project is a perfect place to start. In this guide, you’ll learn step-by-step how to make your very own Shaker peg coat rack that not only looks great but lasts for years.
Ready to add charm and order to your entryway? Let’s get started!
Materials Needed
Gathering the right materials sets the foundation for your Shaker peg coat rack project. Choosing quality wood and having the proper tools makes the process smooth. This section covers the essential items needed to build your rack.
Wood Selection
Choose hardwood like maple, cherry, or oak for durability. These woods resist wear and look beautiful over time. Select wood boards that are straight and smooth to avoid extra sanding. A thickness of about 1 inch works well for strength and style.
Tools Required
Basic woodworking tools suffice for this project. You will need a saw to cut the wood pieces accurately. A drill helps make holes for the pegs and mounting screws. Sandpaper or a sanding block smooths edges and surfaces. A measuring tape and pencil assist in marking precise cuts.
Additional Supplies
Wood glue strengthens joints between parts. Wood screws secure the rack to the wall. Wooden pegs or dowels serve as hooks for coats. Finish with wood stain or paint for protection and an attractive look. A clear coat sealant adds durability to the finish.
Credit: www.aconcordcarpenter.com
Design Planning
Design planning is the first step in making a Shaker peg coat rack. It helps create a clear vision. This step ensures the rack fits your space and needs.
Good planning saves time and materials. It also helps avoid mistakes during building. Focus on size, peg placement, and style.
Choosing Dimensions
Start by measuring the wall space where the rack will hang. Decide the rack’s length based on available space. Standard racks range from 24 to 48 inches long.
The height depends on the pegs and board thickness. Usually, a 4 to 6 inch tall board works well. Keep the depth shallow to avoid bulky racks.
Peg Placement
Space pegs evenly along the board. Common spacing is 4 to 6 inches apart. This spacing gives enough room for coats and bags.
Place pegs high enough for long coats to hang freely. Around 5 to 6 inches from the top edge is ideal. Check peg size to ensure proper fit.
Style Inspiration
Shaker design is simple and functional. Look for clean lines and minimal decoration. Use natural wood or muted paint colors for an authentic look.
Consider traditional peg shapes like round or tapered. These shapes keep the style classic and neat. Let the wood grain show for added beauty.
Cutting The Wood
Cutting the wood is an important step in making a Shaker peg coat rack. It shapes the parts that will hold your coats. Careful cutting ensures the rack fits well and looks great. Take your time to make precise cuts. This will help your project look clean and professional.
Measuring And Marking
Start by measuring the wood pieces carefully. Use a tape measure and a pencil for marking. Mark the exact length and width needed for each part. Double-check your measurements before cutting. Clear, straight lines make cutting easier and more accurate.
Cutting The Board
Use a saw suitable for your wood type. A handsaw or circular saw works well. Follow your marked lines slowly and steadily. Keep your hands steady to avoid slips. Cut each piece with care to maintain straight edges and correct size.
Sanding Edges
After cutting, smooth the edges with sandpaper. Sand all sides until they feel soft and clean. This removes rough spots and splinters. Smooth edges improve the look and make the rack safe to use. Use fine-grit sandpaper for the best finish.

Credit: www.thorfamilylaw.com
Shaping The Pegs
Shaping the pegs is a key step in making a Shaker peg coat rack. This part gives the rack its classic look and makes the pegs easy to use. You will focus on turning the pegs on a lathe, sanding them smooth, and preparing them for attachment. Each step helps create strong, neat pegs that hold coats well.
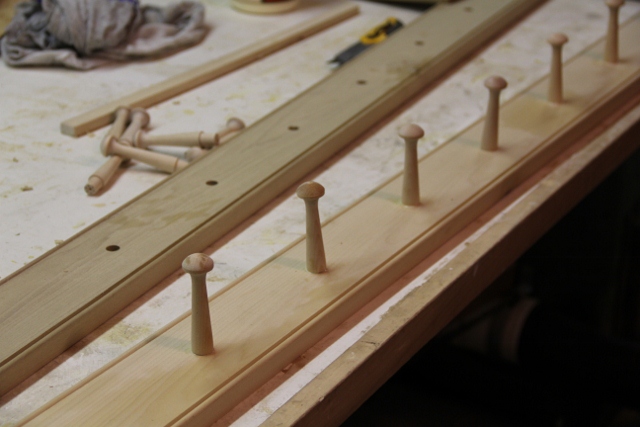
Turning The Pegs
Start by cutting wooden dowels to the right length for your pegs. Mount each dowel on a lathe. Slowly spin the wood while shaping it with a sharp tool. Create a smooth, rounded shape with a wider head and a thinner stem. Keep the pegs uniform in size and shape.
Sanding And Finishing
After turning, sand the pegs with medium-grit sandpaper. Smooth all rough edges and surfaces. Use finer sandpaper for a polished finish. Clean the dust off each peg. Apply a wood finish like oil or varnish. This protects the wood and shows its natural beauty.
Preparing For Attachment
Mark the center of the back end of each peg. Drill a small pilot hole for the screw. Make sure the hole is straight and deep enough. This helps the pegs attach firmly to the rack board. Check each peg for stability before moving on.
Assembly Process
The assembly process is a key step in making your shaker peg coat rack sturdy and functional. This part brings all the pieces together. Follow each step carefully to ensure a strong and neat rack. The right tools and patience will help you finish it well.
Attaching The Pegs
Start by placing the pegs evenly on the front board. Mark the spots where each peg will go. Drill small pilot holes to avoid splitting the wood. Use wood glue on each peg’s base for extra hold. Screw the pegs firmly into the board. Make sure all pegs are straight and aligned.
Securing The Backboard
Lay the backboard flat on a clean surface. Position the front board with pegs on top. Line up the edges carefully. Use clamps to hold both boards tightly. Drill pilot holes through the backboard into the front board. Screw them together for a strong bond. Check that the boards are flush and secure.
Ensuring Stability
Test the rack by pressing gently on the pegs. Tighten any loose screws immediately. Place the rack on a flat surface to check balance. Add wall brackets or anchors if you want extra support. Stability keeps your coat rack safe and long-lasting. A firm rack holds your items without wobbling.

Credit: www.youtube.com
Finishing Touches
Finishing touches give your Shaker peg coat rack a polished look. They protect the wood and enhance its beauty. Taking time on these steps makes your project last longer and look great.
Staining Or Painting
Choose a stain or paint that matches your room’s style. Stain shows the wood grain and gives a natural look. Paint offers many colors and hides the wood grain. Apply thin coats for even coverage. Let each coat dry before adding the next.
Applying Protective Coat
A protective coat keeps your rack safe from scratches and moisture. Use clear polyurethane or varnish for durability. Brush on thin, smooth layers. Avoid drips and bubbles. Allow the finish to dry fully before use.
Mounting Options
Select mounting hardware based on wall type and rack weight. Use wall anchors for drywall to ensure strong support. Screws directly into studs work best for heavy racks. Measure carefully to keep the rack level. Secure the rack firmly to the wall for safety.
Maintenance Tips
Keeping your Shaker peg coat rack in good shape needs regular care. Proper maintenance helps your rack stay strong and look great for years. Simple steps can prevent damage and keep it clean. Follow these tips to maintain your rack easily.
Cleaning Advice
Dust your rack often with a soft cloth. Use a damp cloth for sticky spots. Avoid harsh cleaners that can damage the wood finish. Dry the rack well after cleaning. Clean regularly to keep its natural beauty.
Repairing Damage
Check for loose pegs and tighten screws carefully. Small scratches can be fixed with wood filler or a matching stain. For bigger cracks, use wood glue and clamp until dry. Repair damage quickly to avoid bigger problems later.
Extending Lifespan
Keep your rack away from direct sunlight to prevent fading. Avoid placing it in very humid or dry areas. Use felt pads on the bottom to protect the wall and rack. Regular care and gentle use will help your coat rack last long.
Frequently Asked Questions
What Materials Do I Need For A Shaker Peg Coat Rack?
You need wood (like maple or pine), pegs, wood glue, screws, sandpaper, and finishing oil or paint. These are essential for a sturdy, smooth coat rack.
How Do I Attach Pegs To The Wooden Board?
Drill holes evenly spaced along the board. Insert pegs with wood glue and secure with screws if needed. Ensure pegs are straight and tight.
Can I Customize The Size Of The Coat Rack?
Yes, adjust the board length and number of pegs to fit your space and needs. Custom sizing ensures perfect wall fit.
What Finishing Options Enhance Durability And Look?
Use oil, varnish, or paint to protect wood and enhance appearance. Choose finishes that resist moisture and wear for long-lasting beauty.
Conclusion
Making a Shaker peg coat rack brings charm and function to any space. You need just a few tools and materials to start. Follow simple steps carefully to create a sturdy rack. Enjoy hanging coats, hats, and bags neatly. This project fits well in hallways or mudrooms.
Crafting it yourself adds a personal touch to your home. Try it today and see how easy woodworking can be. A handmade coat rack lasts for years and looks great. Simple, useful, and stylish—a perfect addition to your house.

