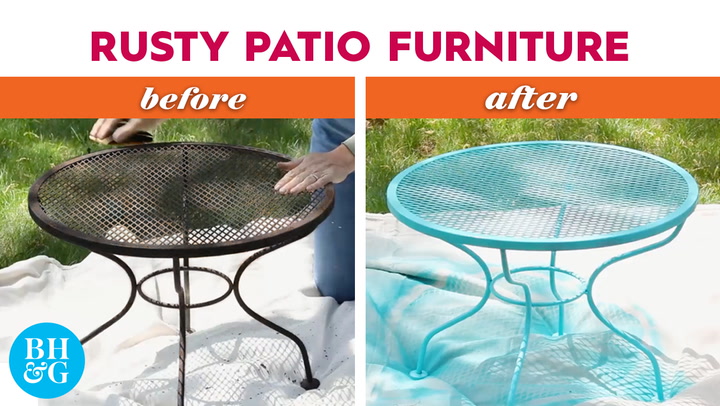
Is your outdoor metal furniture looking worn out with chipped paint? You don’t have to replace it or settle for that rusty, dull look.
Imagine giving your favorite chair or table a fresh, vibrant makeover that lasts through all seasons. In this guide, you’ll discover simple, step-by-step tips to restore your metal furniture’s charm and protect it from future damage. Ready to bring new life to your outdoor space?
Let’s dive in and make your furniture shine again!
Credit: www.bhg.com
Prepare The Work Area
Preparing the work area is a key step before painting outdoor metal furniture. It helps you work safely and get better results. A clean, organized space keeps dust and debris away from wet paint.
Setting up properly also protects nearby plants, walls, and floors from paint spills. Taking time to prepare saves effort later and makes the job easier.
Choose A Well-ventilated Spot
Pick an outdoor area with plenty of fresh air. Good ventilation helps paint dry faster and reduces harmful fumes. Avoid enclosed spaces like garages or sheds.
A shaded spot works best. Direct sunlight can cause paint to dry too fast and crack. Make sure the area is flat and stable to hold your furniture steady.
Gather Necessary Tools And Materials
Collect all tools before starting. You will need sandpaper or a wire brush to remove old paint chips. Get a paint scraper for stubborn spots.
Choose rust-resistant primer and metal paint. Have clean rags, painter’s tape, and drop cloths ready. Wear gloves and a mask to protect your skin and lungs.
Organize everything nearby. This helps you work smoothly without interruptions.
Remove Loose Paint
Removing loose paint is the first step to repaint outdoor metal furniture. Old, chipped paint can cause new paint to peel off quickly. It also makes the surface look rough and uneven. Cleaning the surface well helps paint stick better and last longer.
Start by getting rid of all the loose and flaking paint. Then, smooth the surface to prepare it for a fresh coat. This process may take some effort but is important for a neat finish.
Scrape Off Chipped Paint
Use a paint scraper or putty knife to remove loose paint. Hold the tool at a low angle to avoid damaging the metal. Work gently but firmly to lift off all the peeling paint. Clear away all the flakes and chips. If needed, use a wire brush for stubborn spots. This step clears the surface and prevents lumps under the new paint.
Sand The Surface Smooth
After scraping, sand the metal surface with medium-grit sandpaper. Sanding removes small bumps and leftover paint edges. It also creates a rough texture that helps paint stick. Use even strokes and cover the entire area. Wipe off dust with a clean cloth. A smooth, dust-free surface ensures a clean, even paint finish.
Clean The Metal Furniture
Cleaning metal furniture is a vital step before painting chipped areas. Dirt, dust, and old paint flakes can stop new paint from sticking well. Proper cleaning helps the paint last longer and look better.
Thorough cleaning also reveals hidden rust or damage. Fixing these problems first improves the furniture’s strength. A clean surface creates a smooth base for fresh paint.
Wash Away Dirt And Debris
Start by removing loose dirt and debris. Use a soft brush or cloth to wipe the surface. For tougher grime, mix mild soap with water. Gently scrub the furniture with a sponge or brush.
Rinse the furniture with clean water. Make sure all soap and dirt are gone. Avoid harsh chemicals that can damage metal or remove old paint unevenly.
Dry Thoroughly
Dry the furniture fully before painting. Use a clean towel to wipe off water. Let the furniture air dry in a sunny spot.
Moisture left on metal can cause paint to peel. Drying well helps the new paint stick tight. Take your time to ensure the surface is completely dry.
Apply Rust Treatment
Treat rust on outdoor metal furniture by applying a rust treatment to the chipped areas. This step stops rust from spreading and prepares the surface for painting. Clean the metal well before applying the treatment for best results.
Inspect For Rust Spots
Start by checking your metal furniture for rust spots. Look carefully at chipped and worn areas. Rust can cause more damage if left untreated. Use a wire brush or sandpaper to remove loose rust. Clear away dust and debris to see the surface better. This step helps prepare the furniture for rust treatment. Make sure to wear gloves to protect your hands.
Use Rust Converter Or Primer
Apply a rust converter to the rusty spots. This product changes rust into a stable surface. It stops rust from spreading further. Follow the instructions on the rust converter package. Let it dry completely before painting. Another option is using a rust-inhibiting primer. This primer blocks moisture and prevents rust. It creates a good base for the paint to stick. Both rust converter and primer improve the paint’s durability.
Prime The Surface
Priming the surface is a key step for painting outdoor metal furniture with chipped paint. It creates a smooth base that helps the paint stick better and last longer. Without proper priming, paint may peel or chip again quickly. Take your time to do it right for a strong finish.
Choose The Right Primer
Select a primer made for metal surfaces. Rust-inhibiting primers work best for outdoor furniture. They stop rust from spreading under the paint. Use a primer compatible with your chosen paint type. This ensures better bonding and durability. Read the label to confirm it suits outdoor use.
Apply Even Coats
Shake the primer can well before use. Apply thin, even coats with a brush or spray. Avoid thick layers that can drip or bubble. Let each coat dry fully before adding the next. Usually, two coats provide good coverage. Smooth, even priming makes the paint look smooth and last longer.

Credit: porchdaydreamer.com
Paint The Furniture
Painting outdoor metal furniture with chipped paint can bring it back to life. It protects the metal from rust and weather damage. The right paint and method help the furniture look great for years.
Follow these steps carefully for a smooth and durable finish. Take your time to apply the paint evenly. This makes a big difference in the final look.
Select Suitable Outdoor Paint
Choose paint made for metal and outdoor use. These paints resist rust and weather damage. Look for rust-preventive primers or paints with rust inhibitors. Use oil-based or acrylic paints designed for metal surfaces. These paints stick well and last longer outside.
Use Proper Painting Techniques
Start with a clean, dry surface before painting. Use a brush, roller, or spray paint for even coverage. Apply thin, smooth coats to avoid drips and bubbles. Let each coat dry fully before adding the next one. Paint in a shaded, dust-free area for best results.
Add Protective Finish
Adding a protective finish is an important step after painting outdoor metal furniture. It helps keep the paint safe and stops it from chipping again. The finish adds a clear layer that protects the metal from water, sun, and rust. This step makes the furniture look new for a longer time.
Applying the protective finish is easy. You only need the right products and some patience. Follow the right steps to get the best results.
Apply Clear Sealant
Choose a clear sealant made for outdoor metal. It will protect the paint from weather damage. Use a brush or spray to apply it evenly. Cover all painted surfaces with a thin layer. Avoid thick coats to prevent drips and bubbles. Let the sealant form a smooth, clear shield.
Allow For Proper Drying Time
Let the sealant dry fully before using the furniture. This may take several hours or a full day. Follow the sealant instructions for exact drying times. Avoid touching or moving the furniture while it dries. Proper drying makes the finish strong and long-lasting.

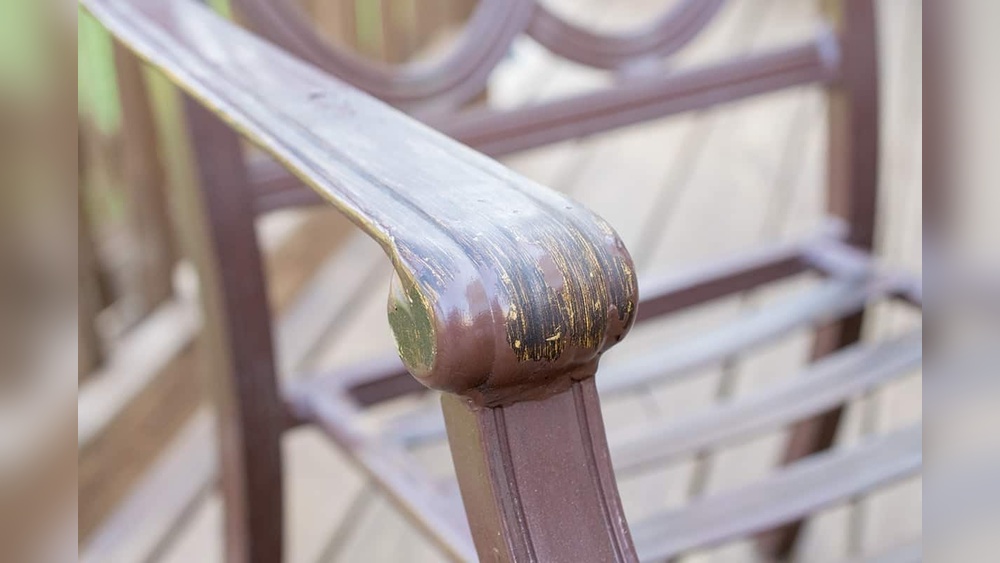
Credit: www.reddit.com
Maintain Painted Furniture
Maintaining painted outdoor metal furniture keeps it looking fresh and protects it from damage. Regular care stops rust and peeling paint. Simple steps help the paint last longer and keep your furniture strong.
Regular Cleaning Tips
Clean your furniture often to remove dirt and dust. Use a soft cloth or sponge with mild soap and water. Avoid harsh chemicals that can damage the paint. Rinse well with clean water and dry with a towel. This prevents grime buildup and keeps the paint bright.
Touch-up Chipped Areas
Check your furniture for chips or scratches regularly. Lightly sand the chipped spots to smooth rough edges. Apply a rust-inhibiting primer on exposed metal. Use matching outdoor metal paint to cover the area. Let it dry completely. Touch-ups stop rust and keep your furniture looking new.
Frequently Asked Questions
How Do I Remove Chipped Paint From Metal Furniture?
Use a wire brush or sandpaper to scrape off loose paint. Clean the surface with soapy water, then dry it thoroughly before repainting.
What Type Of Paint Is Best For Metal Furniture?
Choose rust-resistant, outdoor metal paint like enamel or acrylic latex. These paints provide durability and protect against weather damage.
Should I Prime Metal Furniture Before Painting?
Yes, applying a metal primer improves paint adhesion and prevents rust. Use a primer suitable for outdoor metal surfaces for best results.
How Many Coats Of Paint Are Needed On Metal Furniture?
Apply two to three thin coats for even coverage. Allow each coat to dry completely before adding the next layer.
Conclusion
Painting outdoor metal furniture with chipped paint takes time and care. Start by cleaning and sanding the surface well. Use the right primer and paint to protect the metal. Allow each coat to dry before adding the next. This process helps your furniture look fresh and last longer.
Regular maintenance keeps it in good shape. Small efforts make a big difference in appearance and durability. Enjoy your renewed outdoor space with confidence.


