Are your bedroom furniture pieces looking tired or outdated? You don’t have to spend a fortune buying new ones.
Refinishing your bedroom furniture can give your space a fresh, stylish look without breaking the bank. Imagine transforming your dresser, nightstands, or bed frame into beautiful, customized pieces that reflect your personality and taste. In this guide, you’ll discover simple, effective steps to refinish your furniture like a pro—even if you’ve never tried it before.
Ready to breathe new life into your bedroom? Let’s get started!

Credit: www.youtube.com
Choosing The Right Furniture
Choosing the right furniture to refinish is the first step in your project. Not all bedroom pieces are suitable for refinishing. Some furniture may need more work than others. Picking the right item saves time and effort. It also ensures a better final look. Understanding what to choose helps you avoid common mistakes.
Consider the style, material, and current condition of the piece. These factors affect how easy it is to refinish. You want furniture that fits your skill level and desired outcome. Knowing what to expect makes the process smoother and more enjoyable.
Types Of Bedroom Furniture To Refinish
Common bedroom furniture to refinish includes dressers, nightstands, beds, and wardrobes. Dressers and nightstands often have simple shapes. They are great for beginners. Bed frames can be wood or metal. Wood beds are easier to refinish. Wardrobes usually have large surfaces and can be more challenging. Choose pieces that you feel confident working on. Solid wood furniture is the best choice. Avoid particleboard or veneer, as they are harder to refinish well.
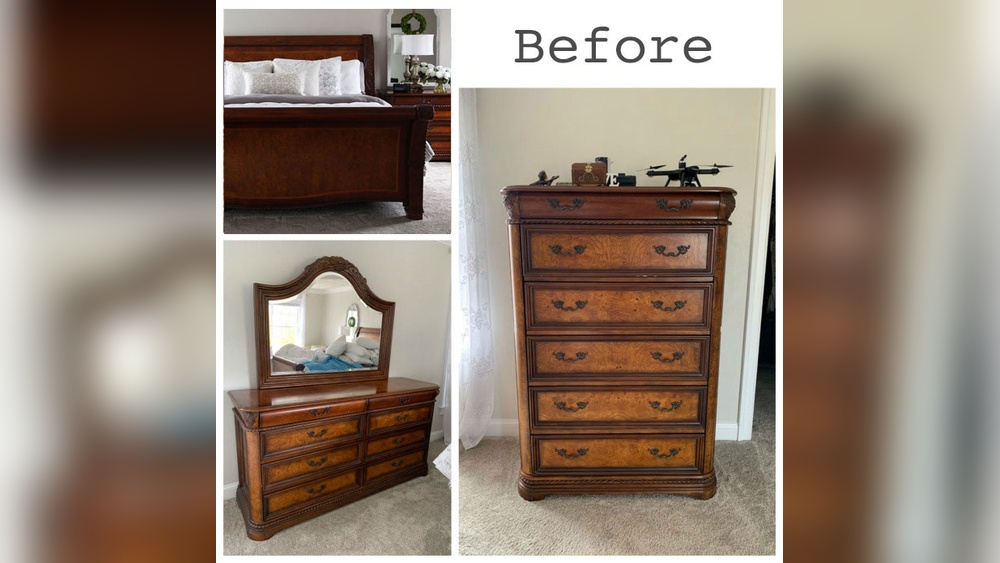
Assessing Furniture Condition
Check for scratches, dents, and loose joints. Small damages are easy to fix. Deep cracks or broken parts may need professional repair. Look for old paint or varnish layers. Thick finishes might require sanding before painting. Also, check for signs of wood rot or insect damage. These issues can make refinishing difficult or impossible. Make sure the piece is sturdy and safe to use. A solid base will ensure your work lasts for years.

Credit: farmfreshvintagefinds.com
Gathering Materials
Gathering the right materials is the first step to refinishing bedroom furniture. Having everything ready saves time and helps the project go smoothly. It also ensures a better finish and longer-lasting results.
Focus on tools and supplies that fit your furniture type. Choose paints and finishes that match your style and the furniture’s use. Quality materials make a big difference in the final look and durability.
Essential Tools And Supplies
Start with sandpaper or a sanding block. These help remove old paint or finish. Get different grits: coarse for rough sanding, fine for smooth finishing. A paintbrush or foam brush is needed for applying paint and sealers. Use a scraper to remove loose paint or varnish. A clean cloth or tack cloth helps wipe dust and debris. Gloves protect your hands, and a mask keeps you safe from dust and fumes. Painter’s tape is useful for covering areas you don’t want to paint.
Selecting Paints And Finishes
Choose paint made for furniture, like chalk paint or latex paint. Chalk paint sticks well and gives a matte look. Latex paint is durable and easy to clean. Pick a finish that protects the wood, such as polyurethane or wax. Polyurethane adds a hard layer, great for tabletops or dressers. Wax gives a soft, natural finish but needs regular care. Test paint on a small area to see how it looks before full application.
Preparing The Surface
Preparing the surface is the first and most important step in refinishing bedroom furniture. A clean, smooth surface ensures the new finish will stick well and look professional. Skipping this step can lead to peeling or uneven paint. Take your time and follow these simple steps to get the best result.
Cleaning And Degreasing
Start by cleaning the furniture thoroughly. Use a mild soap and warm water to remove dirt and dust. Grease spots need special attention. Use a degreaser or a mixture of vinegar and water. Wipe the surface with a clean cloth and let it dry completely. This step removes oils that stop paint from sticking properly.
Sanding Techniques
Sanding smooths the surface and helps the paint grip the wood. Use medium-grit sandpaper for rough surfaces. Switch to fine-grit sandpaper for a smooth finish. Always sand in the direction of the wood grain. Avoid pressing too hard to prevent scratches. After sanding, wipe away dust with a damp cloth. Let the surface dry before moving on.
Handling Varnished Surfaces
Varnished furniture needs extra care. Lightly sand the varnish to create a rough surface. This helps the new paint stick better. If you want to skip sanding, use a special bonding primer. This primer grips the varnish and forms a good base. Clean the surface well before applying any primer or paint. Proper preparation makes your refinishing job last longer.
Priming Tips
Priming is a key step in refinishing bedroom furniture. It creates a smooth base for paint. It also helps paint stick better. Good priming prevents peeling and uneven color. Skipping this step can cause problems later.
Understanding how to choose and apply primer saves time and effort. It improves the final look of your furniture. Follow these tips to get the best results.
Choosing The Right Primer
Select a primer based on your furniture’s material. For wood, use an oil-based or shellac primer. These block stains and cover knots well. For laminate or glossy surfaces, a bonding primer works best. It helps paint stick without sanding.
Consider the paint type you will use next. Latex paint pairs well with water-based primers. Oil-based paint needs oil-based primers. Check the primer label for compatibility. Using the wrong primer can cause peeling or cracking.
Applying Primer Correctly
Start with a clean, dry surface. Remove dust, grease, or old paint flakes. Use a brush for corners and detailed areas. A foam roller works well for flat surfaces. Apply primer in thin, even coats.
Let the primer dry completely before adding paint. Follow the drying time on the primer label. Apply a second coat if the surface still shows through. Sand lightly between coats for a smooth finish.
Painting Strategies
Painting bedroom furniture is a key step in refinishing. It brings new life and style to old pieces. Choosing the right painting strategies helps achieve a smooth, lasting finish. This section covers important tips for painting effectively.
Using Brushes Vs. Sprayers
Brushes give control and work well for small or detailed areas. They can leave brush marks but allow precise application. Sprayers cover large surfaces quickly and create a smooth finish. Sprayers need practice and a well-ventilated space. Choose based on your furniture size and skill.
Applying Thin, Even Coats
Thin coats dry faster and reduce drips or runs. Apply paint in light layers rather than thick blobs. Even coats prevent uneven texture and peeling later. Use long, smooth strokes for a clean look. Allow each coat to dry before adding the next one.
Drying And Curing Times
Drying means the paint feels dry to touch. Curing means the paint hardens fully for durability. Follow the paint label for drying and curing times. Avoid using or moving furniture before curing finishes. Proper curing ensures a tough, lasting finish that resists damage.
Adding Finishing Touches
Refinishing bedroom furniture can refresh your space and save money. Avoiding common mistakes helps get the best results. Many beginners rush or skip key steps. These errors can ruin your work or cause extra effort later. Understanding what to avoid makes the process smooth and rewarding.
Skipping Surface Preparation
Surface preparation is the foundation for a good finish. Skipping sanding or cleaning causes paint to peel or chip. Dirt and oils block paint adhesion. Always clean your furniture well. Sand rough spots and old finishes lightly. This step helps paint stick and last longer.
Using The Wrong Paint Types
Not all paints work well on furniture. Using the wrong type can cause cracking or uneven color. Choose paints made for wood or furniture use. Chalk paint, acrylic, or enamel are common choices. Check product labels for furniture suitability. The right paint improves durability and appearance.
Rushing The Process
Refinishing takes time and patience. Rushing leads to drips, bubbles, and uneven coats. Let each layer dry fully before adding the next. Follow the drying times on paint and primer instructions. Taking your time ensures a smooth, professional-looking finish. Slow and steady wins the race.
Common Mistakes To Avoid
Maintaining refinished bedroom furniture keeps it looking fresh and new. Proper care protects your hard work and extends the life of the finish. Small efforts every day help avoid bigger problems later. Follow simple steps to keep your furniture beautiful and durable.
Cleaning Tips
Dust furniture regularly with a soft cloth. Avoid rough materials that can scratch the surface. Use mild soap mixed with water for gentle cleaning. Wipe with a damp cloth and dry immediately. Do not use harsh chemicals or abrasive cleaners. They can damage the finish and dull the shine. Clean spills quickly to prevent stains and water marks.
Repairing Minor Damage
Fix small scratches with a matching furniture marker or wax stick. Apply gently and blend with a soft cloth. For small dents, use a damp cloth and iron on low heat to raise the wood fibers. Loose joints can be secured with wood glue and clamps. Avoid heavy sanding or stripping, which can harm the finish. Regular checks catch damage early for easy repair.

Credit: www.confessionsofaserialdiyer.com
Frequently Asked Questions
Can I Paint Over Varnished Wood Without Sanding?
Yes, you can paint over varnished wood without sanding using a bonding primer. Clean the surface well first. Sanding improves paint adhesion and durability. For best results and a longer-lasting finish, lightly sanding is recommended before painting.
How Much Does It Cost To Have A Piece Of Furniture Refinished?
Furniture refinishing costs typically range from $100 to $600, depending on size, condition, and finish type. Custom or intricate pieces may cost more.
Is It Better To Sand Or Strip Paint Off Furniture?
Stripping paint removes old layers completely, ideal for thick or multiple coats. Sanding smooths surfaces and improves paint adhesion. Choose stripping for heavy paint; sand for light prep and better finish durability. Combining both often gives the best, long-lasting results on furniture.
Can You Refinish Furniture Without Stripping?
Yes, you can refinish furniture without stripping by cleaning thoroughly and using a bonding primer or special paint designed for existing finishes. Light sanding is recommended for better adhesion and longer-lasting results, but it’s not always necessary.
Conclusion
Refinishing bedroom furniture is a rewarding and creative task. Start with proper cleaning and preparation for best results. Choose the right paint and apply thin, even coats carefully. Patience during drying times ensures a smooth finish. Small steps lead to big improvements in your furniture’s look.
Enjoy the fresh, personalized style you create for your bedroom. This simple project can refresh your space without spending much money. Give your old furniture new life with these easy refinishing tips.