Are you tired of your old bathroom vanity cabinet dragging down the look of your space? Replacing it might seem like a big job, but with the right steps, you can transform your bathroom quickly and easily.
Imagine how refreshing it will feel to open your new cabinet every morning, knowing you did the work yourself. In this guide, you’ll discover simple, clear instructions that anyone can follow—no special skills needed. Ready to give your bathroom a fresh, stylish upgrade?
Let’s get started!
Tools And Materials Needed
Replacing a bathroom vanity cabinet needs the right tools and materials. Having them ready makes the job easier and safer. This section lists everything needed for a smooth replacement.
Tools Required
Basic hand tools include a screwdriver and a wrench. An adjustable wrench helps with plumbing connections. A drill with bits speeds up screw removal and installation. A pry bar assists in removing the old cabinet. A level ensures the new cabinet sits straight. Measuring tape checks dimensions carefully. Safety glasses protect your eyes from debris. Gloves keep your hands safe and clean.
Materials Needed
Choose a vanity cabinet that fits your bathroom space. Silicone caulk seals gaps and prevents water damage. Plumber’s tape helps secure pipe joints. New mounting screws may be necessary. Wood shims adjust the cabinet for level placement. Clean rags help wipe off excess caulk or dirt. Optional: paint or finish if you want to customize the cabinet.
Preparing The Bathroom
Preparing the bathroom is the first step to replacing a vanity cabinet. It sets the stage for a smooth and safe project. Proper preparation saves time and prevents damage.
Organize the space and follow safety steps before you start removing the old cabinet.
Turn Off Water Supply
Locate the water shut-off valves under the sink. Turn them clockwise to stop water flow. If no valves are present, shut off the main water supply. This stops leaks and water damage during removal.
Clear The Area
Remove all items from the vanity and nearby shelves. Take out rugs and mats to avoid tripping. Clear enough space to move freely around the cabinet. This gives you room to work safely and efficiently.
Protect Surrounding Surfaces
Cover the floor with a drop cloth or old towels. Tape plastic sheets on walls near the vanity. Shield mirrors and fixtures from dust and scratches. Protecting surfaces keeps your bathroom clean and damage-free.
Removing The Old Vanity
Removing the old vanity is the first step to install a new one. This process requires care and patience. It involves shutting off water, disconnecting pipes, and unscrewing the cabinet. Safety matters. Protect the floor and walls as you work. Follow these steps to remove the old vanity correctly.
Disconnect Plumbing
Turn off the water supply valves under the sink. Open the faucet to drain any remaining water. Use a wrench to loosen the nuts on the water supply lines. Carefully disconnect the drain pipe from the sink. Place a bucket below to catch any water left inside. Make sure all plumbing connections are free before moving on.
Unscrew And Detach Vanity
Locate the screws securing the vanity to the wall. Use a screwdriver or drill to remove these screws. Check around the countertop and sides for hidden fasteners. Gently pull the vanity away from the wall. Be careful not to damage the wall or floor. The vanity should come loose with steady pressure.
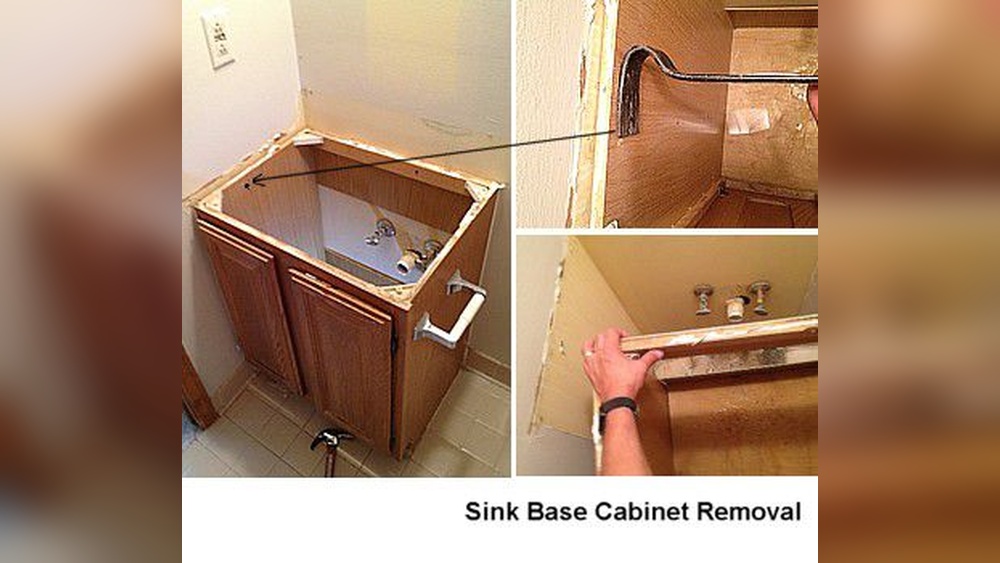
Remove Old Vanity Safely
Lift the vanity carefully with help if it is heavy. Avoid sudden moves to prevent injury or damage. Place the vanity on a protective surface outside the bathroom. Inspect the area for any nails or debris left behind. Clean the space to prepare for the new vanity installation. Proper removal makes the next steps easier and safer.
Credit: www.lowes.com
Measuring For The New Vanity
Measuring for the new vanity is the first important step in your bathroom update. Getting the size right saves time and avoids costly mistakes. Careful measuring ensures the vanity fits well and looks great in your space.
Measure Space Accurately
Start by measuring the width, height, and depth of the area where the vanity will go. Use a tape measure and record each dimension in inches. Measure from wall to wall and from floor to any obstacles like pipes or outlets. Double-check your numbers for accuracy.
Check Plumbing Placement
Look at the current plumbing setup. Note where the water supply lines and drain pipes are located. These need to line up with the new vanity’s openings. Mark the plumbing positions on your measurements to avoid surprises during installation.
Select The Right Vanity Size
Choose a vanity size that fits your bathroom’s space and plumbing. Leave enough room around the vanity for easy movement. Consider the vanity height for comfortable use. A well-sized vanity improves both function and style in your bathroom.
Installing The New Vanity
Installing the new bathroom vanity is a key step in your renovation. This process sets the foundation for a functional and stylish space. Follow these simple steps to place and secure your vanity correctly. Take your time and work carefully for the best results.
Position The Vanity
First, move the vanity close to the wall. Make sure it fits in the space without gaps. Check that the vanity is level from front to back and side to side. Use a carpenter’s level to confirm this. Adjust the feet or use shims if needed. Proper positioning ensures your vanity looks good and works well.
Secure To Wall
Next, attach the vanity to the wall for safety and stability. Find the wall studs behind the vanity using a stud finder. Drill pilot holes through the vanity back into the studs. Use screws to fasten the vanity firmly to the wall. Avoid over-tightening screws to prevent damage. Securing the vanity prevents wobbling and keeps it in place.
Attach Vanity Top
Finally, place the vanity top onto the cabinet. Align it carefully with the edges of the vanity. Apply a thin bead of silicone caulk on the top edges of the cabinet. This seal prevents water from leaking underneath. Press the vanity top down firmly and wipe away any excess caulk. Let the caulk dry as instructed before using the sink.
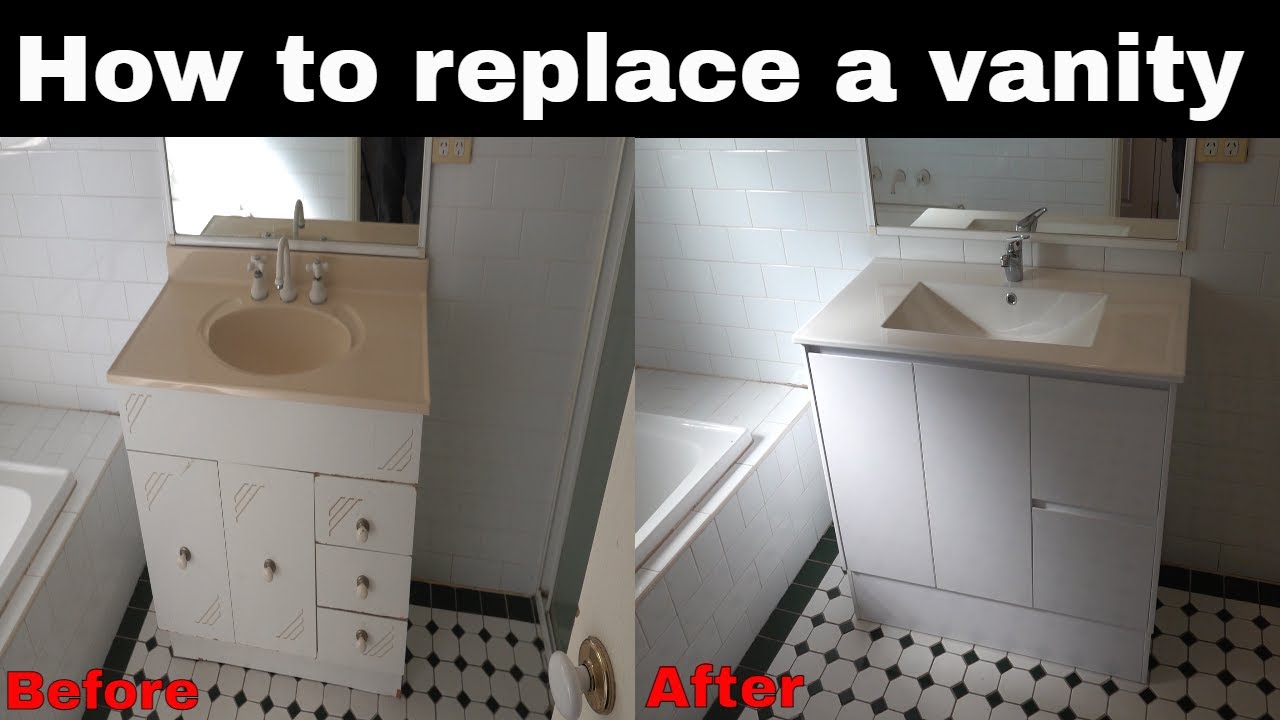
Credit: www.youtube.com
Connecting Plumbing
Connecting plumbing is a key step when replacing your bathroom vanity cabinet. It ensures water flows correctly and prevents leaks. Take care to connect everything tightly and properly. This helps avoid water damage and keeps your bathroom safe.
Reattach Drain And Supply Lines
Start by reconnecting the drain pipe to the new vanity. Use plumber’s tape on threads for a tight seal. Next, attach the water supply lines to the faucet valves. Tighten all connections with a wrench, but do not overtighten. Loose connections can cause leaks later.
Check For Leaks
After reconnecting pipes, turn on the water supply slowly. Look closely around all joints for drips or moisture. Use a dry cloth to wipe areas and watch for wet spots. If you see leaks, tighten the connections gently until they stop.
Test Water Flow
Open both hot and cold faucets fully. Let water run for a few minutes to clear air from pipes. Check if the water pressure feels normal and steady. Ensure the drain empties quickly without any gurgling sounds. This confirms the plumbing works well.
Finishing Touches
After installing your new bathroom vanity cabinet, the final steps matter a lot. These finishing touches improve the cabinet’s look and protect it from damage. Taking time to seal edges, install hardware, and clean your workspace makes the project feel complete. Each step adds polish and ensures your vanity works well every day.
Seal Edges
Sealing the edges stops water from seeping into gaps. Use a waterproof silicone sealant around the sink and cabinet joints. Apply a thin, even line of sealant for a neat finish. Smooth it out with a wet finger or tool. Let it dry fully to create a strong barrier. This step prevents water damage and keeps mold away.
Install Hardware
Attach handles and knobs to doors and drawers next. Choose hardware that matches your bathroom style. Use a screwdriver to secure each piece tightly. Check that doors and drawers open and close smoothly. Proper hardware makes your vanity easy to use. It also adds to the overall look of the cabinet.
Clean Up Workspace
Clear dust, debris, and leftover materials from the area. Use a vacuum or broom to pick up small particles. Wipe down the cabinet surface with a damp cloth. Remove any fingerprints or smudges. A clean workspace highlights your new vanity’s beauty. It also ensures a safe, neat bathroom space for everyone.
:max_bytes(150000):strip_icc()/8_remove-sink-base-cabinet-56a4a26d3df78cf772835b30.jpg)
Credit: www.thespruce.com
Common Mistakes To Avoid
Replacing a bathroom vanity cabinet can refresh your space. Mistakes can cause delays and extra costs. Avoiding common errors makes the project smoother. Focus on key points to save time and money.
Incorrect Measurements
Measure the space carefully before buying a new cabinet. Check width, height, and depth. Measure twice to avoid errors. Wrong size cabinets cause fitting problems and extra work.
Ignoring Plumbing Adjustments
Plumbing may need changes to fit the new cabinet. Don’t assume the pipes will line up perfectly. Check water supply and drain locations. Adjust plumbing to prevent leaks and damage.
Skipping Wall Stud Checks
Always locate wall studs before mounting the cabinet. Cabinets must be anchored securely to studs. Using drywall anchors alone can cause the cabinet to fall. Use a stud finder to locate strong support points.
Not Turning Off Water Supply
Turn off the water supply before removing the old vanity. Leaving water on can cause leaks and flooding. Drain pipes fully to avoid water mess. Safety first to protect your bathroom floor.
Failing To Remove Old Caulk And Sealant
Old caulk can block a proper fit for the new cabinet. Remove all caulk and sealant from the wall and floor. Clean surfaces allow the new cabinet to sit flush and secure. Use a scraper and cleaner for best results.
Tips For Maintenance
Maintaining your bathroom vanity cabinet helps it last longer and look good. Simple care keeps water damage and stains away. Regular upkeep saves money and effort on repairs. Follow easy tips to keep your cabinet in top shape.
Clean Spills Immediately
Wipe up water and soap spills right away. Moisture can cause wood to swell or peel. Use a soft cloth to dry the surface. Avoid letting water sit on the cabinet for long.
Use Gentle Cleaners
Choose mild soaps or cleaners designed for wood or laminate. Harsh chemicals can damage the finish. Test cleaners on a small hidden spot first. Clean regularly but gently to keep the cabinet fresh.
Check For Loose Hardware
Look for loose knobs, handles, and hinges often. Tighten screws to prevent damage or accidents. Replacing broken hardware keeps the cabinet functional and safe.
Protect From Excess Moisture
Use a bathroom fan or open windows to reduce humidity. Moist air can cause mold and rot. Avoid placing wet towels or wet items on the cabinet surface.
Apply A Protective Finish
Use a wood polish or sealant once or twice a year. This shields the cabinet from water and stains. Follow product instructions for the best results.
Frequently Asked Questions
How Do I Remove An Old Bathroom Vanity Cabinet?
First, turn off the water supply and disconnect plumbing. Remove screws securing the vanity to the wall. Carefully pull out the old vanity, ensuring no damage to surrounding areas.
What Tools Are Needed To Replace A Vanity Cabinet?
You need a screwdriver, adjustable wrench, level, drill, tape measure, and plumber’s putty. These tools help in removing, installing, and securing the new cabinet properly.
How Do I Connect Plumbing To The New Vanity?
Attach the faucet and drain assembly to the new vanity. Reconnect water supply lines using an adjustable wrench. Check for leaks by turning the water on slowly.
Can I Replace A Vanity Cabinet Myself?
Yes, with basic plumbing and carpentry skills, you can replace it. Follow safety steps and instructions carefully to avoid damage or leaks during installation.
Conclusion
Replacing a bathroom vanity cabinet can seem tough at first. Take your time and follow each step carefully. Use the right tools and measure twice before cutting. Small mistakes can cause big problems later. A new vanity can refresh your bathroom’s look and add storage.
Enjoy the satisfaction of completing this project yourself. Keep safety in mind and ask for help if needed. Soon, you will have a bathroom that feels clean and new. Simple changes make a big difference. Ready to start your project?