Are you tired of searching for the perfect bathroom vanity cabinet that fits your style and space? What if you could build one yourself, tailored exactly to your needs?
Building your own bathroom vanity cabinet might sound challenging, but with the right steps, it’s easier than you think. Imagine having a custom piece that not only saves you money but also gives your bathroom a unique touch. Ready to discover how you can create your own beautiful and functional vanity?
Keep reading, and you’ll find simple, clear instructions that anyone can follow. Your dream bathroom starts here.
:max_bytes(150000):strip_icc()/build-something-diy-vanity-594402125f9b58d58ae21158.jpg)
Credit: www.thesprucecrafts.com
Planning Your Vanity Cabinet
Planning your bathroom vanity cabinet is the first step to a successful project. Careful planning saves time and money. It also ensures your vanity fits perfectly and looks great. Think about size, materials, and style before you start building. This makes the process smoother and more enjoyable.
Choosing The Right Size
Measure your bathroom space carefully. Consider the area around the sink and toilet. Leave enough room to move comfortably. A vanity that is too big makes the room feel cramped. Too small, and you lose storage and counter space. Choose a size that balances function and space.
Selecting Materials
Select materials that resist water and humidity. Solid wood is strong but needs proper sealing. Plywood is a good budget option and holds up well. Avoid particle board because it swells with moisture. Use waterproof paint or sealant to protect the surface. Durable materials keep your vanity looking nice for years.
Design And Style Ideas
Decide on a style that matches your bathroom theme. Modern vanities have clean lines and simple colors. Rustic designs use natural wood and rough finishes. Classic styles often feature detailed trims and soft colors. Choose hardware that fits your style, like knobs or handles. Your vanity should blend with the room and reflect your taste.
Gathering Tools And Supplies
Building your own bathroom vanity cabinet starts with gathering the right tools and supplies. Proper preparation saves time and helps avoid mistakes. Having everything ready makes the work smoother and more enjoyable.
Below is a list of essential tools, recommended materials, and safety gear needed for this project. These items form the foundation for a sturdy, beautiful vanity cabinet.
Essential Tools List
- Measuring tape for accurate dimensions
- Circular saw or handsaw for cutting wood
- Power drill with drill bits
- Screwdriver set for assembling parts
- Clamps to hold pieces together
- Sandpaper or electric sander for smooth surfaces
- Wood glue to strengthen joints
- Carpenter’s square to ensure right angles
Recommended Materials
- High-quality plywood or hardwood sheets
- Wood screws and finishing nails
- Wood putty for filling gaps
- Primer and paint or wood stain
- Cabinet hinges and handles
- Sealant to protect against moisture
- Countertop material (optional)
Safety Gear
- Safety goggles to protect your eyes
- Dust mask to avoid inhaling sawdust
- Ear protection for loud tools
- Work gloves to prevent splinters
- Closed-toe shoes to protect feet
Preparing The Workspace
Preparing the workspace is the first step in building your own bathroom vanity cabinet. A clean, organized area helps work go smoothly and safely. It reduces mistakes and saves time. Setting up the right space makes your project more enjoyable and efficient.
Setting Up Your Work Area
Choose a flat, sturdy surface to work on. A large table or workbench is best. Make sure the area has good lighting. Natural light or bright lamps help you see details clearly. Keep the space free of clutter. Remove items that could get in the way or cause accidents.
Ensure there is enough room to move around. You will need space to handle large wood pieces. Good ventilation is also important. Sawdust and fumes can build up. Open windows or use a fan for fresh air.
Organizing Tools And Materials
Gather all tools before starting. Common tools include a saw, drill, screwdriver, measuring tape, and clamps. Check that each tool works properly. Place tools within easy reach to avoid searching during work.
Sort your materials by type and size. Keep wood, screws, nails, and hinges in separate containers. Label each container if possible. This helps find items quickly and keeps the workspace tidy. Keep safety gear like gloves and goggles nearby too.
:strip_icc()/open-simple-blue-vanity-32366fec-cedb074f8ff9499fa7e993416f2d9eb8.jpg)
Credit: www.bhg.com
Cutting And Assembling The Frame
Cutting and assembling the frame is a key step in building your bathroom vanity cabinet. This part shapes the basic structure that holds everything together. Taking time to measure and cut wood correctly makes your cabinet strong and neat. Join the pieces carefully to ensure stability and a clean look. Follow each step closely for the best results.
Measuring And Marking Wood
Start by measuring each piece of wood for your frame. Use a tape measure to get exact lengths. Mark the wood clearly with a pencil. Double-check your marks before cutting. Precise measurements help your frame fit perfectly.
Making Accurate Cuts
Use a saw to cut along your marked lines. Cut slowly to keep the edges straight and smooth. A clean cut prevents gaps in the frame. Wear safety gear to protect your eyes and hands. Accurate cuts save time and avoid mistakes later.
Joining Frame Pieces
Arrange the cut pieces to form the frame shape. Use wood glue at the joints for a strong hold. Clamp the pieces together while the glue dries. Add nails or screws for extra strength. Check the frame for squareness before moving on.
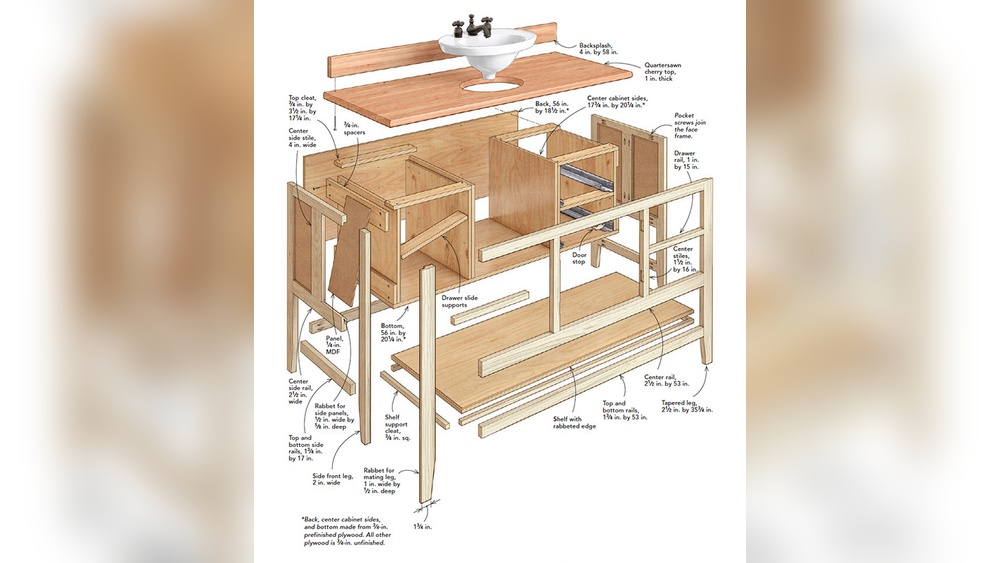
Building The Cabinet Box
Building the cabinet box is the key step in making your bathroom vanity. This structure holds everything together and supports the sink and countertop. Strong, precise work here makes the whole project last longer and look better.
Attaching The Sides And Bottom
Start by cutting the side panels and bottom piece to size. Use wood glue along the edges for a tight bond. Then, join the sides to the bottom with screws or nails. Make sure the edges line up evenly. Check with a square tool to keep corners straight.
Reinforcing Joints
Strengthen the cabinet by adding small wooden blocks inside corners. Glue and screw these blocks firmly. This stops wobbling and adds stability. Reinforce all joints to avoid gaps or movement over time.
Installing The Back Panel
Cut the back panel to fit the cabinet’s rear opening. Attach it using nails or screws along the edges. The back panel stops the box from twisting. It also helps keep dust and debris out of the cabinet.
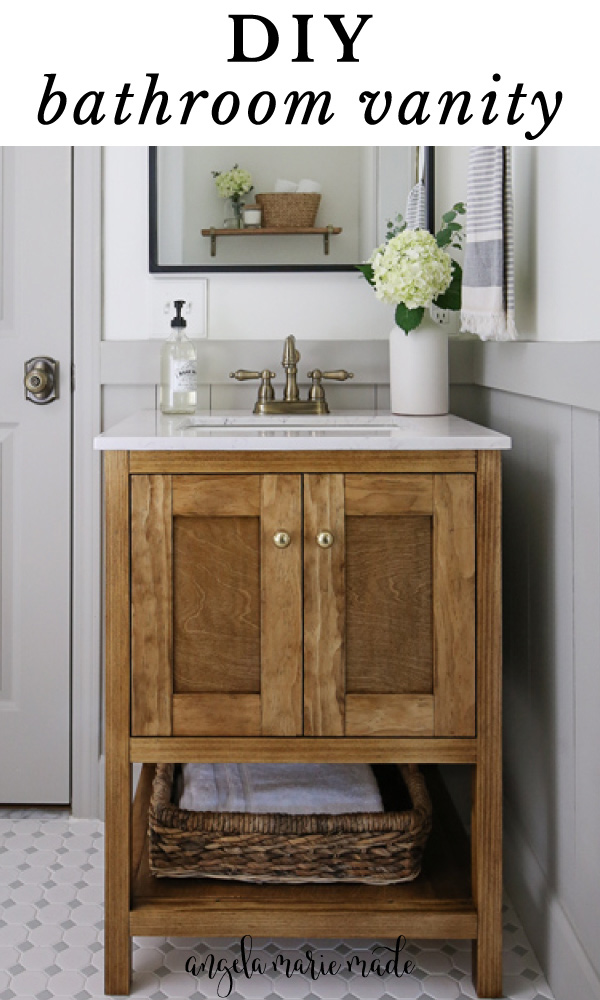
Credit: angelamariemade.com
Adding Doors And Drawers
Adding doors and drawers completes your bathroom vanity cabinet. These elements provide storage and keep your space tidy. Proper installation ensures smooth operation and a polished look. Follow simple steps to build strong doors and easy-slide drawers.
Constructing Door Panels
Start by cutting wood panels to fit your cabinet openings. Use smooth, water-resistant wood for durability. Frame the panels with thin strips for a classic look. Sand edges carefully to avoid splinters. Paint or seal the panels to protect against moisture.
Installing Hinges
Choose hinges that match your door size and style. Mark hinge spots on both the door and cabinet frame. Drill small pilot holes to prevent wood from splitting. Attach hinges firmly with screws, ensuring doors swing open smoothly. Test doors for alignment and adjust if needed.
Assembling Drawers
Cut drawer parts to match inside cabinet dimensions. Join sides, front, and back with wood glue and screws. Attach a sturdy bottom panel for support. Sand edges to ensure smooth sliding. Install drawer slides inside the cabinet and on the drawers. Check for easy movement and adjust slides if necessary.
Sanding And Finishing
Sanding and finishing are key steps in building a bathroom vanity cabinet. They make the cabinet look smooth and protect it from water and wear. Good sanding removes rough spots and old paint. Finishing adds color and a strong layer to keep the wood safe.
Smoothing Surfaces
Start by sanding all wooden parts with medium-grit sandpaper. This removes splinters and evens the surface. Then use fine-grit sandpaper for a smooth finish. Sand in the direction of the wood grain. Wipe away dust with a clean cloth before moving on.
Applying Paint Or Stain
Choose paint or stain based on your style and bathroom theme. Use a brush or cloth to apply thin, even coats. Let each coat dry completely before adding the next. Stain highlights wood grain, while paint covers it for a solid color. Apply at least two coats for best results.
Sealing And Protecting
Seal the cabinet with a water-resistant finish like polyurethane. This stops water from damaging the wood. Apply two to three coats, allowing each layer to dry well. Lightly sand between coats for a smooth surface. This step keeps your vanity cabinet looking great longer.
Installing The Vanity Cabinet
Installing the vanity cabinet is a key step in your bathroom project. This stage sets the foundation for a sturdy and functional space. Proper installation ensures the cabinet stays in place and connects smoothly to plumbing. Follow clear steps for a professional look and long-lasting results.
Positioning And Securing
Place the cabinet against the wall where you want it. Check that it is level using a spirit level. Adjust the cabinet feet or use shims if needed. Mark the wall studs behind the cabinet for secure fixing. Drill pilot holes through the cabinet back into the studs. Use strong screws to attach the cabinet firmly to the wall. Make sure the cabinet does not move when pushed.
Connecting Plumbing Fixtures
Turn off the main water supply before starting. Connect the water supply lines to the faucet carefully. Use plumber’s tape on threads to avoid leaks. Attach the drain pipe to the sink drain securely. Check all connections for tightness but do not overtighten. Open the water supply slowly and watch for leaks. Fix any leaks before proceeding to the next step.
Final Adjustments
Check the cabinet doors and drawers for smooth operation. Adjust hinges and slides to align doors properly. Clean any dust or debris from installation. Apply caulk around the cabinet edges to seal gaps. Let the caulk dry completely for a neat finish. Step back and admire your new vanity cabinet.
Maintenance Tips
Maintaining your bathroom vanity cabinet keeps it looking new and working well. Regular care prevents damage and extends its life. Follow simple tips to keep your vanity clean and strong. Small efforts save you time and money later.
Cleaning And Care
Use a soft cloth to wipe the surface daily. Avoid harsh chemicals that can damage the finish. Warm water with mild soap works best for cleaning. Dry the cabinet after cleaning to stop water damage. Clean spills quickly to prevent stains and warping. Use coasters or mats under toiletries to protect the surface.
Handling Repairs
Fix loose handles or hinges as soon as possible. Tighten screws carefully to avoid stripping them. For scratches, use a matching wood filler or touch-up pen. Replace damaged parts with similar materials to keep the look uniform. Check for water leaks under the sink regularly. Prompt repairs stop small problems from growing bigger.
Frequently Asked Questions
What Materials Are Best For Bathroom Vanity Cabinets?
Wood, plywood, and MDF are popular for vanities due to durability and moisture resistance. Solid wood offers strength, while plywood resists warping. MDF is budget-friendly but less moisture-resistant. Choose materials that withstand bathroom humidity to ensure longevity and maintain appearance.
How Do I Measure Space For A Vanity Cabinet?
Measure the bathroom wall width, height, and depth carefully. Account for plumbing clearance and door swing space. Accurate measurements prevent fitting issues and ensure the vanity suits your bathroom layout perfectly. Double-check dimensions before purchasing or building.
Can I Install A Vanity Cabinet Myself?
Yes, with basic carpentry skills and tools, you can install a vanity. Follow instructions, secure plumbing connections, and level the cabinet properly. DIY installation saves money and offers customization but requires careful planning and safety precautions.
What Tools Are Needed To Build A Vanity Cabinet?
Essential tools include a saw, drill, screwdriver, measuring tape, level, clamps, and sander. These tools help cut, assemble, and finish the cabinet accurately. Having the right tools ensures a professional-looking build and smooth assembly process.
Conclusion
Building your own bathroom vanity cabinet saves money and adds personal style. You control the size, color, and design to fit your space. The process teaches useful skills and gives a sense of pride. Take your time and follow each step carefully.
Soon, you will enjoy a new, custom cabinet in your bathroom. Ready to start your project? This guide will help you every step of the way.