Is your outdoor timber furniture looking tired and worn out? You don’t have to replace it just yet.
With a few simple steps, you can bring back its natural beauty and make it the centerpiece of your garden or patio again. Imagine relaxing on wood that feels smooth, looks fresh, and stands strong against the weather. Ready to transform your furniture and enjoy it for years to come?
Keep reading, and you’ll discover easy, effective ways to restore your outdoor timber furniture like a pro.
Credit: thetimberdoctor.co.nz
Assessing Furniture Condition
Assessing the condition of outdoor timber furniture is the first step in restoration. This process helps you understand what repairs and cleaning the furniture needs. Careful checking can save time and effort later. It also ensures the best results for your furniture’s look and durability.
Start with a close look. Notice any signs of damage or wear. Knowing the type of wood and finish also helps choose the right products and methods for restoration.
Checking For Damage
Look closely for cracks, splits, or loose joints. Tap the wood lightly to hear if it sounds hollow. A hollow sound may mean internal rot. Check for insect holes or signs of mold. These problems need fixing before restoring the surface.
Identifying Wood Type
Knowing the wood type helps pick the right cleaner and finish. Common outdoor woods include teak, cedar, and eucalyptus. Each wood has different needs. Teak is oily and needs special oils. Cedar is soft and can be sanded gently.
Evaluating Finish Wear
Look at the furniture’s surface for peeling or faded finish. Sun and rain cause the finish to wear out. A worn finish can make wood dry and crack. Decide if you need to strip old finish or just clean it. This step guides your restoration plan.
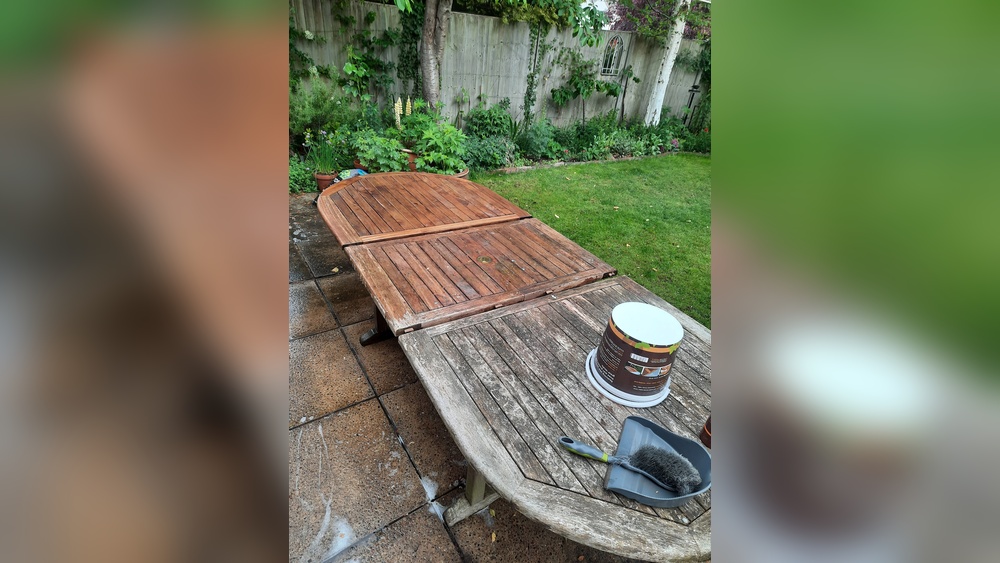
Gathering Restoration Tools
Restoring outdoor timber furniture starts with gathering the right tools. Proper tools make the job easier and improve results. Having everything ready avoids delays and frustration. This section covers key tools for cleaning, sanding, and protecting your timber furniture.
Essential Cleaning Supplies
Cleaning removes dirt, mold, and old finishes. Use a soft-bristle brush to scrub the wood gently. Mild soap mixed with water works well for washing. A bucket and sponge help apply the solution evenly. Rinse thoroughly with clean water. Avoid harsh chemicals that can damage wood.
Sanding Materials
Sanding smooths rough spots and removes old paint or varnish. Select sandpaper with medium grit, about 120 to 150. A sanding block or an electric sander speeds up the work. Sand along the wood grain to prevent scratches. Wear a dust mask to protect your lungs from fine dust.
Protective Coatings
Protective coatings keep timber safe from weather damage. Choose a wood sealant, varnish, or outdoor oil. These coatings prevent moisture and sun damage. Apply with a clean brush or cloth for even coverage. Follow the product instructions for drying times and reapplication.
Cleaning And Preparing
Cleaning and preparing your outdoor timber furniture is the first step to restoring its natural beauty. Dirt, grime, and mold can hide beneath the surface. These must be removed to protect the wood and ensure a smooth finish. Proper cleaning also helps the wood absorb treatments better. Take your time to get this step right.
Removing Dirt And Grime
Start by brushing off loose dirt with a soft brush. Use a mild soap mixed with water to wash the wood. A sponge or cloth works well for this. Avoid harsh chemicals that can damage the timber. Rinse the furniture with clean water and let the excess water drain away. Repeat if the surface still feels sticky or dirty.
Treating Mold And Mildew
Mold and mildew appear as black or green spots on timber. Mix one part white vinegar with three parts water in a spray bottle. Spray the affected areas and let it sit for 10 minutes. Use a soft brush to scrub the spots gently. Rinse with water and remove all residue. This method kills spores and stops mold from growing back.
Drying And Surface Prep
Allow the furniture to dry completely in a shaded area. Direct sunlight can cause cracks or warping. Once dry, lightly sand the timber with fine-grit sandpaper. Sanding removes old finishes and smooths rough patches. Wipe off dust with a damp cloth before applying any treatment. A clean surface ensures better adhesion and a longer-lasting finish.

Credit: www.reddit.com
Sanding And Repairing
Restoring outdoor timber furniture starts with sanding and repairing. These steps prepare the wood for finishing and help the furniture last longer. Proper sanding smooths rough surfaces and removes old paint or stains. Repairing fixes damage like cracks and broken parts. This process makes the furniture safe and strong again.
Sanding Techniques
Begin sanding with coarse sandpaper to remove rough spots. Use 80-grit paper for old finishes or deep scratches. Sand along the wood grain to avoid scratches. After the coarse sanding, switch to finer sandpaper. Use 120-grit or 150-grit paper to smooth the surface. Sand evenly to create a clean and smooth finish. Wipe off dust with a damp cloth before repairing or finishing.
Fixing Cracks And Splits
Small cracks need filling to stop them from growing. Use wood filler or epoxy putty for these gaps. Press the filler into the crack with a putty knife. Let it dry fully, then sand it smooth. For larger splits, use wood glue and clamps. Apply glue inside the split, then clamp tightly. Leave it to dry for several hours. Remove clamps and sand the area to blend with the rest of the wood.
Replacing Broken Parts
Broken legs or slats need replacement for safety. Remove the damaged parts carefully with tools. Measure and cut new wood pieces to match the originals. Use strong wood that fits the furniture style. Attach new parts with screws or wood glue. Ensure all joints are tight and stable. Sand the new wood to match the rest of the furniture. This step keeps your furniture strong and attractive.
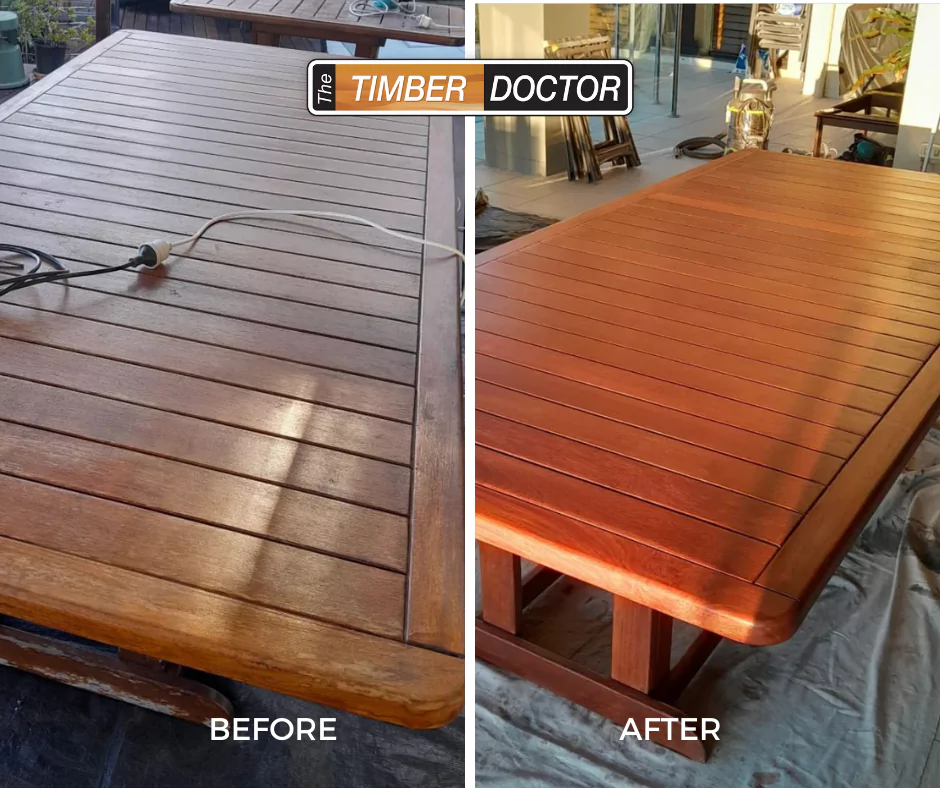
Applying Finish
Applying finish is a key step in restoring outdoor timber furniture. It protects the wood and improves its look. A good finish helps the wood last longer against rain, sun, and dirt. Taking time to apply the right finish makes your furniture beautiful and strong.
Choosing The Right Stain Or Paint
Select a stain or paint made for outdoor use. Stains soak into the wood and keep its natural look. Paint covers the wood and adds color. Pick a product with UV protection to avoid fading. Test on a small area first to see the color and finish.
Sealing For Weather Protection
Seal the wood after staining or painting. A sealer stops water from entering the wood. It also prevents cracking and peeling. Use a clear outdoor sealer or one with a slight tint. Apply it evenly with a brush or cloth. Let it dry well before using the furniture.
Multiple Coats And Drying Time
Apply at least two coats of stain, paint, or sealer. Multiple coats give better protection and color depth. Wait the recommended time between coats. Usually, this is a few hours to a day. Make sure each coat is dry before adding the next. This ensures a strong, smooth finish.

Credit: www.youtube.com
Maintenance Tips
Maintaining outdoor timber furniture helps keep it strong and good-looking. Regular care stops damage from weather and dirt. Follow these tips to make your furniture last longer.
Regular Cleaning Routine
Clean timber furniture often to avoid dirt build-up. Use a soft brush or cloth to remove dust and debris. Wash with mild soap and water. Rinse well and dry with a towel. Avoid harsh cleaners that can harm the wood.
Seasonal Care Advice
Check your furniture each season for cracks or damage. Sand rough spots gently to smooth the surface. Apply a fresh coat of wood oil or sealant to protect against moisture. Keep an eye on joints and screws; tighten if needed. This care keeps the wood strong through weather changes.
Storage Recommendations
Store timber furniture indoors during cold or wet months. Use furniture covers if indoor storage is not possible. Place furniture on a dry, flat surface to prevent warping. Avoid direct contact with the ground to stop moisture damage. Good storage helps keep your furniture in top shape.
Frequently Asked Questions
How Do I Clean Outdoor Timber Furniture Before Restoring?
Start by removing dirt and debris with a soft brush or cloth. Use mild soapy water to wash the surface. Rinse thoroughly with clean water and let it dry completely. Proper cleaning ensures better absorption of restoration products and a longer-lasting finish.
What Products Are Best For Restoring Timber Furniture?
Use teak oil, wood stain, or specialized timber restorers. Choose products designed for outdoor use to protect against moisture and UV damage. Always follow manufacturer instructions for application. These products enhance wood appearance and extend furniture lifespan.
How Often Should Outdoor Timber Furniture Be Restored?
Restore outdoor timber furniture every 1 to 2 years. Frequency depends on weather exposure and wood condition. Regular maintenance prevents damage and keeps furniture looking fresh. Inspect your furniture seasonally to decide if restoration is needed.
Can I Restore Outdoor Timber Furniture Myself?
Yes, restoring timber furniture is a DIY-friendly task. Basic tools like sandpaper, brushes, and protective gloves are needed. Follow step-by-step guides for sanding, cleaning, and applying finishes. DIY restoration saves money and personalizes your furniture care.
Conclusion
Restoring outdoor timber furniture takes time and care. Start with cleaning to remove dirt and old finishes. Sand the wood gently for a smooth surface. Use quality wood oil or sealant to protect it. Regular maintenance keeps your furniture looking fresh and strong.
Enjoy your outdoor space with beautiful, restored timber pieces. Small efforts bring big results. Keep your furniture safe from weather damage. Your outdoor area will feel cozy and inviting again.


