Is your outdoor wood furniture looking tired and worn out? You don’t have to replace it just yet.
With a little care and the right steps, you can bring back its natural beauty and make it shine like new again. Imagine relaxing on your freshly revived deck chair or hosting friends around a restored wooden table that looks stunning.
In this guide, you’ll discover simple, effective ways to breathe new life into your outdoor wood pieces. Keep reading, and you’ll learn how to protect your investment and enjoy your furniture for many more seasons to come.
Assessing Wood Furniture Condition
Assessing the condition of your outdoor wood furniture is the first step to bring it back to life. This process helps you understand what kind of care and repair the wood needs. Careful examination can save time and effort later.
Checking For Damage And Wear
Look closely at the furniture for cracks, splits, or rot. Check for loose joints or broken parts. Notice any areas where the wood feels soft or crumbly. These signs show damage that needs repair. Also, examine the surface for scratches or fading caused by weather.
Identifying Wood Type
Different woods need different care. Identify if the wood is hardwood or softwood. Common outdoor woods include teak, cedar, and pine. Teak is oily and resists water well. Cedar is light and smells nice but can fade. Knowing the wood helps choose the right cleaning and finishing products.
Evaluating Previous Finishes
Look at the old finish on the furniture. Is it paint, stain, or varnish? Check if it is peeling, cracking, or worn away. This shows if the finish still protects the wood. Some finishes may need removal before applying a new coat. Understanding the finish guides the restoration process.

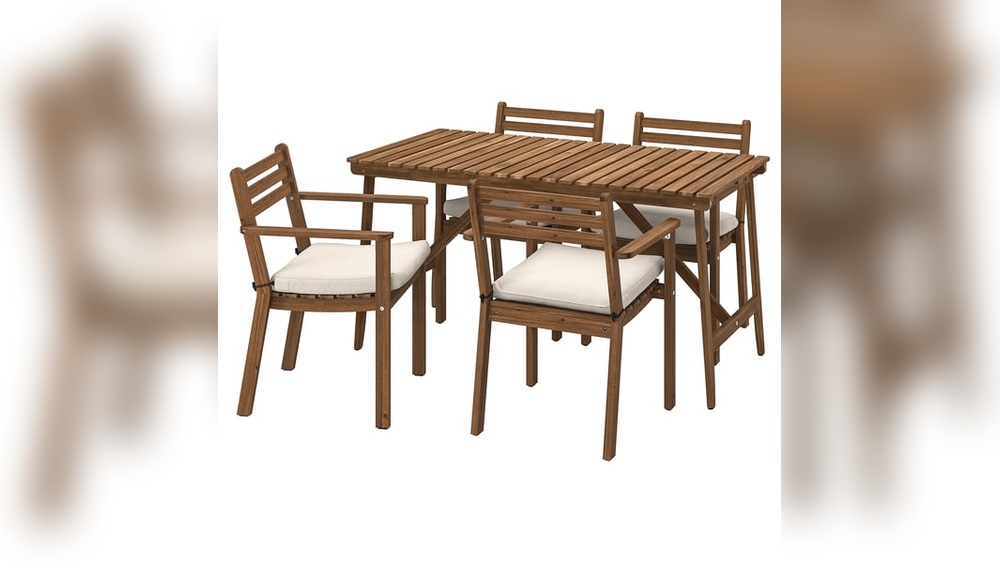
Credit: www.reddit.com
Gathering Necessary Tools And Materials
Before you start reviving your outdoor wood furniture, gather all the tools and materials needed. Having everything ready makes the process smooth and efficient. It also helps avoid interruptions while working. Preparation is key to a successful restoration project.
Essential Cleaning Supplies
Start with basic cleaning supplies to remove dirt and grime. Use a soft brush or cloth to clean the wood surface gently. Mild soap mixed with water works well to avoid damage. A bucket, sponge, and garden hose can help rinse off the soap. Avoid harsh chemicals that can harm the wood or finish.
Sanding And Repair Tools
Sanding restores the wood’s smooth texture and removes old finishes. Use sandpaper with different grits, starting coarse and finishing fine. A sanding block or electric sander speeds up the work. Have wood filler or putty on hand to fix cracks or holes. A putty knife helps apply filler evenly. Make sure to wear a dust mask to protect your lungs.
Finishing Products
Choose the right finish to protect and beautify your furniture. Outdoor wood needs sealers, stains, or varnishes designed for weather resistance. Brushes or foam applicators apply these finishes smoothly. Use clean cloths to wipe off excess finish or to blend colors. Proper finishing extends the life of your furniture and keeps it looking fresh.
Cleaning And Preparing The Surface
Cleaning and preparing the surface is the first step to restore outdoor wood furniture. This step removes dirt, grime, and unwanted growth that damage the wood. A clean surface helps paint or sealant stick better. It also reveals any repairs needed before finishing.
Removing Dirt And Grime
Start by brushing off loose dirt with a soft brush or cloth. Use a mixture of mild soap and warm water to scrub the wood gently. Avoid harsh cleaners that can harm the wood fibers. Rinse the surface well with clean water to remove soap residue. Let the furniture dry completely before moving on.
Treating Mold And Mildew
Mold and mildew can cause stains and weaken wood. Mix one part white vinegar with three parts water for a natural cleaner. Apply the solution to affected areas using a spray bottle or cloth. Let it sit for 10 minutes to kill spores. Scrub gently with a soft brush, then rinse off with water. Repeat if needed until the wood looks clean.
Drying And Inspecting
Dry the furniture in a shaded, well-ventilated area. Avoid direct sunlight, which can cause cracking. Check the wood for cracks, splinters, or loose joints. Mark areas needing repair before applying any finishes. Proper drying and inspection ensure a smooth restoration process.
Repairing Damages
Repairing damages is an important step to bring outdoor wood furniture back to life. It helps keep the furniture strong and safe to use. Small problems can turn into bigger issues if left alone. Fixing cracks, replacing broken parts, and filling holes can make your furniture look new again. These repairs extend the life of your wood furniture and keep it looking nice for years.
Fixing Cracks And Splits
Cracks and splits often happen from weather changes or old age. Use wood glue to fill small cracks. Apply glue inside the crack and press the wood together. Hold it in place with clamps until dry. For bigger splits, use wood filler or putty. Sand the area smooth after it dries. This stops cracks from getting worse and keeps the wood strong.
Replacing Broken Parts
Broken parts like legs or slats need replacement to keep furniture stable. Remove the damaged piece carefully. Measure and cut a new part from similar wood. Attach it with screws or wood glue. Check that the furniture sits evenly on the ground. Replacing broken parts prevents accidents and keeps the furniture safe to use.
Filling Holes And Gaps
Holes and gaps can collect water and cause more damage. Use wood filler to fill small holes and gaps. Press the filler into the area and smooth it out with a putty knife. Let it dry completely, then sand it smooth. Filling these spaces protects the wood from moisture and insects. It also gives a clean, finished look to the furniture.
Sanding Techniques For Smooth Finish
Sanding is a key step to bring back the beauty of outdoor wood furniture. It removes old finishes and smooths rough spots. Good sanding creates a perfect surface for new paint or stain. This helps the wood last longer and look fresh.
Choosing The Right Grit
Select the correct sandpaper grit for each sanding stage. Start with coarse grit like 80 to remove old paint or deep scratches. Next, use medium grit such as 120 for smoothing the surface. Finish with fine grit 220 to get a soft, even finish. Using the right grit prevents damage and saves time.
Sanding Tips And Tricks
Sand along the grain of the wood, not against it. This avoids scratches and rough patches. Keep the sandpaper moving steadily and avoid pressing too hard. Change sandpaper often when it wears out. Use a sanding block or electric sander for better control and even results. Take breaks to check your progress.
Cleaning After Sanding
Clear all dust and debris before finishing the wood. Use a brush or vacuum to remove loose particles. Wipe the surface with a damp cloth to catch fine dust. Let the wood dry completely to prevent moisture problems. Clean wood helps paint or stain stick better and last longer.
Applying Protective Finishes
Applying protective finishes is key to making outdoor wood furniture last longer. These finishes shield wood from sun, rain, and dirt. They also bring out the natural beauty of the wood. Proper application keeps your furniture looking fresh and strong.
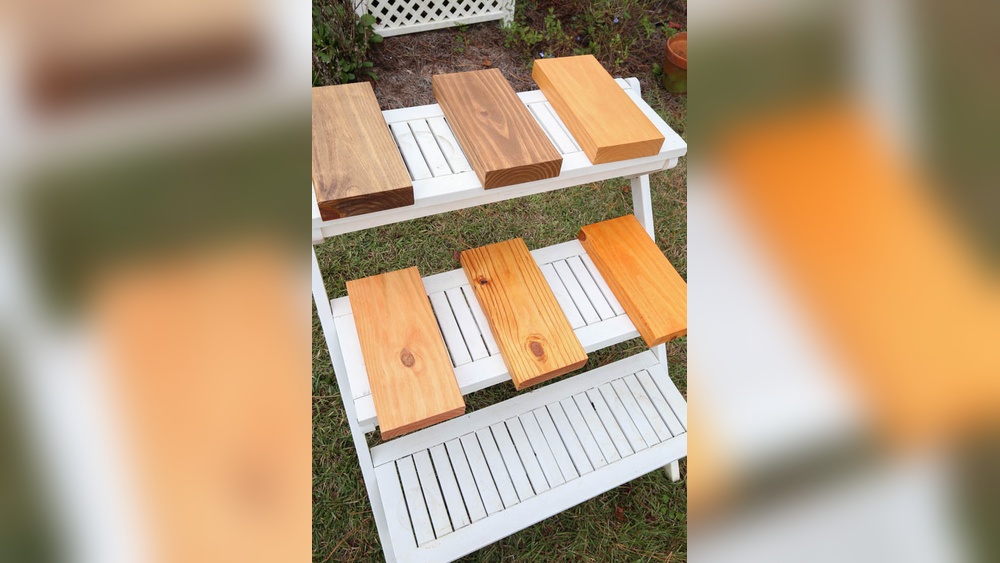
Selecting Stains And Sealers
Choose a stain that matches your wood type and outdoor style. Oil-based stains offer deep color and water resistance. Water-based stains dry faster and have less odor. Sealers create a clear layer that blocks moisture and sun damage. Pick a sealer with UV protection for best results. Make sure the product suits outdoor use.
Step-by-step Application
Start by cleaning the furniture with a mild soap and water. Let it dry completely before applying any finish. Use a brush or cloth to apply the stain evenly. Follow the wood grain for a smooth look. Allow the stain to soak in for 10 to 15 minutes. Wipe off extra stain with a clean cloth. After the stain dries, apply the sealer in thin coats. Wait at least two hours between coats. Apply 2 to 3 coats for strong protection.
Curing And Maintenance Tips
Let the finish cure in a dry, shaded area. Avoid using the furniture for 24 to 48 hours. Check the finish yearly for signs of wear or peeling. Clean the furniture gently with soap and water. Reapply stain or sealer every 1 to 2 years. This keeps the wood safe from weather damage. Cover furniture during heavy rain or winter months for extra care.
Preventing Future Damage
Preventing future damage to outdoor wood furniture helps keep it strong and beautiful. Wood faces sun, rain, dirt, and bugs outside. Protecting wood extends its life and saves money on repairs or replacements.
Using Covers And Placement Tips
Use covers made for outdoor furniture to block sun and rain. Covers stop water from soaking into the wood. Choose breathable covers to avoid mold growth. Place furniture in shaded areas to reduce sun damage. Avoid placing furniture directly on the ground. Use pads or feet to prevent moisture from seeping up.
Routine Cleaning And Upkeep
Clean wood furniture regularly with mild soap and water. Remove dirt and debris to prevent scratches and stains. Dry furniture completely after cleaning to stop mold. Check for loose screws or cracks. Tighten screws and fill cracks to keep furniture safe and stable.
Seasonal Care Guidelines
Before winter, clean and dry furniture thoroughly. Apply a protective sealant to block moisture and cold damage. Store furniture indoors or in a dry place during harsh weather. In spring, inspect for damage and reapply sealant if needed. Seasonal care keeps wood strong year-round.
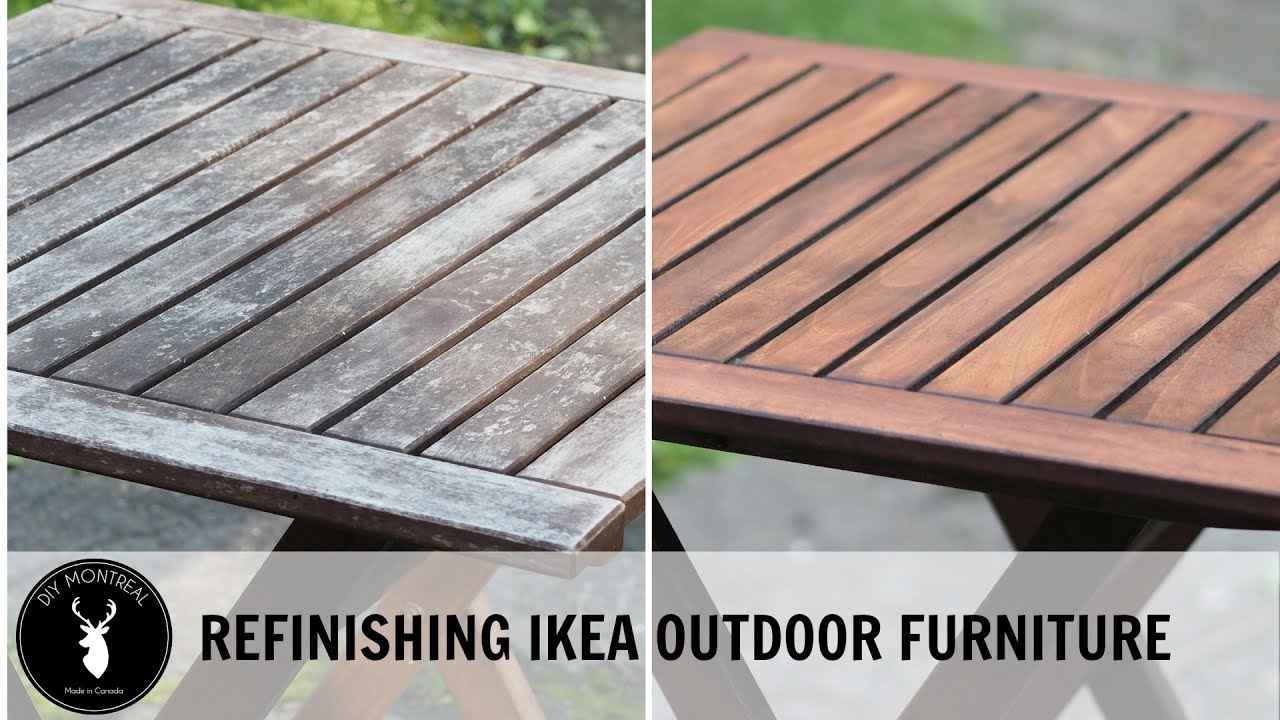
Credit: www.youtube.com
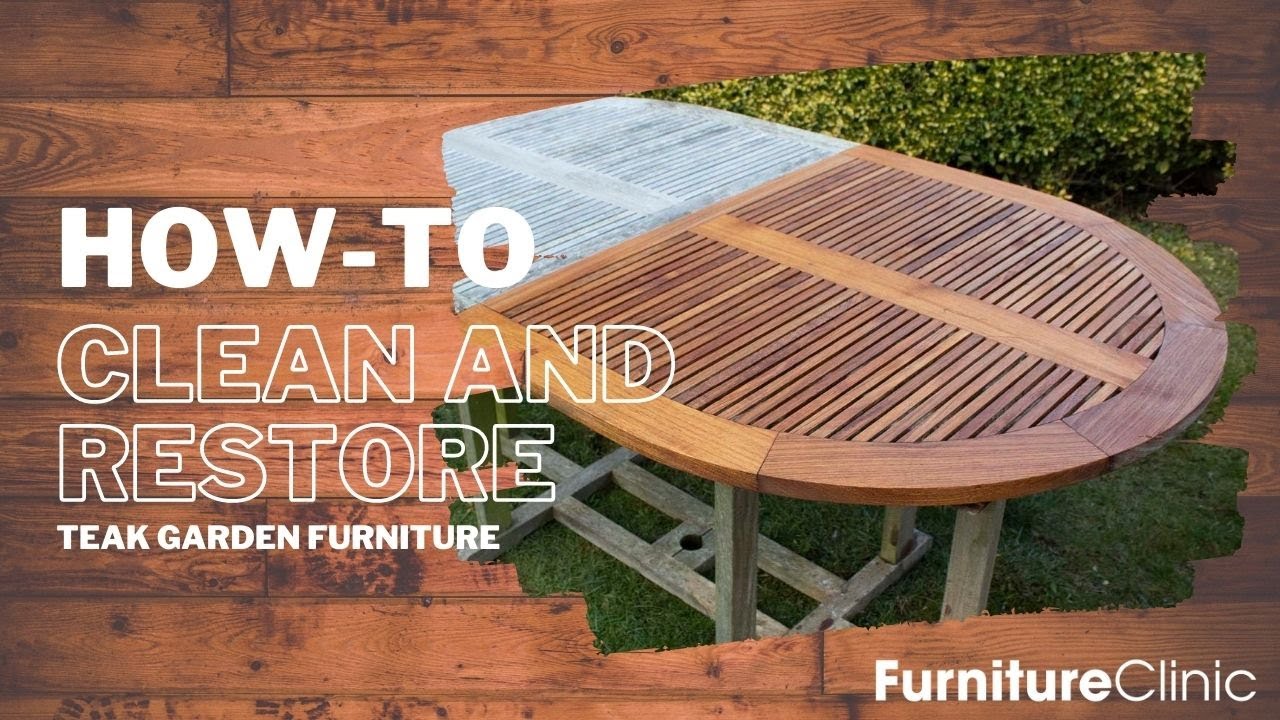
Credit: www.youtube.com
Frequently Asked Questions
How Do I Clean Outdoor Wood Furniture Before Reviving It?
Start by removing dirt and debris with a soft brush. Use mild soap and water to wash the surface. Rinse thoroughly and let it dry completely before any restoration.
What Products Restore Outdoor Wood Furniture Effectively?
Use wood cleaners, brighteners, and restorers designed for outdoor wood. These products remove stains and revive wood’s natural color. Always follow manufacturer instructions for best results.
Can Sanding Improve The Look Of Weathered Wood Furniture?
Yes, sanding removes rough patches and old finishes. Use fine-grit sandpaper gently to avoid damaging the wood. Sanding helps smooth the surface for better stain or paint application.
How Often Should I Seal Outdoor Wood Furniture?
Seal your wood furniture annually or every two years. Regular sealing protects against moisture, UV rays, and prevents cracking. Choose a quality outdoor wood sealant for long-lasting protection.
Conclusion
Reviving outdoor wood furniture takes time and care. Clean the wood gently and remove dirt. Sand rough spots to smooth the surface. Apply a good wood oil or sealant. Let it dry fully before use. Regular care will keep your furniture strong.
Enjoy your refreshed furniture for many seasons. Small steps bring big improvements. Keep your outdoor space cozy and inviting. Wood furniture can look new again. You just need patience and effort.