Are you looking to give your outdoor furniture a fresh, personalized look without spending a fortune? Stenciling is a simple and fun way to transform plain pieces into eye-catching accents for your patio or garden.
Whether you want bold patterns or subtle designs, this method lets you add your unique touch quickly and easily. In this guide, you’ll discover step-by-step tips to stencil your outdoor furniture like a pro, making your space inviting and stylish.
Ready to turn your furniture into a creative masterpiece? Let’s dive in!
Choosing The Right Furniture
Choosing the right outdoor furniture is key before starting your stenciling project. The furniture’s material and style affect how well the stencil will look and last outside. Picking the right pieces makes your work easier and your result more beautiful.
Materials That Work Best
Wood is a top choice for stenciling. It holds paint well and gives a smooth finish. Cedar and teak resist weather damage, making them durable options. Metal furniture also works but needs a clean, rust-free surface. Plastic pieces can be tricky. Use special paints for plastics to avoid peeling. Avoid glass or very rough surfaces. They do not hold stencil paint properly.
Styles That Suit Stenciling
Simple designs suit stenciling best. Flat surfaces show patterns clearly. Avoid furniture with many curves or carvings. They make painting difficult and uneven. Choose tables, benches, or chairs with wide panels. These give enough space for your stencil design. Classic or modern styles both work well. Pick what matches your outdoor space and taste.
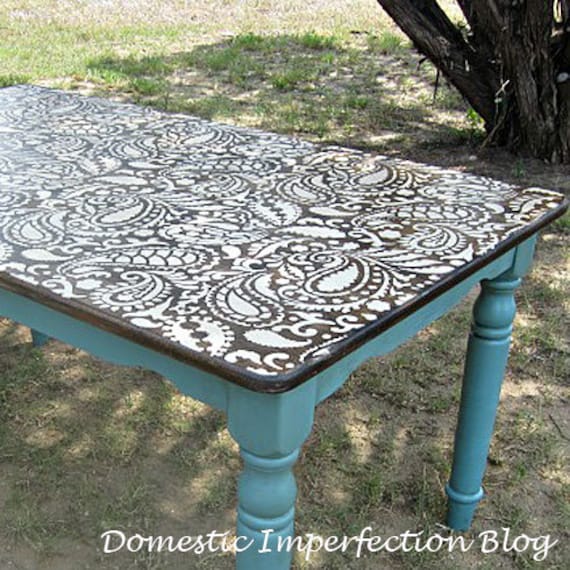
Credit: www.etsy.com
Gathering Supplies
Gathering the right supplies is the first step to stencil outdoor furniture. Good supplies make the project easier and the results last longer. Prepare everything before you start to avoid delays. Choose tools and materials designed for outdoor use.
Essential Tools And Paints
Start with clean brushes or sponges for smooth paint application. Painter’s tape helps keep stencils in place. Use sandpaper to prep the furniture surface. Select outdoor paint that resists weather and fading. Acrylic latex paint works well on wood and metal. Choose colors that match your style and the environment. A small container for paint makes it easier to handle.
Selecting Durable Stencils
Pick stencils made from plastic or mylar for reusability and durability. These materials hold up well against paint and cleaning. Choose stencil sizes that fit your furniture pieces. Simple patterns work best for outdoor furniture. Avoid intricate designs that can be hard to paint evenly. Durable stencils save time and prevent paint bleeding.
Preparing The Surface
Preparing the surface is the first step in stenciling outdoor furniture. A clean and smooth surface helps the stencil paint stick better. It also makes the design look clear and sharp. Taking time to prepare the furniture properly will make your stencil last longer.
Cleaning And Sanding Tips
Start by wiping the furniture with a damp cloth to remove dirt and dust. Use mild soap if the surface is very dirty. Let it dry completely before sanding. Light sanding removes old paint and rough spots. Use fine-grit sandpaper for a smooth finish. Always sand in the direction of the wood grain. Wipe the surface again to clear away sanding dust.
Priming For Longevity
Apply a primer made for outdoor use. Primer helps paint stick and prevents peeling. Use a brush or spray for even coverage. Let the primer dry fully before stenciling. A good primer also protects your furniture from weather damage. This step ensures your stencil art stays beautiful for a long time.

Credit: fortunoffbys.com
Stencil Techniques
Stencil techniques help you decorate outdoor furniture with style. They make your designs clear and neat. Using the right methods keeps paint from bleeding. It also makes your work look professional.
Small details matter. Taking care with stencil placement and painting improves the final look. Let’s explore key steps to get perfect results.
Positioning And Securing Stencils
Place the stencil flat on the furniture surface. Make sure it does not move during painting. Use painter’s tape to hold it in place. Tape the edges firmly but avoid curling the stencil.
Check the stencil alignment before painting. Adjust it to match your design plan. Press down any air bubbles under the stencil. This prevents paint from leaking underneath.
Painting Methods For Clean Lines
Use a stencil brush or a small sponge for best results. Dab paint lightly instead of brushing it on. This stops paint from spreading under the stencil.
Apply paint in thin layers. Let each layer dry before adding more. Remove the stencil carefully while the paint is still wet. This keeps edges sharp and clean.
Creative Design Ideas
Creative design ideas bring life to your outdoor furniture. They make your space unique and inviting. Simple stencils can turn plain chairs or tables into art pieces. Choose designs that match your style and outdoor vibe. Experimenting with patterns and colors helps create a fresh look. Let your imagination guide your project.
Pattern Suggestions
Geometric shapes like triangles and circles add a modern touch. Floral patterns bring a natural, soft feel to furniture. Stripes or chevrons create a bold and clean look. Animal prints offer a playful and wild style. Mandalas and intricate designs give a boho, artistic vibe. Choose patterns that fit your space and personality.
Color Combinations To Try
Bright colors like turquoise and coral brighten up any furniture piece. Soft pastels create a calm and cozy atmosphere. Black and white always look crisp and stylish. Earth tones blend well with natural surroundings. Mix a dark base with light stencil colors for contrast. Use colors that match your outdoor decor and mood.
Sealing And Protecting
Sealing and protecting your stenciled outdoor furniture extends its life and beauty. The paint needs a strong barrier against rain, sun, and wear. Proper sealing stops fading and peeling. It also keeps your design sharp and fresh. A good sealant adds a smooth finish that looks great and lasts long.
Choosing The Right Sealant
Select a sealant made for outdoor use. Look for water-resistant and UV-protective features. Clear acrylic sealants work well on wood and metal. Polyurethane sealants offer strong protection but may yellow over time. Avoid sealants that stay sticky or peel easily. Choose one that dries fast and feels smooth. Check if the sealant is easy to apply with a brush or spray.
Application Tips For Outdoor Use
Clean furniture thoroughly before sealing. Make sure the paint is fully dry. Apply sealant in thin, even coats. Let each coat dry completely before the next. Avoid sealing in direct sunlight or high humidity. Work in a well-ventilated area for safety. Use a fine brush for edges and details. Two to three coats usually provide enough protection. Let the furniture cure for a few days before use.
Maintenance Tips
Maintaining stenciled outdoor furniture keeps it looking fresh and vibrant longer. Proper care protects the paint and the stencil design from fading or chipping. Simple steps help preserve your furniture’s beauty through all seasons.
Cleaning Stenciled Furniture
Clean your furniture gently to avoid damaging the stencil. Use a soft cloth or sponge with mild soap and water. Avoid harsh chemicals or scrubbing too hard. Rinse with clean water and dry with a towel. Do this regularly to remove dirt and dust buildup.
Touch-up Tricks
Small chips or scratches can be fixed easily. Keep some leftover paint from your stencil project. Use a fine brush to carefully touch up any damaged areas. Let the paint dry fully before using the furniture again. This keeps the design sharp and the color bright.

Credit: www.creativeramblingsblog.com
Frequently Asked Questions
How Do I Prepare Outdoor Furniture For Stenciling?
Clean the furniture thoroughly to remove dirt and dust. Sand the surface lightly for better paint adhesion. Ensure the piece is dry before starting the stenciling process for optimal results.
What Type Of Paint Works Best For Outdoor Stencils?
Use weather-resistant acrylic or outdoor spray paint. These paints withstand sun, rain, and temperature changes. They provide vibrant colors and long-lasting durability on outdoor furniture.
How Can I Prevent Paint From Bleeding Under The Stencil?
Secure the stencil firmly with painter’s tape. Use a stencil brush or sponge with minimal paint. Apply paint in light layers and allow drying between coats to avoid bleeding.
How Long Should I Wait Before Using Stenciled Furniture?
Allow the paint to dry completely, usually 24 hours. This ensures the design sets and resists smudging. Avoid heavy use until the paint is fully cured.
Conclusion
Stencil painting adds charm to outdoor furniture easily. Choose the right stencil and paint for best results. Clean the surface well before starting your design. Take your time to apply paint carefully and evenly. Let the paint dry fully to avoid smudges.
Enjoy your refreshed furniture with a fresh, personal touch. This simple project makes outdoor spaces feel warm and inviting. Try different patterns to match your style and mood. Stenciling brings fun and creativity to your outdoor decor.