Looking for a smart way to keep your entryway neat and stylish? Building a built-in coat rack might be just what you need.
Imagine having a dedicated space where your coats, hats, and bags stay organized and easy to grab when you’re heading out the door. In this guide, you’ll discover simple steps to create a custom coat rack that fits perfectly in your home.
Whether you’re a beginner or have some DIY experience, you’ll find tips and tricks that make the process smooth and rewarding. Ready to transform your cluttered hallway into a tidy, welcoming space? Let’s get started!

Credit: www.reddit.com
Planning Your Coat Rack
Planning your built-in coat rack is the first step to a successful project. Careful planning saves time and prevents mistakes. It helps you create a coat rack that fits perfectly and looks great.
This section guides you through choosing the right location, measuring space accurately, and selecting materials and tools. These steps make building easier and more organized.
Choosing The Right Location
Pick a spot near your door or hallway for easy access. Ensure the wall can support hooks and shelves. Avoid places with electrical wiring or plumbing inside the wall. A visible area helps keep coats tidy and ready to grab.
Measuring Space Accurately
Use a tape measure to find the exact width, height, and depth of the space. Write down the numbers to avoid errors. Measure twice to be sure. Accurate measurements help your coat rack fit the space well and look balanced.
Selecting Materials And Tools
Choose wood or MDF for a sturdy coat rack. Pick paint or stain that matches your room’s style. Get hooks that hold heavy coats without bending. Tools like a drill, level, and screwdriver make building easier and safer.
Designing The Rack
Designing the built-in coat rack is the first step to a useful addition. Think about the space where you want it. Consider how many coats, hats, and bags you need to store daily. A good design fits your needs and the room style.
Keep the design simple and clear. It should make your entryway tidy and easy to use. Planning well saves time and money during building.
Deciding On Style And Size
Choose a style that matches your home’s look. Modern, rustic, or classic? Size matters too. Measure your wall and think about how much space coats take. A narrow rack works for small spaces. Larger racks suit big families.
Incorporating Shelves And Hooks
Add shelves above or below for hats and gloves. Hooks must be strong and spaced well. Mix small and big hooks for different items. Shelves keep small things neat and easy to find.
Customizing For Functionality
Think about extra features. A bench can add seating and storage. Use baskets or bins for scarves and mittens. Lighting inside the rack helps find items quickly. Customize the rack to fit your daily routine.
Preparing The Space
Preparing the space is the first step to building a built-in coat rack. It sets the stage for a smooth and safe project. Taking time here helps avoid mistakes and saves effort later.
Focus on clearing the area, marking your workspace, and checking for wall studs. Also, gather all necessary safety equipment before starting any work.
Clearing And Marking The Area
Remove furniture and objects near your work area. A clean space helps you move freely and work safely. Use a pencil and level to mark where the coat rack will go. Clear markings guide your cuts and placement.
Checking For Wall Studs
Use a stud finder to locate wall studs behind drywall. Studs provide strong support for heavy coats. Mark stud locations clearly on the wall. Avoid drilling into wires or pipes hidden inside walls.
Gathering Safety Equipment
Collect gloves, safety glasses, and a dust mask. Protect your eyes and hands from splinters and dust. A mask keeps you safe from breathing in particles. Safety first ensures a smooth build process.

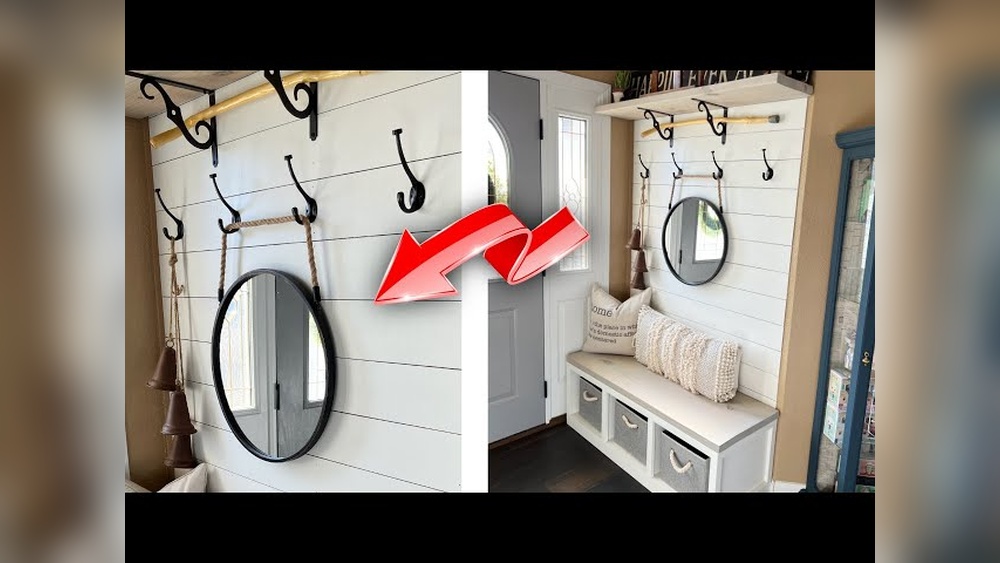
Credit: www.youtube.com
Building The Frame
Building the frame is the first key step to creating your built-in coat rack. This part forms the skeleton of your project. It holds everything together and supports the weight of coats and bags. Taking care in this stage ensures your coat rack stays strong and lasts long.
Cutting And Assembling Wood Pieces
Start by measuring the space for your coat rack. Cut wood pieces to fit those exact dimensions. Use a saw and wear safety gear for protection. Assemble the cut pieces using wood glue and screws. Make sure edges line up evenly. A square tool helps keep corners at right angles. This makes the frame strong and neat.
Securing The Frame To The Wall
Find the wall studs with a stud finder. Mark the stud locations on the wall. Hold the frame in place and drill pilot holes. Use long screws to attach the frame to the studs. This gives solid support for heavy coats. Avoid using only drywall anchors as they may not hold well.
Ensuring Stability And Level
Use a level to check the frame’s alignment. Adjust as needed before fully tightening screws. Make sure the frame is not leaning or tilted. Stability prevents wobbling or damage over time. Add extra brackets if the frame feels loose. This step guarantees a safe and durable coat rack.
Adding Storage Features
Adding storage features to your built-in coat rack makes it more useful and organized. You can keep coats, hats, scarves, and other items tidy. Proper storage helps save space and keeps your entryway neat.
Installing Hooks And Rods
Hooks and rods are essential for hanging coats and bags. Choose sturdy hooks that hold heavy items well. Space hooks evenly for easy access. A rod can hold hangers for jackets or umbrellas. Fix hooks and rods securely into wall studs for strength.
Adding Shelves Or Cubbies
Shelves and cubbies add extra space for shoes, hats, or gloves. Build shelves above or below the hooks for storage. Cubbies work well for small items and keep things separated. Use strong wood or materials that support weight. Make shelves deep enough to hold items without falling.
Finishing Touches With Trim
Trim gives your coat rack a clean, polished look. Use molding around edges to hide gaps and rough cuts. Paint or stain the trim to match the room’s style. Smooth edges and corners improve safety. Trim also helps your coat rack blend with other furniture.

Credit: www.nikola-electric.co.uk
Finishing And Styling
Finishing and styling your built-in coat rack gives it a polished look. This step protects the wood and makes the rack last longer. It also lets you match the rack to your room’s style. Follow these tips to create a beautiful and functional piece.
Sanding And Painting
Start by sanding the wood smooth. Use fine-grit sandpaper for the best finish. Sand all surfaces, edges, and corners carefully. Remove dust with a clean cloth before painting.
Apply a primer if painting to help the paint stick well. Use even strokes to avoid drips. Let the paint dry completely before adding another coat. Two coats usually give the best coverage.
Choosing Paint Or Stain
Pick paint for a solid color and modern look. Paint hides wood grain and offers many color options. Choose stain to show the wood’s natural beauty. Stains bring out the grain and add warmth.
Use a water-based paint or stain for easy cleanup. Match the finish to your room’s style and existing furniture. Glossy paint shines and is easy to clean. Matte paint looks soft and hides flaws.
Decorating For Visual Appeal
Add hooks that fit your style and needs. Metal hooks offer strength and a classic look. Wooden hooks blend in for a subtle touch. Space hooks evenly for a balanced appearance.
Consider adding a shelf above for storage or decor. Use baskets or boxes on the shelf to keep things tidy. Decorate with small plants or artwork to brighten the space.
Maintaining Your Coat Rack
Maintaining your built-in coat rack helps it last longer and stay useful. Regular care keeps it looking good and working well. Simple steps prevent damage and keep your rack strong.
Cleaning Tips
Dust the coat rack with a soft cloth often. Use mild soap and water for sticky spots. Avoid harsh chemicals that can damage the finish. Dry the surface quickly to stop water marks. Clean hooks carefully to keep them shiny and rust-free.
Handling Repairs
Check the rack for loose screws or hooks regularly. Tighten screws with a screwdriver to avoid wobbles. Replace broken hooks with similar ones for a good fit. Fill small scratches with matching wood filler or paint. Fix any damage soon to stop it from getting worse.
Updating For Changing Needs
Add more hooks if your family grows or changes. Swap old hooks for stronger or stylish ones to refresh the look. Paint the rack a new color to match your room. Attach small shelves or baskets for extra storage. Adjust your rack to fit your daily use better.
Frequently Asked Questions
What Materials Are Needed To Build A Built-in Coat Rack?
You need wood panels, screws, a drill, hooks, paint or stain, and mounting brackets. Quality materials ensure durability and a professional finish.
How Much Time Does Building A Built-in Coat Rack Take?
Typically, it takes 3 to 5 hours depending on skill level and design complexity. Proper planning reduces build time and errors.
Can I Customize The Size Of A Built-in Coat Rack?
Yes, you can adjust height, width, and depth to fit your space perfectly. Customization maximizes storage and aesthetic appeal.
What Tools Are Essential For Building A Built-in Coat Rack?
A drill, saw, measuring tape, level, screwdriver, and sandpaper are essential. These tools help create precise cuts and secure assembly.
Conclusion
Building a built-in coat rack adds both style and function to your home. It keeps your space neat and saves room. You can choose the design and size that fits your needs. With basic tools and steps, anyone can create one.
Enjoy a tidy entryway and easy access to your coats. Start your project today and see the difference it makes. Simple, practical, and useful. A great addition to any home.