Looking for a unique way to organize your books and add charm to your space? Turning a ladder into a bookshelf is a simple, creative project you can do yourself.
Imagine transforming an ordinary ladder into a stylish display for your favorite reads and décor. In this guide, you’ll discover easy steps to make a ladder bookshelf that fits your style and space perfectly. Ready to give your room a fresh look while keeping your books within arm’s reach?
Let’s get started!
Choosing The Right Ladder
Choosing the right ladder is important for making a sturdy and attractive bookshelf. The ladder should fit your space and hold your books safely. Picking the right type also helps your shelf look great in your room.
Material Options
Ladders come in wood, metal, and plastic. Wood looks warm and natural. Metal offers a modern and strong frame. Plastic ladders are light but less durable. Choose material that matches your room’s style and needs.
Size And Height Considerations
Measure the space where you want the shelf. The ladder height must fit well in that area. Too tall or too short ladders can look odd or be unsafe. Also, check the width to make sure it holds enough books.
Condition And Stability
Pick a ladder that is sturdy and safe. Avoid ladders with cracks or loose parts. Test the ladder by pressing on steps to check stability. A strong ladder keeps your books safe and prevents accidents.

Credit: www.amazon.com
Gathering Necessary Tools And Supplies
Before starting your ladder bookshelf project, gather all necessary tools and supplies. Having everything ready saves time and avoids interruptions. It also ensures a smooth building process and better results.
Organize your workspace and check each item. This way, you can focus on creating a beautiful and safe bookshelf.
Basic Tools Needed
Start with common tools like a drill and screwdriver. A measuring tape helps with accurate cuts and placements. Sandpaper smooths rough edges and prepares surfaces for paint or stain. A saw is essential if you need to cut wood shelves. Clamps hold pieces together while you work. A pencil marks measurements and drill points.
Additional Materials
You need wood boards for shelves that fit your ladder size. Screws and nails hold everything firmly. Wood glue adds extra strength to joints. Paint or wood stain finishes the look and protects the wood. Optional brackets can secure shelves to the ladder for more support.
Safety Equipment
Protect your eyes with safety goggles during drilling or sanding. Wear gloves to avoid splinters and cuts. Use a dust mask to prevent inhaling sawdust. Work in a well-ventilated area to avoid fumes from paint or glue. Keep a first aid kit nearby for minor injuries.
Preparing The Ladder
Preparing the ladder is the first step in turning it into a stylish bookshelf. This stage ensures the ladder is safe, clean, and ready for use. Careful preparation helps your bookshelf last longer and look great. Follow these steps to prepare your ladder properly.
Cleaning And Sanding
Start by cleaning the ladder thoroughly. Remove dirt, dust, and grease using a damp cloth. Let it dry completely before moving on. Next, sand the ladder to smooth rough spots. Use medium-grit sandpaper for old paint or splinters. Sanding also helps new paint stick better.
Removing Unwanted Parts
Check the ladder for any parts you don’t need. Remove hooks, nails, or broken rungs carefully. Use a screwdriver or pliers as needed. This step makes the ladder safer and gives it a cleaner look. Make sure the structure stays strong after removal.
Applying Primer Or Paint
Apply a coat of primer to the ladder for better paint adhesion. Use a brush or spray primer evenly on all surfaces. Let the primer dry fully before painting. Choose paint that matches your room style. Apply at least two coats for a smooth finish. Allow each coat to dry well before the next.
Credit: www.youtube.com
Designing The Bookshelf Layout
Designing the bookshelf layout is an important step to turn your ladder into a functional piece. It affects both how much you can store and how your shelf looks. Careful planning helps create a balanced and useful bookshelf.
Shelf Placement Ideas
Start by deciding how many shelves you want. Place shelves where the ladder steps are wide and strong. Vary the height between shelves to hold different book sizes. Leave some space for decorations or small plants. Think about the items you want to display.
Maximizing Space
Use the entire ladder length to add shelves. Add vertical dividers for better book support. Fit shelves tightly without crowding. Use the bottom shelves for heavy books and top for lighter items. Consider adding baskets for small items. This saves room and keeps things tidy.
Balancing Aesthetics And Function
Match shelf colors with your room’s style. Keep the design simple and neat. Mix books with decorative objects to avoid clutter. Leave some empty space for a clean look. Make sure shelves are easy to reach. A good balance makes the bookshelf both pretty and useful.
Installing Shelves On The Ladder
Installing shelves on your ladder transforms it into a practical bookshelf. This step needs care and precision. Proper shelves add strength and style to your project.
Choosing Shelf Materials
Pick materials that hold books well. Wood is popular for its strength and look. Plywood is lighter and easy to cut. Consider the thickness to support your items. Smooth surfaces help keep books safe.
Measuring And Cutting Shelves
Measure the ladder width between the sides. Add a little space for easy fitting. Mark the wood with a pencil for accuracy. Use a saw to cut straight lines. Sand edges to avoid splinters and give a clean finish.
Securing Shelves In Place
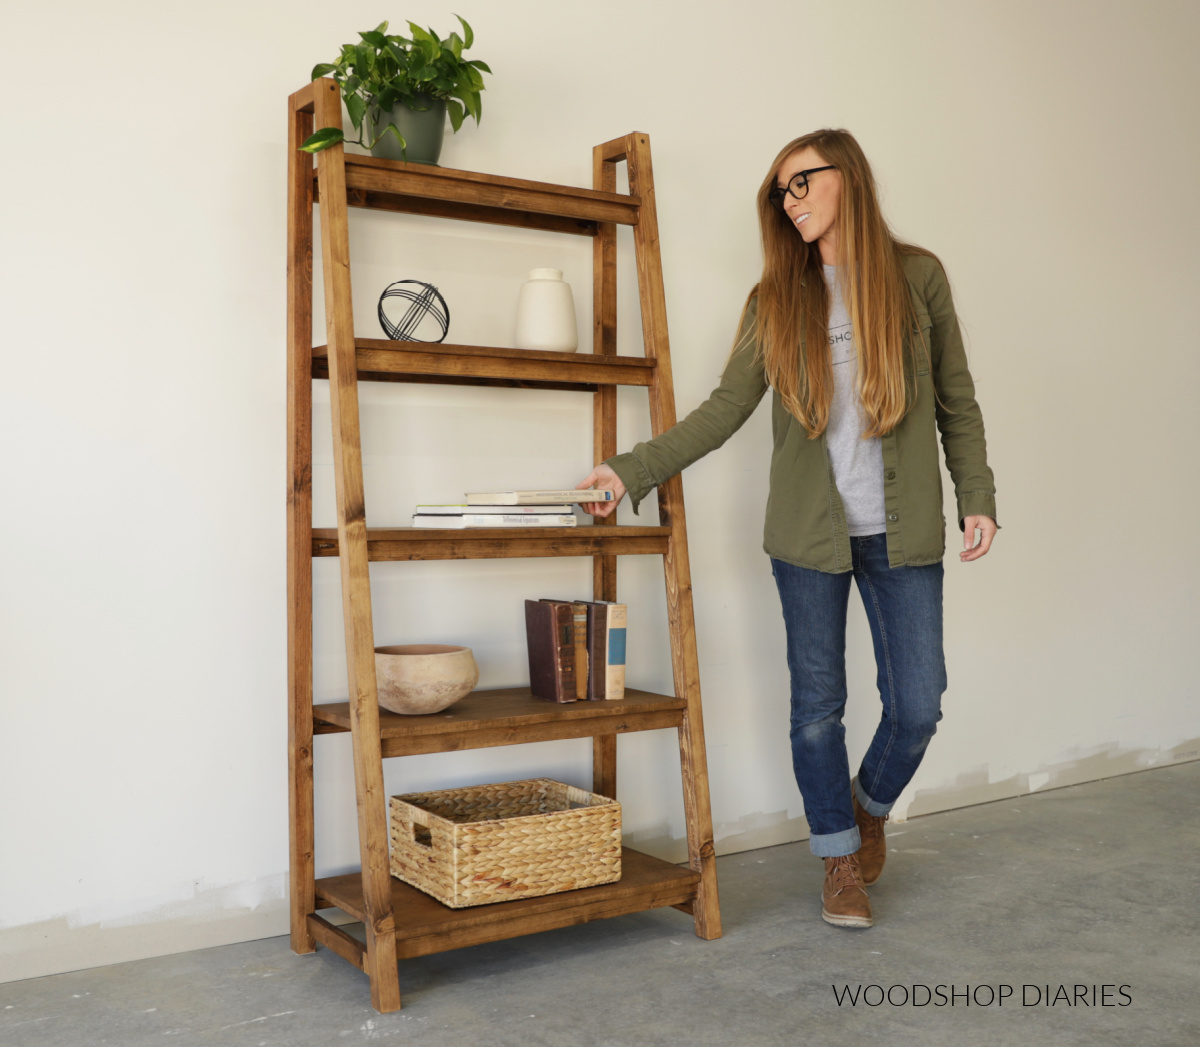
Place the shelves on the ladder steps or between the rails. Use screws or brackets to hold shelves firmly. Pre-drill holes to prevent wood from splitting. Check each shelf for level before tightening. Ensure shelves do not wobble or tilt.
Credit: www.woodshopdiaries.com
Finishing Touches
Finishing touches make your ladder bookshelf look complete and polished. These steps improve its style and strength. Small details create a big difference in the final result. Focus on painting, decoration, and stability to ensure your project lasts long and looks great.
Painting And Sealing
Start by choosing the right paint color for your ladder. Pick something that matches your room’s style. Use a brush or spray paint for even coverage. Let the paint dry completely before moving on.
After painting, apply a clear sealant. This protects the wood from scratches and moisture. Use a sealant made for wood surfaces. It keeps your bookshelf looking new for years.
Adding Decorative Elements
Decorate your ladder bookshelf with small touches. Attach hooks or small baskets to store tiny items. Use washi tape or stencils to add patterns or designs. These additions make the shelf unique and personal.
Place plants or picture frames on the shelves. These items bring life and color to the space. Keep decorations simple to avoid clutter.
Ensuring Stability
Check the ladder’s balance before use. Add rubber pads to the feet to prevent slipping. Secure the ladder to the wall using brackets or straps. This stops it from tipping over.
Test the shelf by placing books and items on it gently. Make sure it holds weight without wobbling. Safety is key for a functional bookshelf.
Styling Your Ladder Bookshelf
Styling your ladder bookshelf turns a simple storage piece into a focal point. It can reflect your personality and taste. The right style makes your space feel cozy and organized. Keep balance in mind to avoid clutter. Use both books and decor to create interest.
Think about colors, shapes, and textures. Mix items to keep the look fresh. A well-styled ladder shelf invites people to explore.
Arranging Books And Decor
Place books both vertically and horizontally to add variety. Stack some books flat to create platforms for small decor. Use bookends to keep books upright and neat. Add small plants for a touch of green and life. Mix in photo frames, candles, or art pieces. Leave some space empty to avoid crowding. Group items in odd numbers for a natural feel.
Incorporating Lighting
Lighting highlights your ladder shelf and items on it. Use string lights wrapped gently around the frame. Small LED spotlights work well on top shelves. Battery-operated lamps are easy to place anywhere. Warm light creates a cozy atmosphere. Lighting helps showcase favorite books and decor clearly.
Maintenance Tips
Dust the shelf regularly to keep it clean. Use a soft cloth to avoid scratches. Check for loose screws or unstable parts often. Rearrange items sometimes to refresh the look. Avoid placing heavy objects on thin steps. Keep the shelf away from direct sunlight to prevent fading. A tidy shelf lasts longer and looks better.
Frequently Asked Questions
How Do I Convert A Ladder Into A Bookshelf?
To convert a ladder into a bookshelf, clean and sand it first. Then, secure wooden planks across the rungs. Finally, paint or stain for a finished look.
What Materials Are Needed For A Ladder Bookshelf?
You need a wooden ladder, wooden planks, screws, a drill, sandpaper, paint or stain, and a measuring tape.
Is It Safe To Use An Old Ladder For Shelving?
Yes, if the ladder is sturdy and free of cracks. Inspect it carefully before use for safety and durability.
How Much Weight Can A Ladder Bookshelf Hold?
Weight capacity depends on ladder type and plank strength. Typically, it can hold 20-50 pounds per shelf safely.
Conclusion
Turning a ladder into a bookshelf is a smart way to save space. It adds charm and function to any room. You only need a few tools and some creativity. This project suits beginners and experts alike. Enjoy organizing your books and decorations in a unique way.
Try it yourself and see how it changes your space. A simple ladder can become a stylish, useful shelf. Why not give it a shot today?