Are you looking to give your bookshelf a fresh, polished look while keeping your favorite items dust-free? Adding cabinet doors to your bookshelf is a simple and effective way to transform its style and functionality.
Imagine turning that open shelf into a sleek storage space that hides clutter but still showcases your personality. In this guide, you’ll discover easy steps to add cabinet doors yourself—no special skills needed. Keep reading, and you’ll learn how to upgrade your bookshelf quickly and confidently.
Choosing Cabinet Doors
Choosing the right cabinet doors for your bookshelf changes its look and function. The perfect doors protect your books and hide clutter. They also add style to your space. Focus on material, size, and design to find the best fit. Simple steps help you pick doors that match your needs and room decor.
Materials And Styles
Cabinet doors come in many materials. Wood offers a classic, warm look. MDF doors are smooth and easy to paint. Glass doors show off your books and keep dust away. Metal doors add a modern touch. Styles vary from shaker to flat panel or louvered. Choose a style that suits your room’s vibe and your taste.
Measuring Your Bookshelf
Measure the width and height of your bookshelf opening carefully. Check the depth to make sure doors will fit well. Measure twice to avoid mistakes. Decide if you want one door or two smaller ones. Accurate measurements ensure the doors close properly and look balanced.
Matching Doors To Decor
Match your cabinet doors to the room style. Wood doors fit rustic or traditional rooms. Sleek MDF or glass doors suit modern spaces. Consider the color of existing furniture and walls. Choose a finish that blends or stands out as you prefer. The right match creates a harmonious look in your home.

Credit: www.youtube.com
Tools And Supplies Needed
Adding cabinet doors to a bookshelf needs some specific tools and supplies. Having the right items makes the job easier and safer. You will spend less time fixing mistakes or searching for tools.
This section lists the basic tools, extra hardware, and safety gear needed for this project. Prepare everything before you start to work smoothly.
Basic Tools List
- Measuring tape to get exact door and shelf sizes
- Pencil for marking places on wood
- Drill with bits for making holes
- Screwdriver to fasten screws
- Level to keep doors straight
- Clamps to hold pieces steady
- Saw to cut doors if needed
- Sanding block for smooth edges
Additional Hardware
- Cabinet hinges for door attachment
- Screws that fit hinges and bookshelf
- Cabinet door handles or knobs
- Magnetic catches or latches to keep doors closed
- Wood filler to fix holes or gaps
Safety Gear
- Safety glasses to protect eyes from dust and wood chips
- Work gloves to avoid splinters and cuts
- Dust mask to prevent breathing sawdust
- Ear protection if using loud power tools
Preparing The Bookshelf
Preparing the bookshelf is a key step before adding cabinet doors. This step makes sure the doors fit well and look great. It includes clearing the shelf, marking where the doors go, and sanding the wood. Each part helps make the project easier and results better.
Clearing And Cleaning
Start by removing all items from the bookshelf. Empty shelves give you space to work safely. Use a soft cloth to clean dust and dirt. Clean surfaces help paint and glue stick better. A clean shelf also shows any damage you may need to fix.
Marking Door Placement
Measure the height and width of each shelf opening. Use a pencil to mark where the doors will go. Mark the edges clearly for easy reference. Check that the marks are straight and even. Correct marks prevent doors from fitting badly later.
Sanding And Priming
Use fine sandpaper to smooth the areas where doors attach. Sanding removes rough spots and old paint. Clean dust off after sanding with a dry cloth. Apply a primer coat to the wood next. Primer helps the paint stick and last longer.
Installing Hinges
Installing hinges is a key step in adding cabinet doors to your bookshelf. It helps the doors open and close smoothly. Proper hinge installation ensures your doors stay aligned and work well for years. This section guides you through choosing hinges, marking positions, and attaching them correctly.
Selecting The Right Hinges
Choose hinges that match your door size and weight. For most bookshelf doors, concealed hinges work best. They offer a clean look and hide the hardware. Make sure the hinges fit your shelf’s thickness. Pick durable metal hinges for long-lasting use.
Marking Hinge Positions
Start by measuring the door height. Mark hinge spots about 2 to 3 inches from the top and bottom edges. Use a pencil for light marks you can erase later. Align the hinge edges with your marks. Double-check the measurements before drilling.
Attaching Hinges To Doors And Shelf
First, attach hinges to the door using screws. Drill small pilot holes to prevent wood splitting. Screw the hinges firmly but avoid overtightening. Next, hold the door against the shelf frame. Mark where the hinges meet the shelf. Drill pilot holes and screw hinges to the shelf. Test the door’s movement and adjust if needed.
Mounting The Cabinet Doors
Mounting cabinet doors on your bookshelf is a key step. It turns an open shelf into a neat storage space. Proper mounting ensures the doors work smoothly and look good. Follow these steps carefully for best results.
Aligning Doors On Bookshelf
Start by placing the doors next to the bookshelf. Check the gap between the door and the shelf edge. The gap should be even on all sides. Use small spacers or shims to hold the doors in place. Make sure the doors are straight and level. Adjust until you see a perfect fit.
Securing Doors With Screws
Once aligned, open the door slightly. Use a drill to attach the hinges to the bookshelf. Insert screws slowly to avoid splitting the wood. Tighten screws firmly but not too hard. Check that the hinges hold the door without wobbling. Repeat this for all doors.
Checking Door Movement
Open and close each door several times. The doors should swing smoothly without sticking. Listen for any unusual noise or resistance. Adjust the hinges if the door rubs or hangs unevenly. Confirm the doors close flush with the shelf frame. This step ensures long-lasting, functional cabinet doors.
.jpg)
Credit: themerrythought.com
Adding Handles And Finishing Touches
Adding handles and finishing touches is the final step in transforming your bookshelf. These small details make a big difference in style and function. Handles help open the cabinet doors easily. Finishing touches protect the wood and bring out its beauty.
Choosing Handles Or Knobs
Pick handles or knobs that match your room’s style. Simple round knobs suit classic designs. Sleek bar handles fit modern looks. Consider the size and shape for comfort. Choose metal, wood, or plastic based on your taste. Test a few options before making a final choice.
Installing Hardware
Mark the spots for screws carefully. Use a drill to make small pilot holes. Attach the handles or knobs with screws tightly. Check that each handle is straight and secure. Avoid overtightening to prevent damage. Test the doors to ensure smooth opening.
Painting Or Staining
Paint or stain enhances the look of your doors. Use a brush or cloth for even coverage. Choose a color or stain that complements the bookshelf. Apply thin coats and let each dry well. Sand lightly between coats for a smooth finish. Seal with a clear coat for protection.
Troubleshooting Common Issues
Adding cabinet doors to a bookshelf can improve its look and function. Sometimes, small problems happen during or after installation. These issues can stop your doors from working well. Fixing them is not hard. This section covers common problems and easy fixes. Follow these tips to keep your cabinet doors smooth and neat.
Fixing Misaligned Doors
Misaligned doors look uneven and may not close right. Start by checking the hinges. Loose screws often cause misalignment. Tighten all screws carefully. If the door still sits wrong, try adjusting the hinge position. Move the door slightly left, right, up, or down. Test the door after each move. Use a level to check if the door is straight. Keep adjusting until the door fits well.
Adjusting Hinges
Hinges control how doors open and close. Some hinges have small screws to adjust the door’s position. Use a screwdriver to turn these screws slowly. One screw moves the door in and out. Another moves it side to side. The last screw can move the door up or down. Adjust each screw a little at a time. Check the door’s movement often. Proper hinge adjustment makes doors open smoothly.
Dealing With Gaps
Gaps between doors or between the door and shelf look bad. Measure the gap size first. Small gaps can close by tightening hinge screws. For bigger gaps, check if the door is warped or the shelf is uneven. Use thin strips of wood or weather stripping to fill gaps. Place these strips along the edges inside the cabinet. This stops dust and keeps the door snug. Adjust the door and hinges if gaps remain.
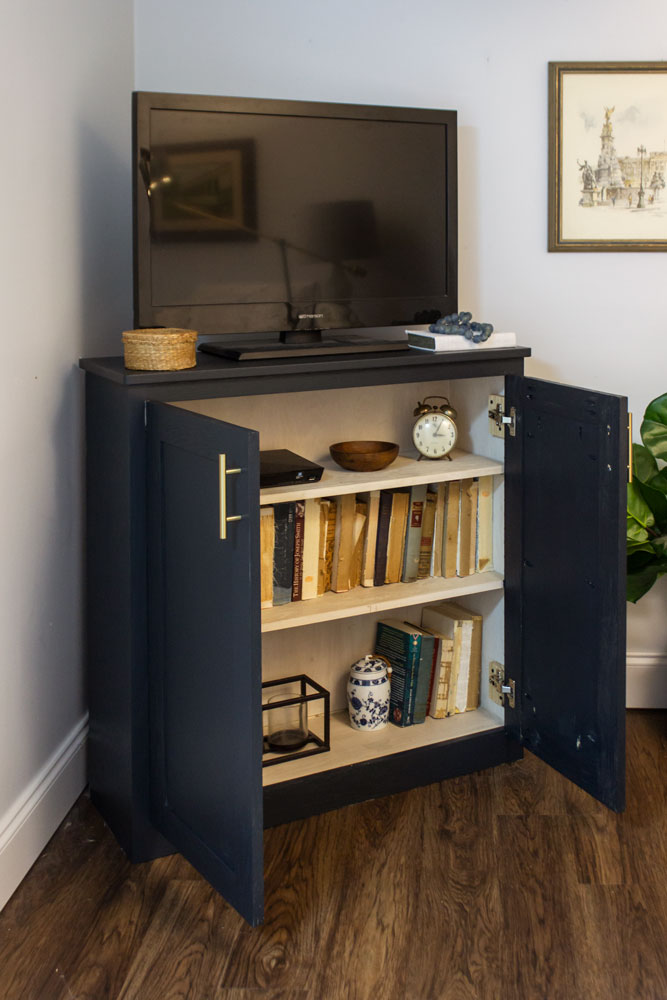
Credit: www.shadesofblueinteriors.com
Frequently Asked Questions
How Do I Measure For Cabinet Doors On A Bookshelf?
Measure the bookshelf opening’s height and width accurately. Subtract a small gap for door clearance. This ensures a perfect door fit and smooth operation.
What Materials Are Best For Bookshelf Cabinet Doors?
Use solid wood, plywood, or MDF for durability and style. Choose materials that match your bookshelf’s design and finish for a cohesive look.
How Do I Install Hinges For Bookshelf Cabinet Doors?
Mark hinge positions evenly on door and bookshelf frame. Pre-drill holes and secure hinges with screws. Proper alignment ensures smooth door movement.
Can I Add Glass Doors To My Bookshelf?
Yes, glass doors add elegance and visibility. Use tempered glass for safety. Frame the glass with wood or metal for stability.
Conclusion
Adding cabinet doors to a bookshelf is simple and practical. It helps keep your items neat and dust-free. You can choose doors that match your room style. Measure carefully and follow the steps for the best fit. Taking time ensures a clean, professional look.
Enjoy your new, organized space with hidden storage. A small change can make a big difference in your home. Try this easy project to improve your bookshelf today.