Are you looking to create the perfect bunk bed for your American Girl doll? Imagine giving your doll a cozy, stylish place to sleep that you built yourself.
Building a doll bunk bed is easier than you think, and it can be a fun project that brings your creativity to life. In this guide, you’ll find simple steps and helpful tips to make a sturdy, beautiful bunk bed your doll will love.
Keep reading, and you’ll be surprised at how quickly you can turn basic materials into a special piece for your collection.
Materials Needed
Gathering the right materials is the first step in building an American Girl doll bunk bed. The right supplies make the project easier and the final product stronger. This section lists all materials needed for a smooth build.
Wood Pieces
Choose lightweight wood like pine or balsa. Cut pieces for the bed frame, ladder, and guardrails. Smooth edges prevent splinters and improve safety.
Wood Glue And Nails
Wood glue holds pieces firmly together. Small nails add extra strength. Both help create a sturdy bunk bed.
Sandpaper
Use fine-grit sandpaper to smooth rough surfaces. It prepares wood for painting and reduces splinters.
Paint And Brushes
Pick non-toxic paint safe for children. Use small brushes for detailed work. Paint adds color and protects wood.
Measuring Tools
A ruler, tape measure, and pencil help ensure accurate cuts. Precise measurements are key for a good fit.
Clamps
Clamps hold wood pieces steady while glue dries. They keep parts aligned for better assembly.
Protective Gear
Wear safety glasses and a dust mask. Protect your eyes and lungs during sanding and cutting.
Choosing The Right Wood
Choosing the right wood is important for building a sturdy American Girl Doll bunk bed. The wood type affects the bed’s strength, appearance, and ease of work. Picking the right wood ensures the bed lasts long and looks great in the doll’s room.
Different woods have different qualities. Some woods are very strong but hard to cut. Others are soft and easy to shape but less durable. Knowing these qualities helps in making the best choice for your project.
Hardwood Vs. Softwood
Hardwood comes from trees with broad leaves. It is usually stronger and lasts longer. Oak, maple, and cherry are common hardwoods. Softwood comes from trees with needles, like pine and cedar. Softwood is lighter and easier to cut.
Hardwood is best for a bed that needs extra strength. Softwood works well if you want a lighter bed or need easier handling. Both can be painted or stained nicely.
Wood Grain And Texture
Wood grain shows the pattern on the wood surface. Some grains are smooth, some are rough. A smooth grain looks clean and is easier to paint. A rough grain adds a natural look but may need more sanding.
Choose wood with a grain that fits your style. Smooth wood helps if you plan to paint the bed. Visible grains can add charm if you prefer a natural look.
Cost And Availability
Wood prices vary a lot. Hardwoods usually cost more than softwoods. Check local stores for available wood types and prices. Buying local wood saves money and supports local suppliers.
Choose wood that fits your budget and is easy to get. This helps finish your project without delay or extra cost.
Tools Required
Building an American Girl doll bunk bed needs basic tools like a saw, hammer, and screws. Simple measuring tools help keep parts even and fit well. Safety gear such as gloves and goggles is important for protection.
Essential Hand Tools
Start with basic hand tools. A hammer is needed for small nails and wood pieces. A screwdriver helps to fasten screws securely. A tape measure ensures all parts are the right size. A pencil marks cutting lines clearly.
Power Tools
A power drill speeds up making holes and driving screws. A jigsaw cuts wood into the right shapes. A sander smooths rough edges for a nice finish. These tools save time and effort.
Safety Gear
Wear safety glasses to protect eyes from dust and splinters. Use gloves to avoid cuts and scrapes. A dust mask keeps you safe from breathing sawdust. Safety comes first during every step.
Wood boards of the right size form the bed frame. Screws and nails hold everything together. Sandpaper helps to smooth surfaces. Paint or stain gives the bunk bed a nice look.
Measuring And Cutting Pieces
Measuring and cutting pieces is the first big step in building an American Girl Doll bunk bed. Accurate measurements ensure the bed fits the dolls perfectly. Cutting the wood pieces right makes assembly easier and safer. Take your time with this step. It sets the base for the whole project.
Start by gathering all tools and materials. A tape measure, pencil, and saw are essential. Clear workspace helps keep everything organized. Mark each piece clearly before cutting. Double-check your measurements to avoid mistakes.
Measuring Each Piece Carefully
Measure twice, cut once. This old saying holds true here. Measure the length, width, and height of each part. Use the doll’s size as a guide. Make notes on your wood pieces. Label each measurement to avoid confusion later.
Marking The Wood For Cutting
Use a pencil to draw straight lines where cuts will go. A ruler or square helps keep lines straight. Mark both sides of the wood. Clear marks help guide your saw. This keeps cuts clean and precise.
Cutting Wood Pieces Safely
Wear safety glasses and gloves while cutting. Use a small saw for better control. Cut slowly along your marked lines. Smooth rough edges with sandpaper after cutting. Clean edges make the bed look neat and fit well.
Assembling The Frame
Assembling the frame is the first step in building an American Girl doll bunk bed. It sets the base for the entire project. A sturdy frame ensures the bed will hold the dolls safely and look great.
Start by organizing all the wood pieces and hardware. Check that you have all parts before you begin. This saves time and avoids frustration during assembly.
Preparing The Wood Pieces
Sand the edges of each wood piece to remove rough spots. Smooth surfaces help prevent splinters and improve the finish. Label each piece with a marker to match the instructions.
Connecting The Bed Rails
Attach the side rails to the headboard and footboard using screws. Use a screwdriver or drill to tighten the screws firmly. Make sure the rails are aligned and level.
Securing The Support Slats
Lay the support slats evenly across the bed frame. Screw each slat into the side rails to hold them in place. These slats will support the mattress and keep it from sagging.
Double-check The Frame Stability
Press gently on different parts of the frame to test its strength. Tighten any loose screws or connections. A stable frame keeps the bunk bed safe for play.
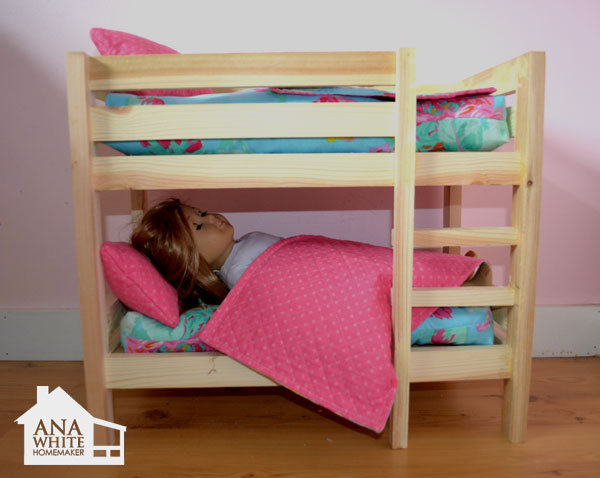
Credit: www.ana-white.com
Adding Support Slats
Adding support slats is a key step in building a sturdy American Girl doll bunk bed. These slats hold the mattress and make sure the bed stays strong. Without good support slats, the bed can sag or break easily.
Support slats spread the weight evenly. They stop the mattress from falling through the frame. Properly placed slats also keep the bed frame from bending or wobbling. This part of the build needs careful measuring and cutting.
Choosing The Right Wood For Support Slats
Pick wood that is strong but not too heavy. Pine or poplar works well. These woods are easy to cut and smooth. Avoid soft woods that might bend or crack under weight.
Measuring And Cutting Slats Accurately
Measure the inside width of the bed frame. Cut the slats a little shorter to fit comfortably. Use a saw for straight cuts. Smooth the edges with sandpaper to avoid splinters.
Spacing The Slats Evenly
Space the slats about 2 to 3 inches apart. This spacing supports the mattress well. It also lets air flow under the mattress. Use a ruler or tape to keep spacing equal.
Securing The Slats To The Frame
Attach slats with small screws or nails. Drill pilot holes to prevent wood from splitting. Make sure the slats sit flat and tight against the frame. Check for any loose ends or gaps.
Building The Ladder
Building the ladder is an important step in making the American Girl doll bunk bed. The ladder lets your doll climb safely to the top bunk. It also adds a fun detail to the bed. This part is easy to make with some basic tools and materials.
Focus on making the ladder strong and the right size for your doll. A well-built ladder keeps the bed stable and looks good. Use smooth wood pieces to avoid splinters. Sand all edges carefully before assembling.
Choosing The Right Wood For The Ladder
Select lightweight wood like pine or balsa for the ladder. These woods are easy to cut and sand. Choose pieces about half an inch thick. This thickness keeps the ladder sturdy but not heavy.
Cutting The Ladder Side Rails
Measure and mark two side rails about 10 inches long. Use a saw to cut straight lines. These rails hold the rungs where the doll will step. Keep the cuts clean for a neat ladder shape.
Making The Ladder Rungs
Cut four to five rungs about 3 inches long each. Use the same wood as the side rails. Sand all rungs smooth to avoid sharp edges. Space the rungs evenly for easy climbing.
Assembling The Ladder
Lay the side rails flat and place the rungs between them. Use wood glue on each joint for a strong hold. Clamp the ladder and let it dry for at least one hour. Add small nails or pins to secure the rungs if needed.
Finishing Touches On The Ladder
After the glue dries, sand the entire ladder again. Remove any rough spots or glue stains. Paint or stain the ladder to match the bunk bed. Let the finish dry completely before use.
Sanding And Smoothing
Sanding and smoothing are key steps in building your American Girl Doll bunk bed. They make the wood safe and nice to touch. Rough edges can hurt dolls and little hands. Smooth surfaces also help paint or finish stick better. Taking time to sand well gives your project a clean, polished look.
Using the right sanding tools and techniques makes the job easier. Start with rough sandpaper to shape the wood. Then, use finer grit for a soft finish. This process removes splinters and small bumps. It also rounds sharp corners for safety.
Sanding Tools Needed
Gather sandpaper in different grits: 80, 120, and 220. A sanding block or sponge helps keep the surface even. You can also use a small hand sander for flat parts. Keep extra sandpaper handy for touch-ups.
How To Sand Properly
Always sand in the direction of the wood grain. This prevents scratches and uneven surfaces. Use gentle pressure to avoid digging into the wood. Check your progress by running your fingers over the surface. Stop when it feels smooth and soft.
Finishing Touches
After sanding, wipe the wood with a damp cloth. This removes dust that can ruin paint or finish. Let the wood dry completely before painting or staining. Lightly sand again with fine grit for the best finish.
Painting And Finishing Touches
Painting and finishing touches bring your American Girl doll bunk bed to life. This step gives your bed a polished, attractive look. It also protects the wood from wear and tear.
Choose colors that match your doll’s room or your child’s taste. Use smooth, even strokes to avoid drips and streaks. Let each layer dry fully before adding another coat.
Choosing The Right Paint
Select non-toxic, child-safe paint for the best results. Acrylic paint works well on wood and dries fast. Pick colors that fit the theme you want.
Applying Primer And Paint
Start with a primer to make the paint stick better. Use a small brush for corners and details. Paint the larger areas with a foam brush or roller.
Adding Decorative Details
Use stencils or tape to create patterns or stripes. Paint small designs like stars or hearts for a fun look. Let the paint dry completely before removing stencils.
Sealing And Protecting
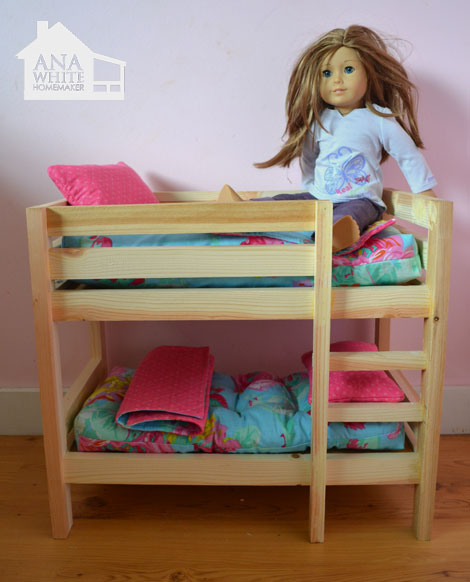
Apply a clear sealant to protect the paint. Choose a matte or glossy finish based on your preference. This step helps the paint last longer and resists scratches.

Credit: www.ana-white.com
Safety Tips For Kids’ Furniture
Safety is the most important part of building furniture for kids. Kids’ furniture must be strong and safe. This keeps children from getting hurt. Bunk beds, especially for American Girl dolls, need extra care. Follow these safety tips to build a safe and fun bunk bed.
Use Non-toxic Materials
Choose paints and finishes that are safe for children. Avoid products with strong chemicals. Use water-based paints or natural oils. These materials do not harm kids or their dolls.
Check For Smooth Edges
Sand all wood surfaces well. Remove sharp corners and rough spots. Smooth edges stop cuts and scratches. Make sure every part is safe to touch.
Secure Joints And Fasteners
Tighten all screws and nails firmly. Loose parts can cause the bed to fall. Use strong glue for extra hold. Check the bed often for any loose pieces.
Keep The Bed Stable
Build the bed with a wide base. A stable bed will not tip over easily. Test the bed’s balance before use. Add extra support if needed to improve stability.
Limit Height For Safety
Make the top bunk low enough to avoid falls. A lower height reduces injury risks. This is important for small children playing nearby.
Customizing Your Bunk Bed
Customizing your American Girl doll bunk bed makes it unique and special. It helps the bed fit your doll’s style perfectly. Small changes can make a big difference in how the bed looks and feels.
Adding colors, decorations, and personal touches gives the bed a new life. It also makes playtime more fun and exciting. Here are some easy ways to customize your bunk bed.
Choosing The Right Paint And Finish
Pick paint colors that match your doll’s room theme. Use non-toxic, water-based paint for safety. Matte or satin finishes work well for a smooth look. Avoid thick paint that hides small details. Let each layer dry before adding the next coat.
Adding Bedding And Pillows
Create tiny mattresses and pillows with soft fabric scraps. Use bright patterns or soft pastels to suit your doll’s personality. Add small lace or ribbon trims for extra charm. Sewing simple covers is easy and adds comfort to the bed.
Decorating With Stickers And Decals
Use stickers or decals for quick and fun decoration. Choose stars, hearts, or flowers to brighten the bed. Apply them carefully to avoid bubbles or wrinkles. Change them often to keep the look fresh and playful.
Incorporating Storage Solutions
Add small baskets or boxes under the bed for extra storage. Use miniature crates to hold doll clothes or accessories. This keeps play areas tidy and organized. Storage also makes the bunk bed more practical for daily play.
Credit: www.ana-white.com
Frequently Asked Questions
What Materials Are Needed To Build An American Girl Doll Bunk Bed?
You need wood boards, screws, wood glue, sandpaper, paint, and a saw. Measuring tape and clamps help ensure accuracy and stability. These materials provide a sturdy, safe, and attractive bunk bed for dolls.
How Long Does It Take To Build The Doll Bunk Bed?
Building time varies but typically takes 3 to 5 hours. It depends on your experience and tool availability. Taking time to sand and paint improves the bed’s finish and durability.
Is This Bunk Bed Safe For American Girl Dolls?
Yes, the design ensures stability and safety for dolls. Proper sanding removes sharp edges, and strong joints prevent collapse. The bunk bed fits standard American Girl doll sizes perfectly.
Can I Customize The Bunk Bed Design?
Absolutely! You can change paint colors, add decorations, or alter dimensions. Customizing makes the bed unique and fits your personal style or room décor. Personal touches enhance playtime enjoyment.
Conclusion
Building an American Girl doll bunk bed is fun and rewarding. It gives your dolls a cozy place to sleep. You only need simple tools and materials. Take your time and follow each step carefully. This project adds a special touch to doll playtime.
Kids enjoy the creativity and the finished bed. Try it yourself and see how great it looks. Small efforts create big smiles. Enjoy making memories with this easy craft.