Do you have an old dresser sitting unused in your home? What if you could turn it into a stylish, functional bookshelf instead?
Transforming a dresser into a bookshelf is easier than you think, and it can give your space a fresh new look without spending a lot of money. In this guide, you’ll discover simple steps to breathe new life into your furniture.
Keep reading to find out how you can create a unique bookshelf that fits perfectly in your room and showcases your favorite books beautifully.
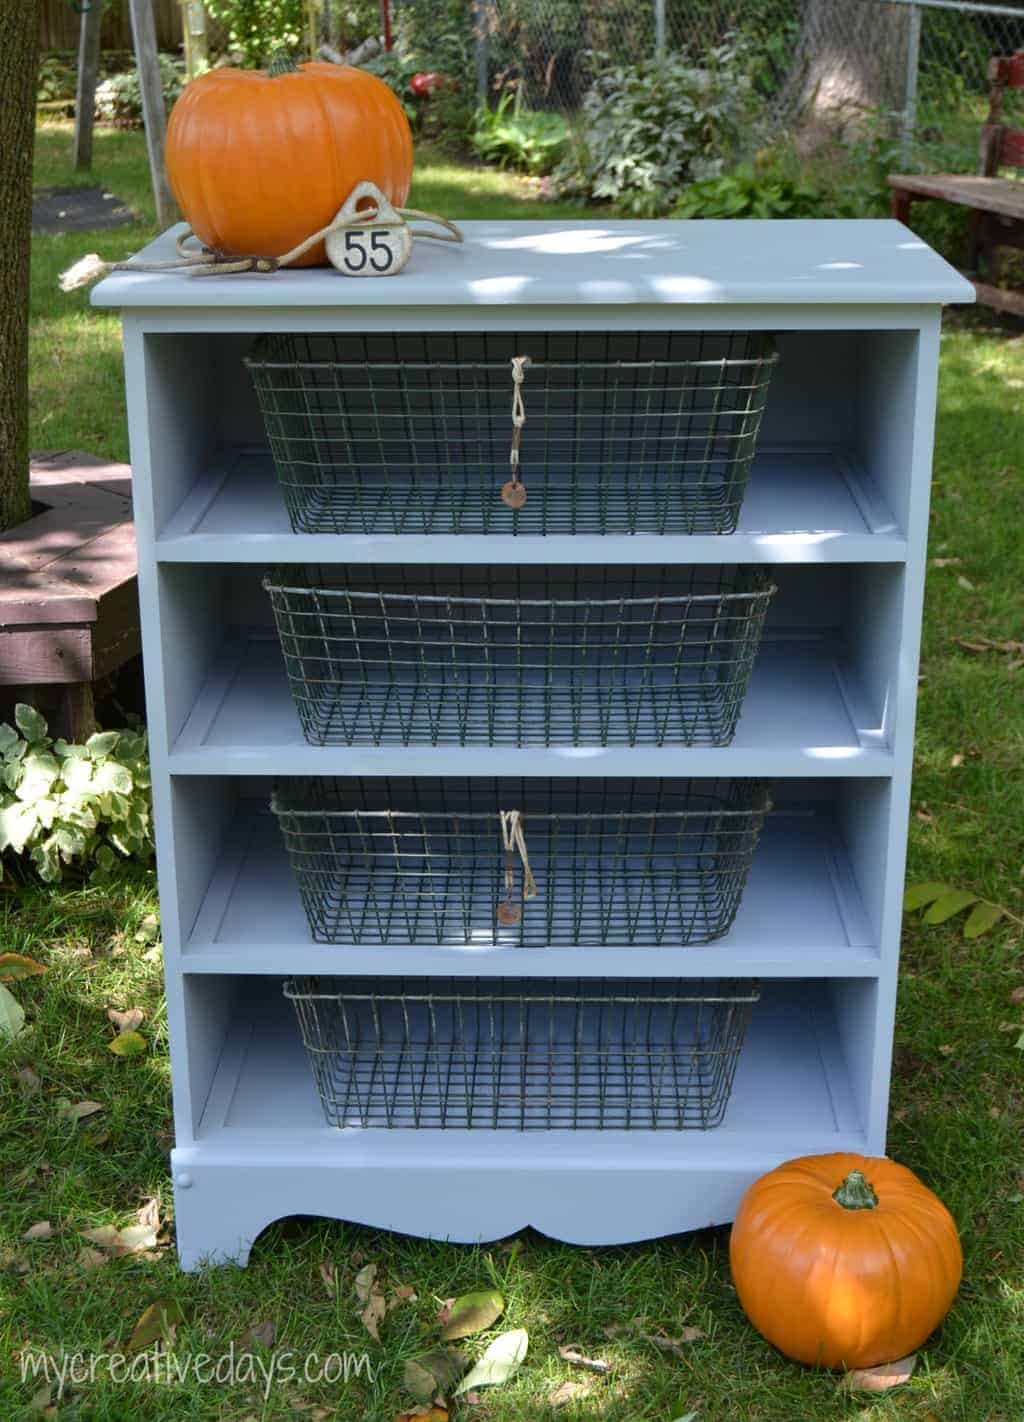
Credit: www.mycreativedays.com
Gather Materials And Tools
Before converting a dresser into a bookshelf, gather all materials and tools. This step saves time and helps the project go smoothly. Prepare everything to avoid interruptions during work. Here is what you need to know.
Choose The Right Dresser
Select a sturdy dresser with strong shelves. Avoid dressers with weak or damaged wood. A dresser with wide, deep drawers works best. It should be tall enough to hold your books. Choose one that fits well in your room.
Essential Tools Needed
Gather basic tools for this project. You will need a screwdriver to remove drawer handles. A saw helps cut shelves or parts if needed. Sandpaper smooths rough edges after cutting. A drill is useful for making holes. Also, get screws and wood glue for assembly.
Safety Gear
Wear safety gear to protect yourself. Use gloves to avoid splinters. Safety glasses protect your eyes from dust. A dust mask stops you from breathing sawdust. Always work in a well-ventilated area to stay safe.

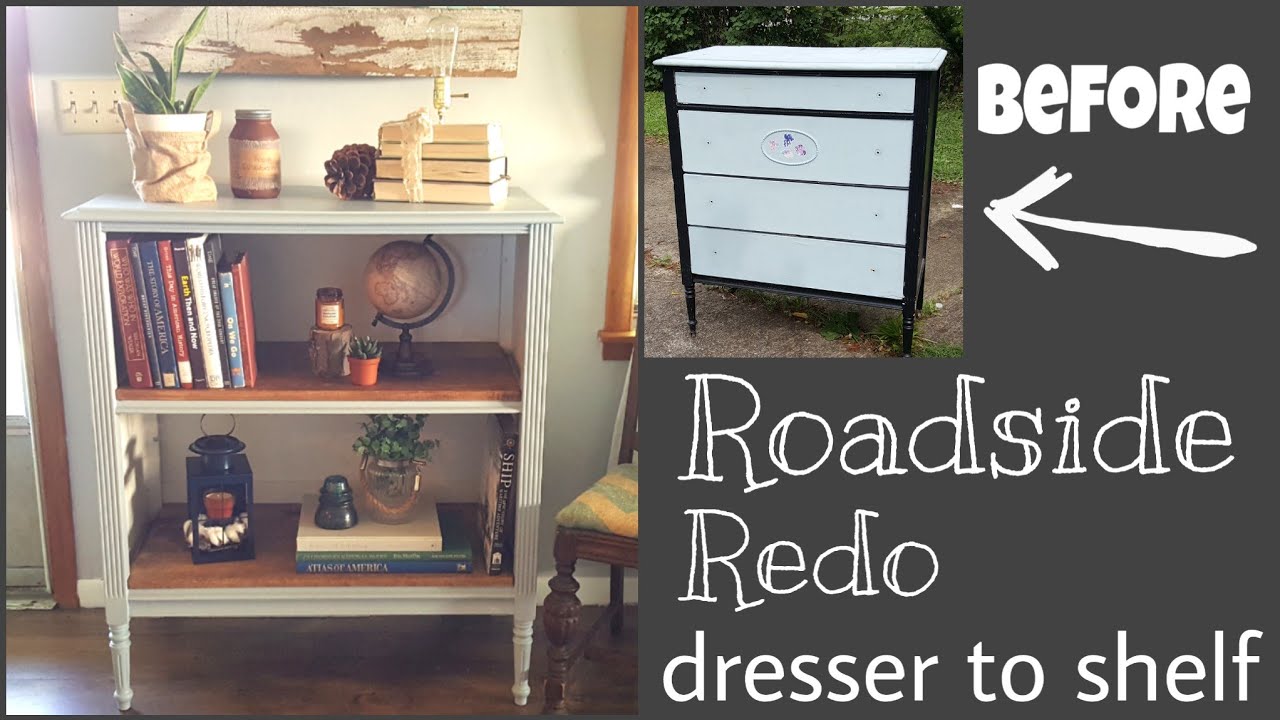
Credit: www.youtube.com
Prepare The Dresser
Preparing the dresser is the first step to turn it into a bookshelf. This step makes sure the dresser is ready for changes. A clean and smooth surface helps paint or stain stick better. Taking out the drawers creates space for your books. Sanding removes old finishes and rough spots. Let’s look at how to prepare your dresser carefully.
Empty And Clean
Start by taking everything out of the dresser. Remove all items inside the drawers. Wipe the dresser with a damp cloth. Use mild soap to clean dirt and stains. Dry the dresser completely to avoid moisture problems. Clean surfaces help the paint or finish stick well.
Remove Drawers
Pull out each drawer carefully. Set them aside for later use or removal. Removing drawers gives room to add shelves. Check if the drawers slide easily. Fix any stuck or broken parts. Clear space inside the dresser makes it ready for shelves.
Sand The Surface
Use sandpaper or an electric sander for best results. Sand the whole dresser surface gently. Focus on rough spots and old paint areas. Sanding helps new paint or stain hold better. Wipe off dust with a dry cloth after sanding. Smooth surfaces make your finished bookshelf look great.
Modify The Frame
Modifying the frame of your dresser is the next step in turning it into a bookshelf. This step prepares the structure to hold books safely. Strong support and open space are key. The frame must be ready to carry more weight than clothes.
Remove Drawer Dividers
Start by taking out all drawer dividers inside the dresser. These parts block the space where books will go. Use a screwdriver or hammer to remove nails or screws. Clear space makes the shelves wider and easier to use. Keep the removed parts if you want to use them later.
Reinforce Shelves
Check the existing shelves for strength. Most dresser shelves are thin and may bend under heavy books. Add wooden boards or metal brackets under the shelves for support. Attach them firmly with screws. Strong shelves keep your books safe and prevent damage.
Add Additional Supports
Books can be heavy, so add extra supports inside the frame. Place vertical braces along the back or sides. Use sturdy wood pieces or metal strips. Secure them tightly to the dresser frame. Extra supports stop the shelves from sagging or falling apart over time.
Paint And Finish
Painting and finishing your dresser turned bookshelf gives it a fresh, new look. This step protects the wood and makes your project last longer. Choose the right paint or stain to match your style and room decor. Proper application ensures a smooth, even surface. A protective coating seals the finish and guards against wear and tear.
Select Paint Or Stain
Decide between paint and stain based on the look you want. Paint covers the wood fully and hides imperfections. Stain enhances the natural grain and adds color without masking it. Use water-based paint for easy cleanup and low odor. Oil-based paints offer durability but take longer to dry. Pick colors that fit your room’s theme and lighting.
Apply Primer And Paint
Start with a primer to help paint stick and last longer. Primer blocks stains and evens out the surface. Use a brush or roller for smooth, even coats. Apply thin layers of paint to avoid drips and streaks. Let each coat dry completely before adding the next. Lightly sand between coats for a polished finish.
Add Protective Coating
Seal your paint or stain with a clear protective coat. Use polyurethane for strong protection against scratches and moisture. Choose a matte, satin, or glossy finish to match your style. Apply thin, even layers and let each dry fully. This step keeps your bookshelf looking new for years.
Assemble And Install Shelves
Assembling and installing shelves is a key step in turning your dresser into a functional bookshelf. This process transforms empty space into storage for your favorite books. It also gives the piece a new, fresh look. Follow clear steps to make sure shelves fit well and stay strong.
Measure the inside width and depth of the dresser carefully. Cut wooden boards to size for the shelves. Use sturdy wood that can hold the weight of books. Sand the edges smooth to avoid splinters.
Install Shelves
Place shelf supports inside the dresser at the right heights. Use a level tool to keep shelves straight. Attach wooden cleats or brackets on the sides for added strength. Slide or set the shelves on these supports. Make sure each shelf fits snugly without wobbling.
Secure The Bookshelf
Fix the bookshelf to the wall to stop it from tipping. Use wall anchors and screws for safety. Attach brackets at the top back of the dresser. Check that it stands firm before placing items on it. Securing the bookshelf protects children and pets from accidents.
Decorate And Organize
Arrange your books by size, color, or subject for a neat look. Add decorative items like plants or photo frames to personalize the shelf. Leave some space between items to avoid clutter. Keep frequently used books at eye level for easy reach. A well-organized shelf makes your room look tidy and inviting.
Tips For Customization
Customizing your dresser-turned-bookshelf makes it unique and practical. Small changes can create big style and function improvements. Focus on details that suit your room and taste.
Add Doors Or Panels
Install doors to protect books from dust. Glass doors also show your collection while keeping it clean. Use wooden panels for a classic look. Hinged or sliding options work well.
Choose colors that match or contrast with the dresser. This adds visual interest and blends with your decor. Doors bring neatness and style.
Incorporate Lighting
Lighting brightens shelves and highlights your books. LED strips or small spotlights fit inside easily. Battery-powered lights avoid extra wires.
Place lights on the top or under shelves. Warm light creates a cozy reading vibe. Good lighting helps you find books quickly.
Use Decorative Hardware
Swap plain knobs with decorative handles or pulls. Choose vintage, modern, or rustic styles to match your look. New hardware changes the dresser’s mood instantly.
Hardware adds charm and makes opening shelves easier. Small details like this enhance the bookshelf’s appeal and function.
Credit: www.youtube.com
Frequently Asked Questions
How Do I Prepare A Dresser For Conversion?
Start by emptying all drawers and cleaning the dresser. Remove drawer fronts if needed. Sand rough areas for better paint or finish adhesion.
What Materials Are Needed To Convert A Dresser?
You will need sandpaper, paint or stain, screws, brackets, and wood panels. Tools include a drill, screwdriver, and measuring tape.
Can All Dressers Be Turned Into Bookshelves?
Most wooden dressers can be converted. Avoid particleboard or very fragile furniture. Ensure the structure is sturdy enough to hold books.
How Do I Secure Shelves Inside The Dresser?
Use brackets or wooden supports to hold shelves. Attach them firmly to the dresser’s frame for stability and safety.
Conclusion
Transforming a dresser into a bookshelf is simple and fun. You only need a few tools and some patience. This project saves money and gives old furniture new life. Plus, it creates a unique space for your books. Try different paint colors or decorations to match your style.
Enjoy your new bookshelf and the satisfaction of doing it yourself. It adds charm and function to any room. Give your old dresser a fresh purpose today.