Do you ever find your favorite bookshelf bursting at the seams with books, photos, and keepsakes? Instead of buying a whole new shelf, what if you could simply add an extension to your existing one?
Making a bookshelf extension is easier than you think, and it lets you customize your space exactly how you want it. In this guide, you’ll discover simple steps to build a sturdy, stylish extension that fits perfectly with your current shelf.
Ready to give your bookshelf a fresh new look and more room for your treasures? Let’s get started!

Credit: www.youtube.com
Choosing The Right Materials
Choosing the right materials is key to building a sturdy bookshelf extension. Good materials ensure the shelf lasts long and looks great. Picking the right wood and tools makes your project easier and more fun.
Types Of Wood
Softwoods like pine are easy to cut and affordable. They work well for simple bookshelf extensions. Hardwoods such as oak or maple are stronger and last longer. These woods give a polished look but cost more. Plywood is a budget-friendly option. It is stable and less likely to warp. Choose wood based on your budget and style.
Tools You’ll Need
Basic tools include a saw, drill, and measuring tape. A level helps keep shelves straight. Sandpaper smooths rough edges for safety. Clamps hold pieces together while glue dries. A screwdriver is useful for screws. Having the right tools saves time and effort.
Additional Supplies
Wood glue adds strength to joints. Screws or nails hold parts firmly. Wood filler fixes small holes or cracks. Paint or stain improves the shelf’s look. Finish with a clear coat for protection. Gather all supplies before starting your project.

Credit: songbirdblog.com
Measuring Your Existing Bookshelf
Measuring your existing bookshelf is the first step before making an extension. Accurate measurements ensure the new part fits perfectly. It also helps maintain the shelf’s stability and look.
Take your time and use a tape measure or ruler. Write down every important dimension clearly. This will guide you through the building process and prevent mistakes.
Dimensions To Note
Measure the height, width, and depth of your current bookshelf. Note the thickness of the shelves and the distance between each one. Check the back panel size if your extension will have one. Also, measure the space where you plan to place the extension.
Record these numbers carefully. They will help you cut materials to the right size. Keep your notes handy during the build.
Checking For Weight Limits
Bookshelves hold heavy items. Knowing the weight limit is important for safety. Check what materials your bookshelf is made of. Solid wood holds more weight than particleboard. Also, consider how the shelf is attached to the wall.
Look for signs of wear or damage on the existing shelf. Avoid overloading the extension to prevent accidents. Plan your extension to support the same or more weight as your current shelf.
Designing The Extension
Designing a bookshelf extension takes careful thought. It helps the new part fit well with your current shelf. A good design makes the extension look like it belongs there.
Focus on the style and the size. These details make the extension both useful and nice to see. Plan these before you start building.
Matching The Style
Match the extension’s style to your existing bookshelf. Look at the color, wood type, and finish. Try to use the same materials for a uniform look.
Notice the shape and lines of the original shelf. Copy these shapes on the extension for a smooth fit. Avoid big style changes that stand out too much.
Planning Shelf Height And Depth
Measure the height of each shelf on your current bookshelf. Use these numbers to set the heights on the extension. Keep the same spacing for a neat look.
Check the depth of your shelves. The new shelves should be as deep as the old ones. This keeps the extension balanced and useful for storing books.
Cutting And Preparing Wood
Cutting and preparing wood is a crucial step in making a bookshelf extension. This process shapes the wood pieces to fit perfectly. Precise cuts ensure the extension fits your existing bookshelf. Proper preparation helps the wood last longer and look better. Safety is important when using tools for cutting. Sanding smooths the surfaces for a clean finish. Finishing protects the wood and enhances its beauty.
Safe Cutting Techniques
Wear safety goggles and gloves before cutting wood. Use a sharp saw to make clean cuts. Measure twice to cut once. Clamp the wood to keep it steady while cutting. Cut slowly and steadily to avoid mistakes. Keep fingers away from the saw blade. Work in a well-lit area to see clearly. Always follow the tool’s safety instructions carefully.
Sanding And Finishing
Start sanding with coarse sandpaper to smooth rough edges. Switch to fine sandpaper for a soft finish. Sand along the wood grain, not against it. Remove dust with a clean cloth after sanding. Apply wood finish or sealant to protect the wood. Let the finish dry fully before assembly. Finishing gives the wood a polished, professional look.
Assembling The Extension
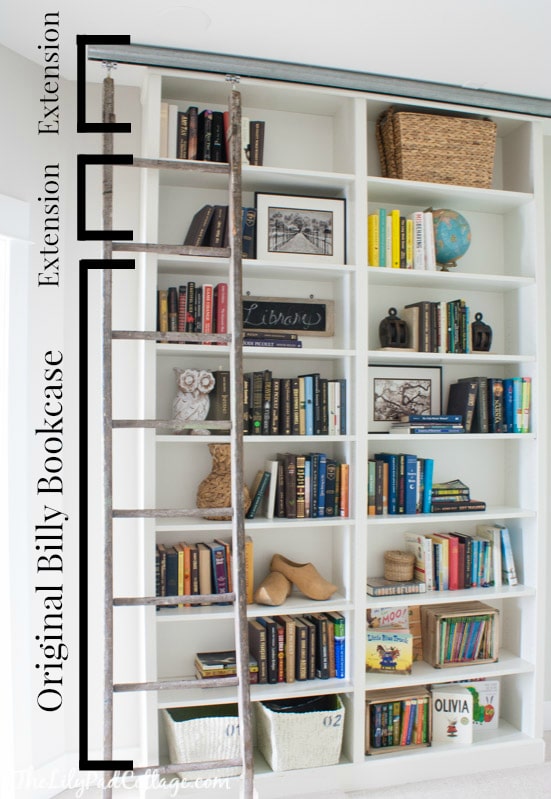
Assembling the bookshelf extension is an important step. It brings all the pieces together. Careful assembly ensures the extension is strong and safe. Follow simple steps to connect parts firmly and neatly.
Joining Pieces Securely
Start by aligning the wood pieces correctly. Check edges and corners for a tight fit. Use wood glue on contact surfaces for extra hold. Press the pieces together firmly and wipe off excess glue. Hold or clamp them until the glue dries. This prevents gaps and weak joints.
Using Screws And Brackets
After glue, screws add strength to the joints. Choose screws that fit the thickness of your wood. Drill small pilot holes to avoid wood splitting. Insert screws slowly and straight for a tight grip. Metal brackets add support at corners. Attach brackets with screws on both connected pieces. This keeps the extension stable and durable.
Credit: www.thelilypadcottage.com
Attaching The Extension To The Bookshelf
Attaching the extension to your bookshelf is a key step. It makes sure the new part fits well and stays strong. Proper attachment keeps the shelf safe for your books and decor. Focus on alignment and stability for the best results.
Aligning And Securing
Start by placing the extension next to the bookshelf. Check if the edges line up perfectly. Use a level to ensure the extension is straight. Clamp the pieces together gently to hold them in place. Drill pilot holes through the extension into the bookshelf. Insert screws to secure the two parts firmly. Avoid overtightening to prevent wood damage.
Reinforcing Stability
Add metal brackets inside the joint for extra strength. Attach brackets with screws on both the bookshelf and extension. Use wood glue along the connecting edges before screwing. This glue adds hold and reduces movement. Check for any wobbling after assembly. Tighten screws or add more brackets if needed.
Painting And Finishing Touches
Painting and finishing touches bring your bookshelf extension to life. They protect the wood and give it style. This step makes your project look complete and neat. Choosing the right color or stain changes the room’s mood. A careful finish also keeps the shelf safe from damage.
Choosing Paint Or Stain
Pick paint for bold colors and full coverage. Paint hides wood grain and offers many shades. Stain shows off the natural wood beauty. It soaks into the wood and adds warmth. Consider the room’s style and your shelf’s use. Use water-based paint for easy cleaning and less smell. Oil-based stain lasts longer and resists wear well.
Applying Coats Evenly
Start with a clean, dry surface. Use a brush or roller for smooth layers. Apply thin coats to avoid drips and bubbles. Let each coat dry fully before the next. Lightly sand between coats for a smooth finish. Repeat until the color or stain looks even. Finish with a clear sealant for extra protection. This keeps your shelf looking fresh for years.
Maintaining Your Extended Bookshelf
Maintaining your extended bookshelf keeps it safe and looking good. Regular care helps the wood last longer and stay strong. Small problems fixed early stop bigger damage later. A clean, sturdy shelf shows off your books well.
Regular Cleaning Tips
Dust the shelf often using a soft cloth or duster. Avoid wet cloths that may damage the wood. Use a dry or slightly damp cloth for sticky spots. Clean both the shelves and the sides carefully. Keep the area around the bookshelf clean too. This stops dust from settling back quickly.
Checking For Wear And Tear
Look over the shelf every few months for cracks or loose parts. Test the joints to see if they feel weak or shaky. Tighten screws or nails that have come loose. Watch for signs of wood splitting or warping. Repair small issues quickly to prevent bigger problems. Check the shelf weight to avoid overload.
Frequently Asked Questions
How Do I Measure For A Bookshelf Extension?
Measure the existing bookshelf’s width, height, and depth accurately. Ensure the extension matches these dimensions for a seamless fit. Use a tape measure and record all sizes to avoid errors during construction.
What Materials Are Best For Bookshelf Extensions?
Wood like pine, oak, or plywood works well for durability and style. Choose materials that match your existing bookshelf for a consistent look. Consider lightweight options if you plan to move the shelf often.
Can I Build A Bookshelf Extension Without Professional Tools?
Yes, basic tools like a saw, drill, screws, and sandpaper are sufficient. Many DIY bookshelf extensions require minimal equipment. Follow step-by-step guides to ensure safety and accuracy during your project.
How Do I Attach The Extension Securely To My Bookshelf?
Use brackets, screws, or wood glue to firmly connect the extension. Ensure the attachment points align with the bookshelf’s structure. This prevents wobbling and enhances overall stability.
Conclusion
Building a bookshelf extension is a simple way to add space. It saves money and fits your room perfectly. You only need basic tools and a little time. Follow the steps carefully, and your shelf will look great. Enjoy organizing your books and decorations better.
Small projects like this bring big satisfaction. Try it yourself and see how easy it can be. Keep your space neat and stylish with your new shelf.

