Are you looking to create a sturdy and stylish bunk bed that stands out? Making a bunk bed out of pipe is a smart and affordable way to build a unique piece of furniture for your home.
Imagine having a bed that not only saves space but also adds an industrial touch to your room. In this guide, you’ll discover easy steps and practical tips to build your own pipe bunk bed, even if you’re new to DIY projects.
Keep reading, and you’ll soon have the confidence to transform simple materials into a functional and eye-catching bed that suits your style perfectly.
Materials Needed
Building a bunk bed out of pipe requires specific materials. Having the right supplies ensures a safe and sturdy frame. This section covers the essential materials to gather before starting your project.
Types Of Pipes
Steel pipes are the best choice for bunk beds. They are strong and durable. Black iron pipes offer a rustic look and hold weight well. Galvanized pipes resist rust and last longer. Choose pipes with a diameter of at least 1 inch. This size provides enough support for the bed.
Additional Supplies
Besides pipes, you need pipe fittings like elbows, tees, and flanges. These parts connect the pipes securely. Use pipe clamps or brackets to add extra strength. Sandpaper helps smooth rough edges. Paint or sealant protects the pipes from rust and scratches.
Tools Required
Basic tools make assembly easier. You need a pipe cutter or hacksaw to cut pipes to size. A wrench or pipe wrench tightens fittings. A measuring tape ensures accurate cuts. A drill with bits helps attach flanges to the wall or floor. Safety gear like gloves and goggles protects during work.

Credit: www.amazon.com
Planning Your Design
Planning your design is the first step in building a bunk bed out of pipe. A clear plan helps you avoid mistakes and saves time. It also ensures the bed fits well in your space and stays safe for use.
Start by understanding the space you have. Then decide the right size for the beds. Safety is the top priority. Think about strong joints and guardrails. These points make your project easier and safer.
Measuring Space
Measure the room where you want the bunk bed. Check the length, width, and height. Leave space for easy movement around the bed. Consider the ceiling height to avoid hitting the top bunk. Note any windows or doors near the bed area.
Choosing Bed Dimensions
Choose bed sizes that fit your space and needs. Standard twin beds work well for most bunk beds. Make sure the height between bunks allows enough headroom. Keep the frame size slightly bigger than the mattress. This prevents the mattress from slipping off.
Safety Considerations
Use strong pipes and secure fittings for the frame. Add guardrails on the top bunk to prevent falls. Ensure the ladder is steady and easy to climb. Check all connections for tightness and durability. Avoid gaps where children could get stuck.
Cutting And Preparing Pipes
Cutting and preparing pipes is a key step in building a sturdy pipe bunk bed. Precise measurements and clean cuts ensure all parts fit well. This process helps avoid weak joints and makes the assembly smoother. Take time to mark, cut, and finish each pipe carefully. This section guides you through these important tasks.
Marking Pipe Lengths
Start by measuring the pipes according to your bunk bed plan. Use a tape measure for accuracy. Mark each pipe with a permanent marker or masking tape. Double-check all marks before cutting. Clear markings prevent mistakes and save material. Mark every pipe clearly to keep track of their purpose.
Cutting Techniques
Use a pipe cutter or a hacksaw for cutting. Pipe cutters give clean and straight cuts. If using a hacksaw, cut slowly to avoid bending the pipe. Secure pipes with a clamp or vise for safety. Wear safety goggles and gloves to protect yourself. Smooth, even cuts make joining easier and stronger.
Sanding And Finishing Edges
After cutting, sand the pipe edges to remove burrs and sharp bits. Use sandpaper or a metal file for this step. Smooth edges prevent injuries and help pipes fit better. Check each end carefully and sand until all rough spots are gone. Clean the pipes to remove dust before assembly.
Assembling The Frame
Assembling the frame is the first key step in making a bunk bed out of pipe. It gives the bed its shape and strength. Start with a clear plan and all materials ready. Take your time to connect each part carefully. A strong frame means a safe bunk bed.
Connecting Pipes
Begin by measuring and cutting pipes to the right lengths. Use pipe connectors to join vertical and horizontal pipes. Make sure the pipes fit tightly into the connectors. Use a rubber mallet to tap pipes in without damage. Check that the frame is square by measuring diagonals. This keeps the bed stable and balanced.
Securing Joints
Secure each joint with screws or pipe clamps. Tighten all fasteners but avoid over-tightening. Over-tightening can crack the pipes or connectors. Use a level to keep the frame straight as you work. Double-check each joint after tightening. This step prevents wobbling and keeps the bed safe.
Building The Ladder
Cut two long pipes for the ladder sides. Attach shorter pipes evenly as ladder steps. Secure each step with pipe clamps or screws. Space the steps so they are easy to climb. Attach the ladder firmly to the bed frame. A stable ladder ensures safe access to the top bunk.
Adding Support And Slats
Adding support and slats is crucial for a strong bunk bed made of pipe. These parts hold the mattress and keep the bed stable. Proper support prevents sagging and ensures safety.
Focus on installing solid cross supports first. Then position the mattress slats evenly. Finally, reinforce stability to avoid any wobbling.
Installing Cross Supports
Cross supports connect the pipes across the bed frame. Use metal pipes or wood planks for this. Attach them tightly with pipe clamps or screws. Place them near the middle and ends of the frame. This spreads the weight evenly. Double-check all fittings for a firm hold.
Positioning Mattress Slats
Lay slats across the cross supports. Use wood slats that are strong and straight. Space them about 2 to 3 inches apart. This lets the mattress breathe and stay firm. Secure each slat with screws or brackets. Avoid gaps that can cause mattress sagging.
Reinforcing Stability
Add corner braces to the frame’s joints. Use metal brackets to tighten pipe connections. Check for any movement in the structure. Tighten loose parts to stop wobbling. Place the bunk bed on a flat surface. Stability is key for a safe bunk bed.
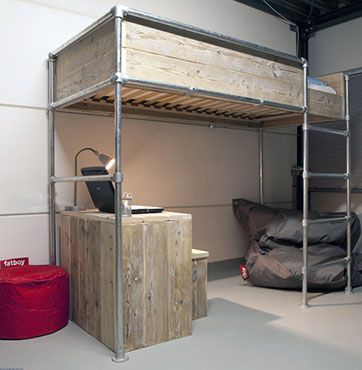
Credit: www.simplifiedbuilding.com
Finishing Touches
Finishing touches bring your pipe bunk bed to life. These steps protect the bed and make it safe. They also add style to your project. Pay close attention to this stage. It ensures your bunk bed lasts long and looks great.
Painting Or Sealing
Choose paint or sealant that fits metal pipes. Paint adds color and protects against rust. Use spray paint for a smooth, even coat. Sealant keeps the metal safe from moisture and wear. Apply a few thin layers and let dry well. This step improves both strength and appearance.
Attaching Safety Rails
Safety rails stop falls and keep sleepers secure. Use sturdy pipes that match the bed’s frame. Attach rails tightly with strong fittings or clamps. Check that rails cover the full side of the top bunk. Ensure no sharp edges or loose parts remain. Safety first, always.
Final Inspection
Inspect every part of your bunk bed carefully. Check for loose screws, fittings, or rough spots. Test the bed’s stability by gently shaking it. Confirm safety rails are secure and at the right height. Fix any problems before use. This step guarantees a safe, strong bunk bed for years.
Maintenance Tips
Maintaining your pipe bunk bed keeps it safe and sturdy. Regular care helps the bed last longer. It also prevents accidents and damage.
Regular Checks
Look over the bed every few weeks. Check all pipes and joints for any signs of wear. Tighten loose bolts and screws right away. Watch for rust or cracks on the pipes.
Cleaning Advice
Wipe the pipes with a damp cloth to remove dust. Use mild soap if needed. Avoid harsh chemicals that can damage the pipe finish. Dry the pipes well to stop rust from forming.
Repairing Loose Connections
Loose connections make the bed unsafe. Use the correct tools to tighten all fittings. Replace any worn-out washers or screws. Make sure all parts fit snugly without movement.

Credit: aeroclubcomo.com
Frequently Asked Questions
What Materials Are Needed To Make A Pipe Bunk Bed?
You need steel pipes, pipe fittings, screws, wood planks for the mattress base, and tools like a drill and wrench. Ensure pipes are sturdy and rust-resistant for safety and durability.
How Do You Ensure Safety In A Pipe Bunk Bed?
Use secure pipe fittings and tighten all connections firmly. Add guardrails on the top bunk and check for sharp edges to prevent injuries.
Can I Customize The Size Of A Pipe Bunk Bed?
Yes, pipe bunk beds are highly customizable. Adjust pipe lengths and wood plank sizes to fit your room and mattress dimensions perfectly.
How Long Does It Take To Build A Pipe Bunk Bed?
Building a pipe bunk bed typically takes 4 to 6 hours, depending on your skill level and tool availability. Planning and prepping materials speed up the process.
Conclusion
Building a bunk bed from pipe can be a fun and useful project. It saves money and lets you customize the size and look. Just follow the steps carefully and use the right tools for safety. Take your time to measure and fit each part well.
This way, your bunk bed will be strong and last a long time. Enjoy having a unique bed that you made with your own hands. Simple materials can create something practical and cool. Give it a try—you might be surprised by what you can build.