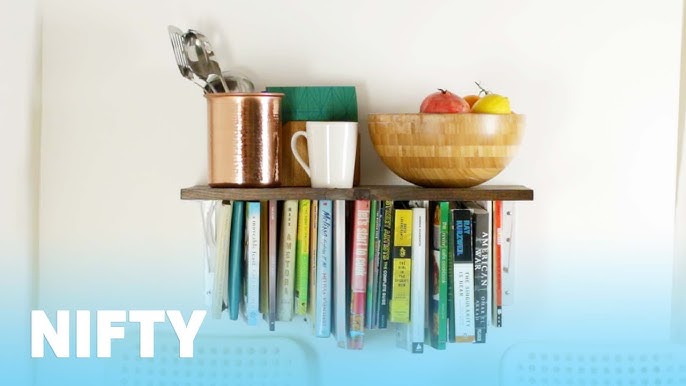
Have you ever wanted a bookshelf that stands out and sparks conversation? An upside down bookshelf is a clever way to add a unique twist to your space.
It’s not just about holding books—it’s about showcasing your style and creativity. In this guide, you’ll discover simple steps to make your own upside down bookshelf, even if you’re new to DIY projects. Ready to transform your room and impress your guests?
Keep reading, and you’ll have a stunning, one-of-a-kind bookshelf in no time.

Credit: www.instructables.com
Materials Needed
Gathering the right materials is the first step to making an upside down bookshelf. Using quality wood and the correct tools ensures your project is sturdy and looks great. This list covers all basics needed for a smooth build.
Wood Types And Sizes
Choose wood that is strong and easy to work with. Pine and plywood are good choices. Pine is soft and cuts easily. Plywood is stable and less likely to warp. For size, use boards about 1 inch thick. Length and width depend on your shelf design. Common sizes are 12 inches wide and 24 inches long. Select smooth wood to reduce sanding time.
Tools Required
You need a saw to cut the wood pieces. A hand saw or electric saw works well. A drill is necessary for making holes and driving screws. Sandpaper or an electric sander smooths rough edges. A screwdriver or drill bit helps tighten screws. A tape measure and pencil mark your cuts precisely. A level keeps shelves straight during assembly.
Additional Supplies
Wood screws hold pieces firmly together. Wood glue adds extra strength. Use clamps to hold parts while glue dries. Paint or wood stain finishes the shelf and protects the wood. Brushes or rags apply paint and stain evenly. Safety gear like gloves and goggles protect your hands and eyes. A dust mask prevents breathing sawdust.
Credit: www.youtube.com
Design Planning
Design planning is a key step to create an upside down bookshelf. It helps you make smart choices. The better your plan, the easier the building process. You save time and avoid mistakes. Focus on size, style, and drawing a clear plan.
Choosing The Right Dimensions
Measure the space where you want to place the bookshelf. Think about the height, width, and depth. Make sure it fits well and holds your books safely. Consider the size of your books too. Small or large books need different shelf sizes. Choose dimensions that match your needs.
Selecting A Style
Decide how you want your bookshelf to look. Simple or decorative? Modern or classic? The style affects the shape and details. Choose one that matches your room’s decor. An upside down bookshelf can be fun and unique. Pick a style that feels right for your space.
Sketching Your Blueprint
Draw a clear plan before starting. Use paper or a computer program. Show all parts and measurements. Label each piece to avoid confusion. A good sketch guides you through building. It helps to see the final design. Make changes on paper, not on wood.
Cutting The Wood
Cutting the wood is a crucial step in building your upside down bookshelf. Precise cuts ensure the pieces fit well and the shelf looks great. Take your time and focus on accuracy. Use the right tools and follow safety rules to avoid accidents. This section covers measuring, safety tips, and cutting methods.
Measuring And Marking
Start by measuring the wood pieces carefully. Use a tape measure for exact lengths. Mark the cutting lines clearly with a pencil. Double-check your measurements before cutting. Mark both sides of the wood to guide your saw. Accurate marks help you cut straight and avoid mistakes.
Safety Tips
Wear safety goggles to protect your eyes from dust and wood chips. Use ear protection if your saw is loud. Keep your fingers away from the blade. Secure the wood firmly with clamps to prevent slipping. Work in a clean, well-lit area. Never rush the cutting process.
Cutting Techniques
Use a handsaw or power saw based on your comfort level. Follow the marked lines slowly and steadily. Let the saw do the work; do not force it. For long cuts, use a guide or straight edge. Smooth rough edges with sandpaper after cutting. Clean cuts make assembly easier and the shelf stronger.
Assembling The Shelf
Assembling the upside down bookshelf is an exciting step. It turns separate parts into a useful piece of furniture. This process needs care and patience. Follow clear steps to build a strong shelf that looks great and holds books well.
Joining Pieces Together
Start by arranging all wood pieces on a flat surface. Match the edges that fit together. Use clamps or hold pieces by hand. Make sure the shapes align perfectly. Take time to check every joint before fixing them.
Using Screws And Nails
Choose screws and nails suitable for wood. Pre-drill holes to avoid splitting the wood. Insert screws slowly with a screwdriver. Use nails to secure smaller parts. Drive them in straight to keep parts tight.
Ensuring Stability
Check the shelf for any wobble or loose parts. Tighten screws if needed. Add corner braces for extra support. Place the shelf on a flat floor to test balance. Stability is key for safety and durability.
Finishing Touches
Finishing touches give your upside down bookshelf a polished, complete look. These final steps protect the wood and enhance its beauty. They also make the bookshelf safer to use and more attractive in your space.
Sanding And Smoothing
Start by sanding the entire bookshelf. Use medium-grit sandpaper to remove rough spots. Then, switch to fine-grit for a smooth finish. Sand edges and corners carefully to avoid splinters. Wipe dust away with a clean cloth before moving on.
Painting Or Staining Options
Choose paint or stain based on your room’s style. Paint adds color and hides imperfections well. Stain shows the wood’s natural grain and texture. Apply thin, even coats for the best results. Let each coat dry completely before adding another.
Adding Decorative Elements
Decorative touches make your bookshelf unique. Consider stencils, decals, or patterned tape for a personal flair. Small knobs or handles can add charm and function. Keep decorations simple to match the upside down design’s clean look.
Placement And Styling
Placement and styling are key to making your upside down bookshelf both useful and attractive. The right spot can highlight your unique design and keep your space tidy. Thoughtful styling helps your books and decor stand out beautifully.
Choosing The Ideal Location
Pick a wall that has enough space for the bookshelf’s size. Avoid crowded corners to keep the design visible. Place it where natural light hits, but not too much to avoid book damage. Near seating areas works well for easy access.
Organizing Books Creatively
Group books by color, size, or theme for a neat look. Mix horizontal and vertical stacks to add interest. Use the upside down design to show book covers or titles in new ways. Leave some empty space for a clean feel.
Incorporating Decorative Items
Place small plants or art pieces on some shelves to add life. Use items like candles or photo frames to give personality. Balance books and decorations to avoid clutter. Keep heavier items at the bottom for safety.
Maintenance Tips
Maintaining an upside down bookshelf keeps it strong and looking good. Regular care helps avoid damage and extends its life. Simple steps can protect your bookshelf from wear and tear.
Cleaning Techniques
Dust the bookshelf with a soft cloth. Avoid wet cloths that can damage wood. Use a small brush for tight corners. Clean spills quickly to prevent stains. A gentle cleaner made for wood works best.
Preventing Damage
Keep heavy items evenly spread on shelves. Avoid placing very heavy books on one side. Use coasters under plants or liquids. Keep the bookshelf away from direct sunlight. Sunlight can cause fading and cracks.
Periodic Checks
Check screws and joints every few months. Tighten loose parts to keep the shelf stable. Look for signs of wear like cracks or splits. Repair small issues early to avoid big problems. Make sure the shelf stays level and balanced.

Credit: www.amazon.com
Frequently Asked Questions
What Materials Are Needed To Make An Upside Down Bookshelf?
You need wood planks, screws, brackets, paint, sandpaper, and a drill. Choose sturdy wood for durability. Use brackets for extra support and paint for finishing.
How Do I Assemble An Upside Down Bookshelf Step-by-step?
Cut wood to size, sand edges, and paint if desired. Attach brackets to the bottom side. Secure shelves upside down on the wall. Ensure proper alignment and use anchors for stability.
Can I Customize The Size Of An Upside Down Bookshelf?
Yes, you can customize it to fit any space. Measure your wall area first. Cut wood planks accordingly. Adjust shelf height and length to suit your needs.
Is It Safe To Mount An Upside Down Bookshelf On Drywall?
Yes, but use proper anchors or wall studs. Drywall anchors prevent damage and increase stability. Always check weight limits and secure brackets tightly for safety.
Conclusion
Building an upside-down bookshelf is simple and fun. It adds a unique touch to any room. You only need basic tools and materials. Follow the steps carefully, and you will succeed. Personalize it with your favorite colors or decorations. It creates a great space for books and small items.
Try this project to enjoy a creative and useful shelf. You will feel proud of your handmade creation. Start today and see the difference it makes.