Are you staring at your Ikea bookshelf, wondering how to take it apart without turning it into a pile of confusing pieces? You’re not alone.
Disassembling Ikea furniture can feel tricky, but with the right steps, you can do it quickly and safely. This guide will walk you through each part, helping you avoid common mistakes and save time. By the end, you’ll have your bookshelf neatly taken apart, ready for moving, storage, or a fresh new setup.
Keep reading—you’ll find tips that make the whole process easier than you expected.

Credit: www.youtube.com
Tools Needed
Disassembling an Ikea bookshelf needs the right tools. Having these tools ready makes the process smooth and safe. Some tools are essential, while others can speed up your work.
Basic Tools
A screwdriver is the most important tool. Ikea bookshelves usually use screws with a Phillips head. A flathead screwdriver might be needed for some parts. A hammer helps to gently tap out dowels or nails. A small wrench or Allen key is often required for bolts or hex screws. Keep a cloth nearby to protect surfaces and catch small parts.
Optional Tools For Efficiency
An electric screwdriver saves time and effort. It makes removing screws faster and less tiring. A rubber mallet is better than a hammer for delicate parts. It prevents damage while loosening joints. A pair of pliers helps to grip and pull stubborn pieces. Using a magnetic tray keeps screws and bolts in one place. This stops them from getting lost during disassembly.
Prepare The Area
Preparing the area before disassembling your Ikea bookshelf is very important. It makes the process safer and easier. A clean, open space helps you work without stress. It also protects your floor and furniture from damage. Take some time to get the area ready. This small step saves time and effort later.
Clear The Space
Remove all items around the bookshelf. Move furniture and decorations away. This creates enough room to work freely. You need space to lay down parts and tools. A clutter-free area reduces the risk of accidents. It also helps you keep track of small screws and pieces.
Protect The Floor
Cover the floor with a soft blanket or cardboard. This prevents scratches and dents. Use thick material to cushion heavy parts. Protection is essential if you have wooden or tiled floors. It also makes sliding parts easier and safer. You avoid damage to both the floor and the bookshelf.
Remove Shelves
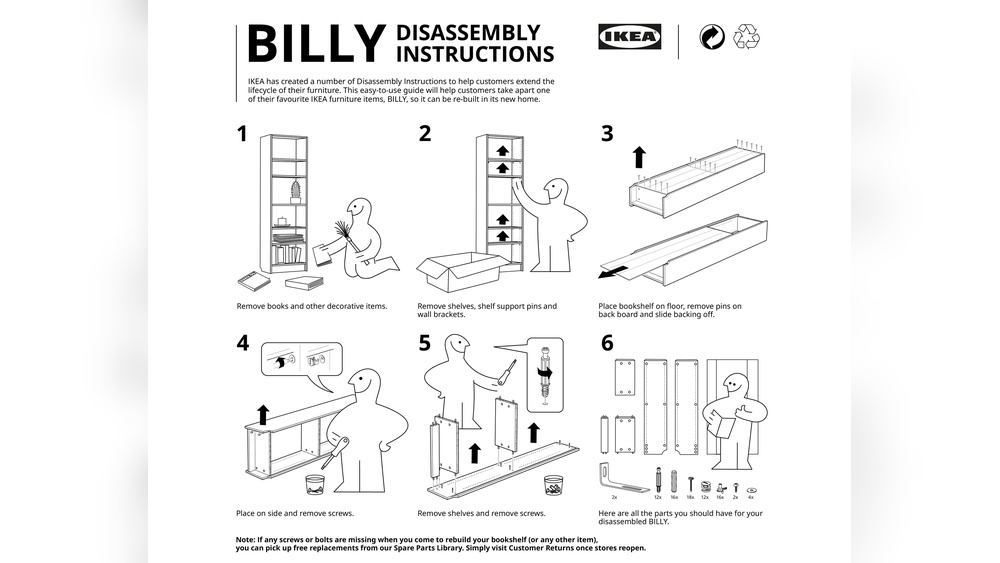
Removing shelves is an important step in taking apart your Ikea bookshelf. This makes the whole process easier and safer. Shelves come in two types: loose and fixed. Each type needs a different method to remove.
Start by checking which shelves you can take out by hand. Then, move to the fixed ones that need tools. Follow the simple steps below to remove all shelves without damage.
Take Out Loose Shelves
Loose shelves usually just rest on small supports. Lift them gently from one side. Then, pull the shelf out carefully. Avoid forcing it to stop breaking the supports. Set the shelves aside on a soft surface to keep them safe.
Unscrew Fixed Shelves
Fixed shelves attach firmly with screws or brackets. Use a screwdriver to remove all screws holding the shelf. Keep the screws in a container to avoid losing them. After unscrewing, pull the shelf out slowly. Check for hidden screws or nails before pulling hard.
Detach Back Panel
Detaching the back panel is a key step in disassembling an Ikea bookshelf. The back panel keeps the bookshelf stable and secure. Removing it carefully helps protect the shelf and makes the next steps easier. This part often uses simple fasteners but requires some care to avoid damage.
Identify Fasteners
Look closely at the back panel to find the fasteners. Ikea bookshelves often use nails, screws, or staples. Nails are small and thin, pushed into the wood. Screws have a head that fits a screwdriver. Staples are metal clips holding the panel in place. Spotting the right fastener helps choose the right tool for removal.
Careful Removal Tips
Use a flat tool like a screwdriver or a pry bar to remove nails or staples. Gently lift each fastener without forcing it. For screws, use a screwdriver matching the screw head. Turn slowly to avoid stripping the screw. Work around the panel evenly to avoid bending or breaking it. Keep the panel flat on a soft surface to protect it during removal.
Disassemble Frame
Disassembling the frame of your Ikea bookshelf is a key step. It allows you to take apart the main structure safely and efficiently. Understanding how the frame fits together helps prevent damage. Follow clear steps to remove parts in the right order.
This part focuses on removing the side panels and separating the top and bottom pieces. Handle each piece carefully to keep everything intact. Keep your tools ready and work on a flat surface for best results.
Unscrew Side Panels
Start by locating the screws on the side panels. Use a screwdriver that fits well to avoid stripping the screws. Turn the screws counterclockwise to loosen them. Remove all screws holding the side panels in place. Gently pull the side panels away from the frame. If they feel stuck, check for hidden screws or clips.
Separate Top And Bottom Pieces
Next, focus on the top and bottom parts of the frame. Look for screws or dowels connecting these pieces to the sides. Unscrew any fasteners carefully and keep them safe. Slide or lift the top piece off the frame. Do the same with the bottom piece. Make sure to keep these parts organized for reassembly or transport.

Credit: moveadvisor.com
Handle Hardware
Handling the hardware is a key step in disassembling your Ikea bookshelf. It includes screws, bolts, and small parts that keep the shelf together. Keeping these pieces safe and organized helps avoid frustration later. Easy to lose, these tiny components are important for reassembly.
Keep Screws Organized
Collect all screws in one place. Use small containers or bags for different screw types. Label each container with the screw size or where it came from. This prevents mixing parts and saves time when putting the shelf back together. Make sure to check for any washers or nuts and keep them with the screws.
Label Parts For Reassembly
Mark each part with a simple label or tape. Write down where each piece belongs. This helps you remember the correct order and position. Labeling avoids confusion during reassembly. Take photos of the hardware before you remove it. This visual guide makes the process easier and faster.
Transport And Storage
Transporting and storing your disassembled Ikea bookshelf needs care. Proper handling keeps all parts safe and ready for reassembly. Organize the pieces to avoid damage or loss. Small parts require special attention to stay secure. Planning the storage space helps save room and protects the components.
Pack Components Safely
Use small bags for screws and tiny pieces. Label each bag with the part name or shelf number. Wrap large panels in blankets or bubble wrap. This prevents scratches and dents during moves. Place fragile parts between soft layers. Keep tools and manuals together in one box.
Stacking Tips
Stack flat parts horizontally to avoid warping. Place heavier pieces at the bottom for balance. Avoid leaning panels against walls alone. Use straps or ropes to hold stacks tightly. Keep the stacks away from wet or humid areas. Proper stacking makes transport easier and safer.

Credit: www.youtube.com
Common Challenges
Disassembling an Ikea bookshelf can be tricky. Many face common challenges that slow down the process. Knowing these issues helps to prepare and avoid frustration. Below are two frequent problems during disassembly.
Stuck Screws
Screws often get stuck in their holes. Over-tightening during assembly causes this. Using the wrong screwdriver can also strip the screws. Stuck screws need patience and the right tools. Applying a bit of oil can loosen them. Turning screws slowly helps to avoid damage.
Damaged Parts
Parts can break or crack during disassembly. Thin boards and plastic pieces are fragile. Pulling too hard can cause damage. Check for weak spots before starting. Use gentle force and proper tools. Replacing damaged parts might be necessary to reuse the bookshelf.
Frequently Asked Questions
How Do I Safely Disassemble An Ikea Bookshelf?
Start by removing all items and shelves. Use the right tools like a screwdriver or Allen key. Work slowly to avoid damaging parts. Keep screws and small pieces organized in a container. Follow Ikea’s manual for step-by-step guidance.
What Tools Are Needed To Disassemble Ikea Bookshelves?
You typically need a Phillips screwdriver, Allen wrench, and sometimes a flathead screwdriver. These tools help remove screws and fasteners efficiently. Having a small container to hold screws is also useful to avoid losing parts.
Can I Reuse The Screws After Disassembly?
Yes, you can reuse screws if they are not stripped or damaged. Store them carefully in labeled containers to keep track. Using original screws ensures the bookshelf stays sturdy when reassembled or moved.
How Long Does It Take To Disassemble An Ikea Bookshelf?
Disassembly usually takes 20 to 40 minutes, depending on bookshelf size and complexity. Smaller units require less time, while larger ones need more care and patience. Taking your time prevents damage and keeps parts intact.
Conclusion
Disassembling your Ikea bookshelf can be simple and stress-free. Follow the steps carefully to avoid damage. Keep all screws and parts in one place. Take your time and stay organized throughout the process. This way, reassembly will be easier later.
With patience and care, you can handle this task confidently. Remember, small actions lead to better results. Now, your bookshelf is ready for moving or storage.